


31
○
○
○
○
○
○
○
○
○
○
○
○
○
○
○
○
○
○
○
○
○
○
○
○
○
○
○
○
○
○
○
○
○
○
○
○
○
○
○
○
○
○
○
○
○
○
○
○
○
○
○
○
○
○
○
○
○○
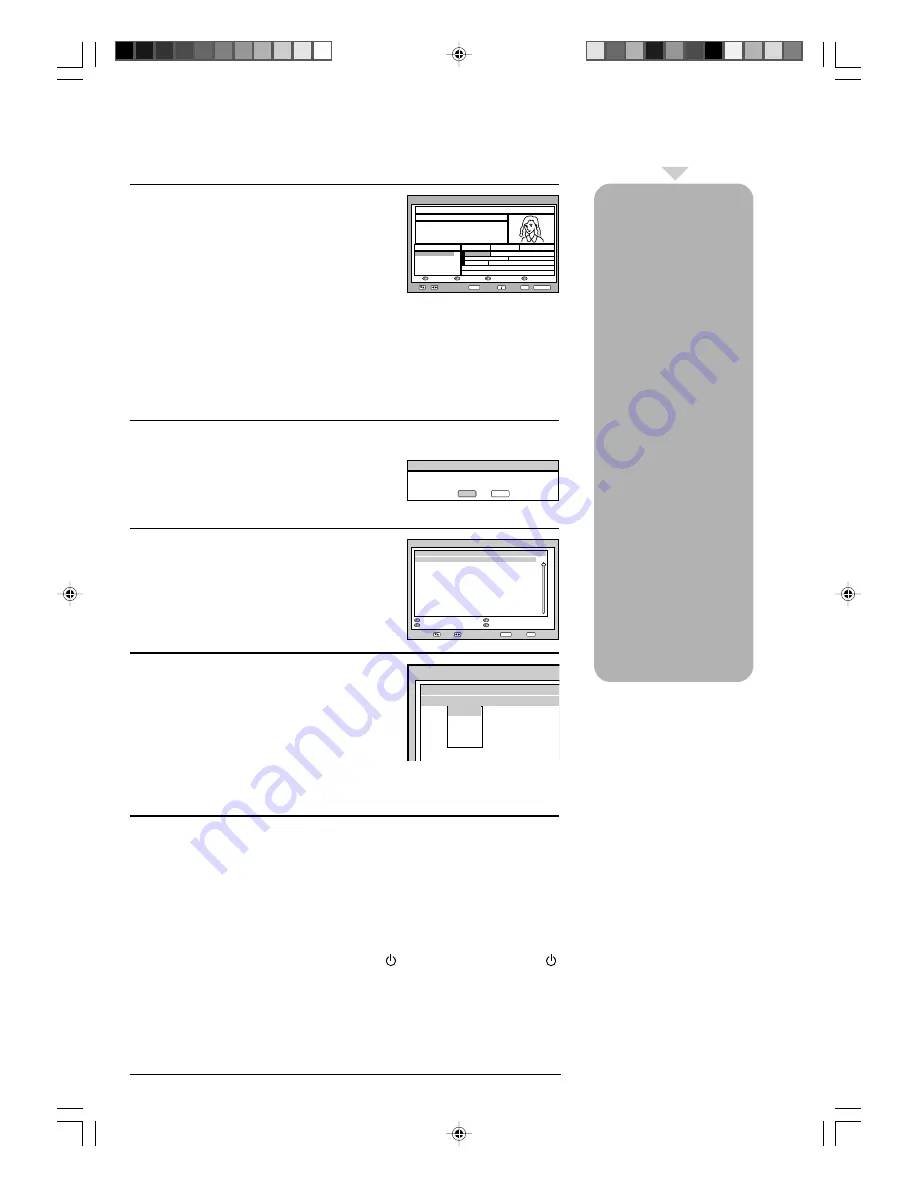
EPG Timer
1
Press
GUIDE
to display the Guide menu. Then
press
C
/
D
/
B
/
A
to highlight the programme you
want to set as an event timer, then press
ENTER
.
Note:
• If you select an event which has already started, the selected program will be
displayed on the screen, as you cannot set the timer for a programme which
has already started.
• To display the stored event timer, press
GUIDE
twice. The EPG Timer menu
(see step 3 below) will appear. You can also delete or change the frequency
(Once / Daily / Weekly) of the stored event timer (but please note that you
cannot edit the time details that have been set from the EPG).
2
The confirmation banner will be displayed.
Press
B
or
A
to select ‘Yes’ or ‘No’, then press
ENTER
(the selected option is shown in blue).
3
The EPG Timer menu will appear.
Press the
Red
key to set the Timer mode for a
selected event.
4
The Timer mode specifies the frequency of Timer
wake-up which can be set as Once, Daily or
Weekly.
Press
ENTER
to save the selected Timer mode.
Note:
To delete an event timer, select the specified event, then press the
Green
key.
5
To return to the Guide menu, press
DIGITAL MENU
.
To clear the menu screen, press
EXIT
.
Note:
• Press the
Yellow
key to change the start time of the event.
• Press the
Blue
key to change the time duration of the event.
• If the unit goes to standby mode (by pressing (
STANDBY
) on the unit or
(
STANDBY
) on the remote control) after the EPG Timer has been set.
You can choose
whether or not the
screen switches on
when the event timer
begins - please see
page 18 (Rec screen
status (LCD Power on/
off)). This is so that if
you are using the
timer to make a re-
cording to your VCR or
other device, the TV
screen will not switch
on unless you want it
to.
If you try to switch to
another channel while
an event timer is in
progress, the following
message will appear:
‘WARNING: CHANG-
ING THE CHANNEL
WILL INTERRUPT YOUR
EVENT TIMER. ARE YOU
SURE YOU WANT TO
PROCEED? YES/NO’.
Select YES or NO
according to your
wishes.
Note:
• A maximum of eight Timers
can be programmed.
• If the EPG Timer starts
when it is already switched
on, it will start at the exact
time that is set. If it starts
from the standby mode, it
will begin 20 seconds in
advance of the stated time.
• You cannot hasten the start
time from the original start
time of the Event.
• You cannot set with the
same date and time of
another Event.
• The programme set as
event timer will be
highlighted in the Guide
menu.
Guide
16:50 Sun 20/08/2007
TV
Page -
Page +
Prev.Day
Next Day
BBC ONE
BBC TWO
ITV1
Channel4
Five
The Wild Thornberrys Bogged Down:
Nigel and Eliza are on their way to film a
rare fish. Nigel suggests a shortout
through a bog, but Ellza is reluctant. Th...
16:30-17:00 The Wild Thornberrys CBBC
001 BBC ONE
Sun 20/08/2007
16:30
Channels
The Wild T...
Ready Steady Co...
Little Be...
No Event Name
No Event Name
No Event Na...
17:30
17:00
The Blue...
The Weakest Link
No Event Name
Enter
Exit
View
Info
TV/Radio
Navigate
Confirmation
This programme has not yet started - Do you want to
set a timer event ?
Yes
No
Event Timer
Navigate
Enter
Exit
Service Name Mode
Date
Time Duration
BBC ONE Once
26/02/02 8:10 00:23
Timer mode
Delete Timer
Edit Timer
Edit Duration
Event Timer
Service Name Mode
Date
BBC ONE Once
26/02/02
Once
Daily
Weekly
50A0201A_p26-31.p65
9/12/07, 4:57 PM
31


