4
1 Choose a target that is in excess of one mile away. This
eliminates any possible parallax effect between the tele-
scope and finder.
2 Release the altitude and azimuth clamps of your telescope
mount and point the telescope at your target.
3 Center your target in the main optics of the telescope. You
may have to move the telescope slightly to center it.
4 Now look in the finder scope. Is the object visible? Ideally it
will be somewhere in the field of view. If not, some coarse
adjustment to the finder scope bracket’s alignment thumb-
screws will be needed until the object comes into the finder
scope’s field of view.
5. With the image in the finder scope’s field of view, adjust the
alignment thumbscrews one at a time to center the object
on the intersection of the crosshairs.
Focusing the Finder Scope
If, when you look through the finder scope, the images appear
somewhat out of focus, you will need to refocus the finder
scope for your eyes.
1. Loosen the lock ring located behind the objective lens cell
on the body of the finder scope (see Figure 3b).
2. Back the lock ring off by a few turns, for now. Refocus the
finder scope on a distant object by threading the objective
lens cell in or out of the finder scope body. Precise focusing
will be achieved by focusing the finder scope on a bright
star.
3. Once the image appears sharp, retighten the locking ring
behind the objective lens cell. The finder scope’s focus
should not need to be adjusted again.
Image orientation through the finder scope is upside down. This
is normal for any finder that is used straight-through. Because
of this, it may take a few minutes to familiarize yourself with the
directional change each screw makes on the finder.
Focusing the Telescope
The Schmidt-Cassegrain
focusing mechanism con-
trols the primary mirror,
which is mounted on a ring
that slides back and forth
on the primary baffle tube.
The focusing knob, which
moves the primary mirror,
is on the rear cell of the
telescope. To focus, turn
the focusing knob until the
image is sharp. If the knob
will not turn, it has reached
the end of its travel on the
focusing mechanism. Turn
the knob in the opposite
direction until the image
is sharp. Once an image is in focus, turn the knob clockwise
to focus on a closer object and counterclockwise for a more
distant object. A single turn of the focusing knob moves the
primary mirror only slightly. Therefore, it will take many turns
(about 30) to go from close focus to infinity.
For astronomical viewing, out-of-focus star images are very
diffuse, making them difficult to see. If you turn the focus knob
too quickly, you can go right through focus without seeing the
image. To avoid this problem, your first astronomical target
should be a bright object (like the Moon or a planet) so that
the image is visible even when out of focus. Critical focus-
ing is best accomplished when the focusing knob is turned in
such a manner that the mirror moves against the pull of grav-
ity. In doing so, any mirror shift is minimized. For astronomical
observing, both visually and photographically, this is done by
turning the focus knob counterclockwise.
Image Orientation
The image orientation changes depending on how the eye-
piece is inserted into the telescope. When using a star diago-
nal, the image is right-side-up but reversed from left to right
(i.e., mirror image). If inserting an eyepiece directly into the
visual back (i.e., without a star diagonal), the image is upside-
down and reversed from left to right (i.e., inverted). This is nor-
mal for the Schmidt-Cassegrain design.
Calculating Magnification
You can change the magnifying power of your telescope by
changing the eyepiece (ocular). To determine the magnifica-
tion of your telescope, simply divide the focal length of the tele-
scope by the focal length of the eyepiece used. In equation
format, the formula looks like this:
Telescope Focal Length (mm)
= Magnification
Eyepiece Focal Length (mm)
For example, if you are using a 26mm eyepiece in the 8"
Schmidt-Cassegrain, divide the focal length of the telescope
(2032mm) by the focal length of the eyepiece, 26mm. That
yields a magnification of 78.
Although the power is variable, each instrument has a limit to
how much it can practically achieve. The general rule is 60x
magnification per inch of aperture. So an 8"-aperture telescope
can achieve a maximum useful magnification of 480 power.
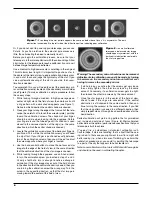
Figure 4.
The emblem on the end
of the focus knob shows the correct
rotation direction for focusing your
telescope.
Normal image
orientation as seen
with unaided eye.
With star diagonal,
image in telescope
is reversed.
With an eyepiece
but no diagonal,
image in telescope
is inverted.
Figure 5.
Image orientation in Schmidt-Cassegrains
Summary of Contents for Telescope
Page 7: ...7 ...


