the onscreen directions for installation. Do not plug the
camera in until the drivers have been installed for the
camera.
3. Once the driver and software has been installed, plug the
camera into an available USB 3.0 port, and connect the
AC power cord to the DC input on the camera
(Figure
1)
, and connect to AC power.
4. Windows will take a moment to recognize the USB device
plugged in, and once that is complete, you can open up
the StarShoot Image Capture program to connect to the
G10.
Hardware setup
Now that the camera drivers and software are installed, it’s time
to connect the camera to the telescope, and open up the soft-
ware. Install the G10 into your focuser, connect any peripheral
devices to the two USB 2.0 ports on the camera, and connect
the G10 to power as well as the USB 3.0 port on your computer
(Figure 1)
. Please note the AC/DC transformer has a rela-
tively short DC cable length. This prevents 12v voltage from
dropping over longer runs, but you may find it difficult to reach
an AC outlet depending on your scope setup. Use of an exten-
sion cord on the AC side of the adapter is suggested, and the
DC transformer itself can rest on the tripod accessory tray, or
secured with Velcro or some other method directly to the tube
wall or telescope rings. If you need to extend the 12v side of the
power cable, a 5.5mm/2.1mm DC extension cable (available
from your local electronic supply) can be used, but please try to
keep the length of the cable as short as possible.
Focusing the camera for the first time can be tricky, since the
camera may focus at a completely different place from where
an eyepiece focuses. It is recommended that you first center
a bright star in a 25mm eyepiece before attaching the camera,
to be sure the G10 is centered on the star. Even very far out
of focus, you should be able to see a fat disk (the out-of-focus
star), to determine which way to turn the focus knob to bring the
star down to a focused point.
4. Software
The next section with document connecting to the G10 and
basic image downloads. The included software will run the basic
astro-imaging steps including image download, cooler control,
exposure controls and such, but please note that this software
only touches on the basic functions of acquiring astro imagings.
To get the best results with more advanced processes such
as stacking multiple long exposures together to reduce noise,
manual dark frame subtractions, flat field and dark frame stack-
ing for smoother calibration frames, and other processes, it is
HIGHLY recommended to control the camera with an ASCOM
compatible capture program. Some are free on the web, others
are paid, but there is a vast array of programs available that will
be compatible with the G10. Here are some of our favorites:
DeepSkyStacker: http://deepskystacker.free.fr/ - Excellent free
program for pre-processing that simplifies the alignment and
stacking of your images. Automatically monitors a directory
where images are saved, and processes on the fly. Add all the
calibration frames, including darks, flats, biases, and step back
while the software does the rest giving you output ready for post
processing in programs such as PhotoShop.
RegiStax: www.astronomie.be/registax/ - Excellent free pro-
gram for aligning, stacking and processing of AVI video files,
ideal for capturing lunar and planetary video, splitting the video
into individual frames, analyzing each frame and aligning/stack-
ing/processing the best ones for pulling out fine details.
SharpCap: sharpcap.co.uk – Free camera control and capture
program. Features include video and long exposure control,
flat field and dark frame subtractions, histogram control, excel-
lent focus assist routines including Bahtinov mask overlays and
FWHM measurements, and MUCH more!
Sequence Generator Pro: mainsequencesoftware.com – free
45 day trial. Excellent Image Capture suite to control all aspects
of your setup. Create sequences of exposures of different
lengths, control a Go-To mount for automatic pointing and auto-
centering in any part of the image, auto v-curve focusing with
a compatible electronic focuser (without having to re-center to
a target star), autoguider control, and a host of other features.
Nebulosity: stark-labs.com – free demo available to try.
Powerful, yet very easy to use image capture and process-
ing program. Excellent processing routines such as aligning/
stacking and dark/flat/bias handling. An excellent choice for the
beginning astro-photographer getting into processing, yet will
carry over for more advanced users as well.
Orion StarShoot Image Capture
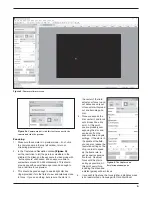
Plug the camera into the USB 3 port, and into AC power. When
you open Orion Starshoot Image Capture, you’ll be presented
with the main preview window on the right, and the control
options on the left-hand side.
(Figure 4)
. On the top of the
left-hand side, click the camera name to start a video preview
(Figure 4a)
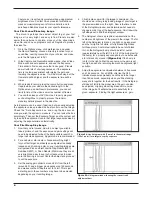
. Scrolling down the left-hand side, you’ll find all
the controls for operating the camera. The primary window
to control the exposure and to use first is the Capture and
Resolution window
(Figure 5)
. In this window, you can set
either video or still image mode (trigger mode), as well as set
the resolution and gain of the camera and set single, looping, or
sequence shots to be saved automatically in a chosen directory.
Scrolling down further along the left side, you’ll find windows
for other camera attributes including bit depth (always choose
14-bit to get the most detail and quality out of the image), bin-
ning control (1x1 is full camera resolution), histogram, and
cooler control. There are other windows present, but the ones
listed above are the most important ones when taking your first
image. Some windows are not applicable to astro-imaging, and
can be shut off by going into the Options>preferences menu.
To take your first image, focus must be achieved. With a CMOS
camera like the G10, one of the quickest and easiest ways to
focus is to point the camera at a bright star, and choose a fast
video frame rate with higher gain settings so you can watch the
star in real time, and focus until the star becomes a point.
4
Summary of Contents for StarShoot G10 Color
Page 11: ...11...

