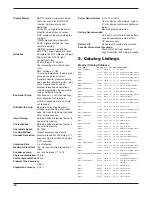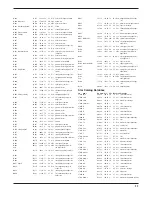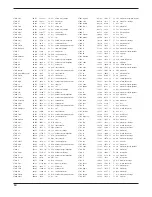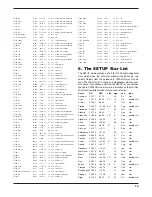
tions. The unit of measure is degrees from the current
position. Suppose, for example, we selected
M27, but the
telescope got bumped a few degrees before we could see it.
Use the
FIND mode and move the telescope as indicated to
make the displayed deviation zero. The indication shows 2.3
degrees left and 1.5 degrees up. Press ENTER to obtain a
scrolling description.
Guide display arrows:
2.3
1.5
Description:
M027 MAG=8.0 SIZE=480
DUMBELL NEBULA VULPECULA
PLANETARY NEBULA IRREGULAR
SA=08
As you move the telescope the numbers will count down until
the object is re-centered and the distance displayed is 0.0
degrees. If the distance back to the object is greater than 10
degrees in either direction, the steering will be in whole 1
degree increments. Once the object is within 10 degrees of
center the instrument will display finer resolution steering
directions of 0.1 degrees. The following sequence of guiding
displays shows how the guiding arrows and digits change as
the object is approached and then passed.
50
36
17
24
2.3
1.5
0•0 0•0 1.4
0.8
The guide mode displays guide directions based on the axes of
motion of the telescope mount. Thus an altazimuth mount will be
directed by the pointing arrows right, left and up, down. Motion in
one axis will not cause the other deviation display to change.
Scrolling UP or DOWN while in
FIND mode will tell Sky
Wizard to move in the previously selected catalog database,
even though the display does not show the object.
If your telescope has a German-type equatorial mount, Sky
Wizard allows for the two possible ways to point at an object. Sky
Wizard will display the path from the current position that involves
the least turning. Should the observer want to “flop” the telescope
180°, Sky Wizard will guide you to that position as well.
timer
The Timer is a stopwatch function which measures elapsed
time in hours, minutes, and seconds. It is a real convenience
to have an illuminated stopwatch right on the telescope for
observing the planets or comets. Press the MODE button and
select the
TIMER option using the arrow buttons.
Press ENTER to enter the
TIMER mode. Press the ENTER
button to start, stop, or reset the timer. Time is shown is hours,
minutes, and seconds.
sYnc
This function is usually used only when objects are not centered
in the field of view. It allows any star or object in the database to
be used for alignment. For example, center the Messier object
M37 in the eyepiece. Enter CATALOG mode and look up M37 in
the
M list, then press MODE and scroll to SYNC mode. Press
the ENTER button to choose this as a new alignment fix. This
function is useful for obtaining a new alignment fix during the
middle of an observing session to correct small coordinate errors
that may accumulate due to slight misalignments of the encoder
installation. When you
SYNC, Sky Wizard will display the object
as a reminder. Example:
SYNC M037. If you SYNC with the
wrong subject, Sky Wizard may become disoriented and you will
need to run
SETUP again to reorient accurately to the sky.
3. sample observing
session
Power on & setup alignment
Let’s pretend we are observing through our telescope with an
equatorial mount, not perfectly polar-aligned. We turn on the Sky
Wizard. It will briefly display the startup message
ORION SKY
WIZARD V2.0 (2.0 is the software version number - your unit
may have a larger number). Then it will display
DEC=0, this
indicates that you need to point the telescope to declination
equal to zero (using the mechanical setting circles), where the
optical axis is perpendicular to both the right ascension and
declination axis. This means the telescope is pointed at the
Celestial Equator. (German-type Equatorial mountings must
have the encoder initialized with the declination axis set at the
east of the meridian zero declination. Be sure to use the Dec.
zero degree mark which coincides with the telescope aiming
toward East.)
Press ENTER when the declination angle is set at 0 Deg. The
display will then say
MODE SETUP. Sky Wizard initially
assumes that your equatorial telescope is properly polar-aligned
(EP or GP mount type), in which case it is only necessary to
sight a single star at the beginning of the observing session.
Position the telescope so that a familiar bright star is centered in
the eyepiece. Press ENTER and use the arrow buttons to scroll
through the list of 32 stars until you find the name of the star that
is in the eyepiece. Press the ENTER button again. The telescope
is now aligned. A second star may be sighted in another region
of the sky to increase accuracy in
GP or EP mount types. All
other mount types, you must sight on 2 stars. The first star sight-
ing should be at least 60° from the celestial pole, a second star
should be between 60° and 120° from the first star. It is best NOT
to use Polaris for the second star.
A second star sighting is also required for an altazimuth tele-
scope. It is critical that the initialization index mark for either
vertical or horizontal has been checked for accuracy. This
operation is described in the I
NSTALL section of this manual.
For our example we will use Regulus, the bright star at the
base of the backward question mark of Leo. In the
SETUP
mode the display will show the first star name in the list of 31
bright stars. The first star in the list is Achernar, and the dis-
play will read
ALIGN ACHERNAR
We want to use the star Regulus for our first star sighting, so
press down, and hold, the UP arrow button to advance
through the list of star names. If you went past Regulus while
scrolling, simply press the DOWN arrow button to back up.
Release the button when the display reads
REGULUS.
Press ENTER when Regulus is in the center of the field of
view. Verify the star is still centered in the eyepiece and press
the ENTER button. For optimal coverage of the sky, pick a
second star that is between 60° and 120° away from the first
8


