background image


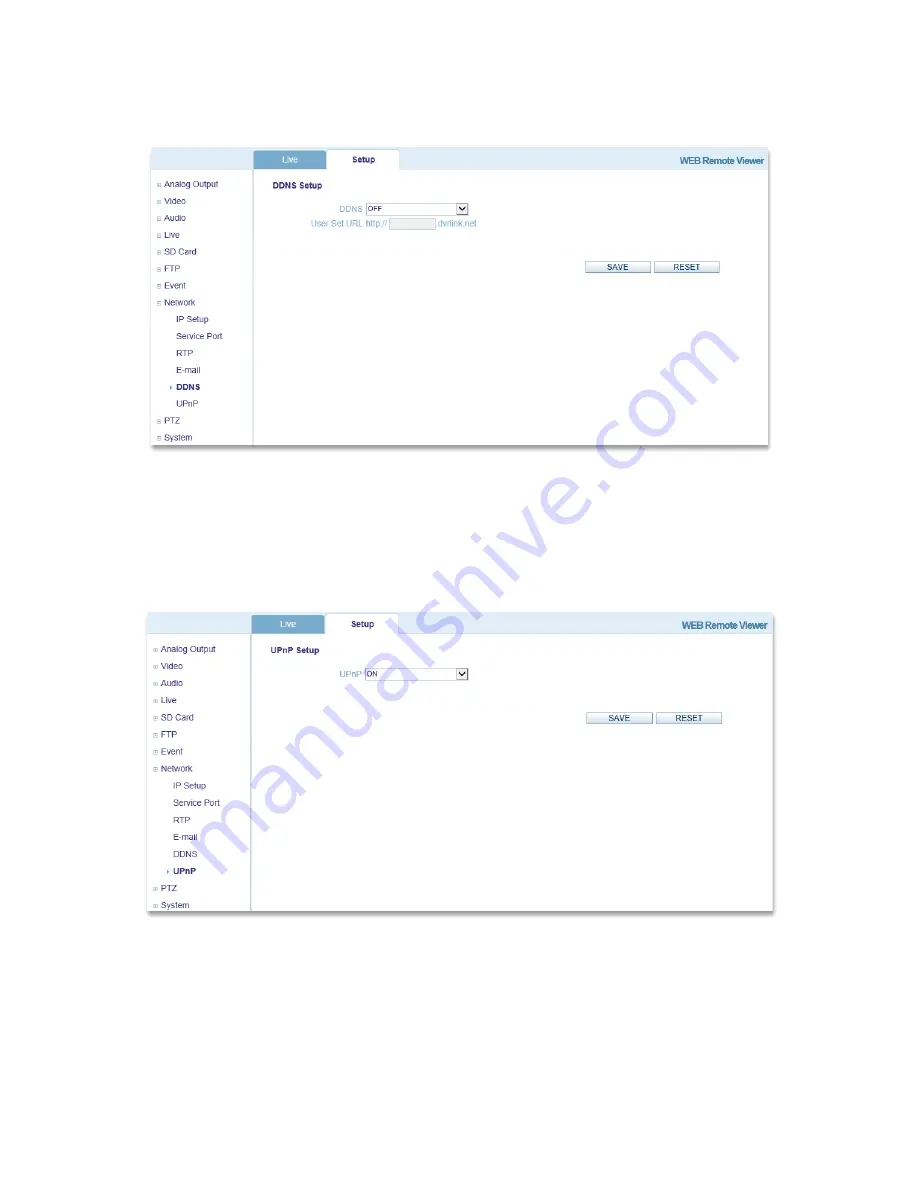
3.8.5 DDNS 


This page allows a user to enable or disable DDNS (Dynamic Domain Name System) and select an 
address to be used for connecting to the IP Camera. 

o


DDNS Setup:


DDNS: 

Toggle DDNS ON/OFF. 


User Set URL:

 Input a domain name to connect to the IP Camera (for example, 

http://ipcamera.dvrlink.net) 

3.8.6 UPnP 


This page is for toggling UPnP (Universal Plug and Play) on or off. It is ON by default. 


Summary of Contents for OR-S7020i

Page 1: ...H 264 Network Camera User Manual ...

Page 2: ...paratus combination to avoid injury from tip over 12 Unplug this apparatus during lightning storms or when unused for long periods of time 13 Refer all servicing to qualified service personnel Servicing is required when the apparatus has been damaged in any way such as power supply cord or plug damage liquid has been spilled or objects have fallen into the apparatus the apparatus has been exposed ...

Page 3: ...ve 21 3 4 1 Setup 21 3 4 2 Privacy Mask 21 3 5 SD Card 22 3 5 1 Config 22 3 5 2 Event 23 3 5 3 Periodical 24 3 6 FTP 25 3 6 1 Config 25 3 6 2 Event 26 3 6 3 Periodical 27 3 7 Event 27 3 7 1 Alarm Port 27 3 7 2 Motion 28 3 7 3 Mapping 28 3 8 Network 29 3 8 1 IP Setup 29 3 8 2 Service Port 30 3 8 3 RTP 31 3 8 4 E mail 32 3 8 5 DDNS 33 3 8 6 UPnP 33 3 9 PTZ 34 3 9 1 Preset 34 3 9 2 Preset 35 3 9 3 Sc...

Page 4: ...or Status LED Micro SD card slot SDHC Supported Reset Button Alarm In Alarm Out Power Network Audio In Black Audio Out White Indoor Model Video output for service monitor Status LED Micro SD card slot SDHC Supported Reset Button Alarm In Alarm Out Power Network Audio In Black Audio Out White ...

Page 5: ...core accessory is included to be used when connecting the network cable in order to suppress electromagnetic waves 2 Audio in Audio in line level for line in mono signal only left channel is used from a stereo signal 3 Audio out The Audio output line level which could be connected to a line output of an active speaker with a built in amplifier 4 Power Connector 24VAC power connector 5 Alarm out Tw...

Page 6: ...hed Status Red On Camera is booting up Flash Firmware Upload in progress 8 Reset Button Press this button to restore the camera configuration to its factory default settings 9 Micro SD card Save snapshot images onto a Micro SD card 10 Video Output for Service monitor This analog video output is available when installation mode is set to ON Use accessory cable to video output ...

Page 7: ...M4X15 X2 1 Remove the two hex screws and twist to remove the mount adapter 2 Turn the mount adaptor counter clockwise to rem ove from product Mount Adaptor Silica Gel 1 Attach the included silica gel accessory to inner dome with double sided tape ...

Page 8: ...Mount Wall Mount Bracket Option Mount Adaptor Gasket Wall Mount Anchor Bolt X4 1 Affix the wall mount bracket to the wall with anchor bolts 2 Place mount adaptor in wall mount bracket rotate clockwise and tighten with screws ...

Page 9: ...e Safety Wire Alignment Mark Hex Screw M4X20 X4 Dome Cover 3 Align housing safety wire to product hooks connect cables and align mount adapter with the body and tighten clockwise with hex screws 4 Connect dome safety wire and secure dome cover ...

Page 10: ... Mount Anchor Bolt X4 Gasket Ceiling Mount Ceiling Mount Bracket Option Mount Adaptor 1 Affix the ceiling mount bracket to the wall with anchor bolts 2 Place mount adaptor in ceiling mount bracket rotate clockwise and tighten with screws ...

Page 11: ...e Safety Wire Alignment Mark Hex Screw M4X20 X4 Dome Cover 3 Align housing safety wire to product hooks connect cables and align mount adapter with the body and tighten clockwise with hex screws 4 Connect dome safety wire and secure dome cover ...

Page 12: ...stallation In ceiling Mount Indoor Safety wire Mounting wing 1 Drill a hole in the ceiling Ø170mm Connect safety wire to hook on module to secure camera 2 Turn three mounting wing screws clockwise to secure product ...

Page 13: ...Mounting wing Screw X3 Tapping Screw X2 Dome Cover 3 Secure tapping screws to prevent product movement 4 Insert dome cover and twist clockwise to secure ...

Page 14: ...he default password is 1234 4 The IP Camera s Live View will now be displayed on the web browser Note The layout of the live view page for the IP Camera may have been customized to meet specific requirements Consequently some of the examples and functions featured here may differ from a user s experience 2 2 Accessing the IP Camera from the Internet Once installed the IP Camera is accessible on th...

Page 15: ...rm the image is set as desired on the Lenz Adjustment in Live View page 2 4 Live View PC Client Speaker PC Client Microphone Digital Zoom Snap Shot Full Screen Video Stream change First stream Second stream Play Click this button by manually to start the stream Stop Click this button by manually to stop streaming NOTE It is possible that not all the buttons described below will be visible unless t...

Page 16: ...s This technology is used primarily on delimited networks intranets as each user needs an uninterrupted data flow and should not rely on network routers 2 6 How to Stream H 264 Deciding on the combination of protocols and methods to use depends on user viewing requirements a local network properties Setting the preferred method s is done on the Setup page o RTP RTSP This method actually RTP over U...

Page 17: ...he Setup tab 3 1 Analog Output Toggle the Analog Output ON to connect via BNC output or toggle OFF and click SAVE Not all IP Cameras have an Analog Output 3 2 Video 3 2 1 Codec These are tools to control the camera network streams adjust network stream video quality settings and control the video bit rate ...

Page 18: ... When using H 264 compression if there is only a limited amount of bandwidth available a constant bit rate CBR is recommended although this may compromise image quality Use a variable bit rate VBR for the best possible image quality o Average Bit rate Can be set from 512Kbps 10Mbps Recommended bit rate for D1 800Kbps 1Mbps Recommended bit rate for 1 3M 720p 3Mpbs 4Mbps Recommended bit rate for 2M ...

Page 19: ...ntrol Back Light Compensation control This adjusts the exposure of scenes with strong backlight in the center bottom of the image When the image background is too bright or the subject is too dark backlight compensation makes the subject appear clearer The settings for low light behavior determine how the camera behaves at low light levels These settings affect video image quality and how much noi...

Page 20: ...ly MWB Mode If white balance is set to MANUAL the light source can be manually added such as INDOOR 3200K or OUTDOOR 5800K o Image Property Control Sharpness Modifies the video signal sharpness Default 8 Range 1 15 Brightness Modifies the video signal brightness Default 12 Range 0 30 Contrast Modifies the video signal contrast Default 18 Range 0 30 Color Modifies the video signal color Default 7 R...

Page 21: ...live video RTP Unicast UDP RTP Multicast UDP or RTP over RTSP TCP can be selected Buffering Time Buffering time can be set for a number between 0 90 times 1 30 seconds or a range of 1 3 seconds o Viewer OSD Setup Resolution Toggle OSD Resolution ON OFF Date Time Toggle OSD Date Time ON OFF Event State Toggle OSD Event State ON OFF 3 4 2 Privacy Mask ...

Page 22: ...ick Save 3 5 SD Card 3 5 1 Config This section is provided to set up an SD Card for recording images o SD Card Configuration Overwriting Enable or Disable the SD Card function for recording images SD Status Check the status of the SD Card SD Safety Remove Unmount any SD Card before removal and mount when inserting an SD Card Erase Image Files Delete image files on the SD Card ...

Page 23: ...able or Disable this function Directory Input the desired file path on the SD Card for the uploaded images File Prefix Input the desired file name prefix for example alm_ SD Write Mapping Choose whether to write images during Alarm In and or Motion Effective Period Choose whether to always write images when an event occurs or during a user defined schedule ...

Page 24: ...ether to Enable or Disable this function Directory Input the desired file path on the SD Card for the uploaded images File Prefix Input the desired file name prefix for example per_ Interval Choose the desired image write interval from 10 seconds to 1 hour Effective Period Choose whether to always write images when an event occurs or during a user defined schedule ...

Page 25: ...er Enable or Disable the FTP Server function for downloading recorded images o Client Configuration Server IP Enter the desired FTP Server s IP address Port Enter the desired FTP Server s Port number Default 21 Range 1025 65535 User name Enter the FTP Server client user name Password Enter the FTP Server client password Send Mode Choose whether the send mode is Active or Passive ...

Page 26: ...able or Disable this function Directory Input the desired file path on the FTP server for the uploaded images File Prefix Input the desired file name prefix for example alm_ FTP Send Mapping Choose whether to write images during Alarm In and or Motion Effective Period Choose whether to always upload images when an event occurs or during a user defined schedule ...

Page 27: ...le or Disable this function Directory Input the desired file path on the FTP server for the uploaded images File Prefix Input the desired file name prefix for example per_ Interval Choose the desired image upload interval from 10 seconds to 1 hour Effective Period Choose whether to always upload images when an event occurs or during a user defined schedule 3 7 Event 3 7 1 Alarm Port ...

Page 28: ...esigned to allow for different motion areas to be selected and saved Select an area and use the mouse to click and drag the desired area then click Save 3 7 3 Mapping This page is designed to allow a user to select whether or not to have an e mail notification sent to specified users if Alarm In or motion event occurs ...

Page 29: ... is the IP address of the primary DNS server on the network and the 2nd DNS is the IP address of the secondary DNS server which is used if the primary DNS server is unavailable By default the IP Camera is set to get the IP address from the DHCP server and UPnP is enabled If the network has a DHCP server and the UPnP function is enabled on a PC it is possible to find the IP Camera in My Network If ...

Page 30: ...HTTP Port Input a desired HTTP Hyper Text Transfer Protocol port number RTSP Port Input a desired RTSP Real Time Streaming Protocol port number o Port Forwarding Port Forwarding Select AUTO to automatically set the connection ports of the router Note UPnP must be supported by the router External IP If Port Forwarding is successful the external IP address for the IP Camera will be displayed This is...

Page 31: ... and video over an IP network including multiple destinations through multicast o RTP Port Range Start Port Enter the desired Start Port number End Port Enter the desired End Port number o Multicast Setup Enter the IP addresses Video Port numbers even values only Audio Port numbers even values only and TTL values for each stream ...

Page 32: ...tifications Range 1 60 minutes Server If not using the default server input the address of the desired server Port If not using the default server input the SMTP port number of the desired server Default value 25 Security Toggle SSL or TLS security ON OFF User If not using the default server input the user name for accessing the e mail server Password If not using the default server input the user...

Page 33: ... select an address to be used for connecting to the IP Camera o DDNS Setup DDNS Toggle DDNS ON OFF User Set URL Input a domain name to connect to the IP Camera for example http ipcamera dvrlink net 3 8 6 UPnP This page is for toggling UPnP Universal Plug and Play on or off It is ON by default ...

Page 34: ...can Tour from prior operation if unit completes booting action o Parking Action Run the specified action after a user specified period of time when there are no Pan Tilt Zoom operations o Wait Time Wait Time is the waiting time before engaging Parking Action when PTZ is not in operation o PTZ Action Action is executed after a set wait time Preset Select Select Preset to run Latest Action Run most ...

Page 35: ...y moved to and viewed simply by selecting the preset o Preset select preset Number o Name Input preset Name o Show Advanced Day Night Focus Setup windows pops up o Save Specified value Saved o Move Run preset o Delete Specified value Deleted o Delete All All Preset value Deleted ...

Page 36: ...eset o Preset Can select one from previously set Presets Preset1 From Preset2 To o Direction The direction of Scan movement can be set AUTO CW or CCW o Add Del Press the Add button to add new Scans or Delete to delete Scans must click Save to apply o Run Run Scan 3 9 4 Tour Set the camera movement Preset Scan and Tour can be selected to fulfill one entire Tour o Tour Speed Sequence movement speed ...

Page 37: ...This page configures the IP Camera date and time settings o Date Time Setup Current Server Time This displays the IP Camera s current system time and date Date Format This allows the display format for the date to be changed Time Format This allows for the display format for the time to be changed between 12 hour and 24 hour timekeeping systems NTP Server If Synchronize with NTP server is selected...

Page 38: ...t Resets all IP Camera settings to original factory settings if clicked Save Load PTZ Data PTZ Setup Status Preset Scan Tour Save or Load Enable Firmware Upgrade Must be clicked prior to performing a firmware upgrade Firmware Updates Browse the network directory for a firmware file and press OK to update the IP Camera firmware 3 9 4 Information This page displays some important information about t...

Page 39: ...D FUNCTIONS OF THIS PRODUCT The apparatus shall not be exposed to dripping or splashing and that no objects filled with liquids such as vases shall be placed on the apparatus WARNING To Reduce the Risk of Fire or Electric Shock Do Not Expose This Apparatus to Rain or Moisture 4 Accessory List Accessory List Item Description IP Camera IP PTZ Camera 1EA CD User Manual CD including product documentat...

Reviews: