background image

24 pages  105mm x 148mm (A6) 160gsm Gloss Art Stock 4 colour process double sided - CPIN005103

19

18

8

 INSTALLATION

PREPARATION  

Pair your camera inside the house before installation. Before choosing your preferred 
location, check the Wi-Fi strength/coverage to ensure the camera is fully functional.


Note:

 For ceiling/under eave, ensure you navigate to 

settings > basic function 

settings > flip


screen

 to obtain correct orientation.

UNDER EAVE MOUNT


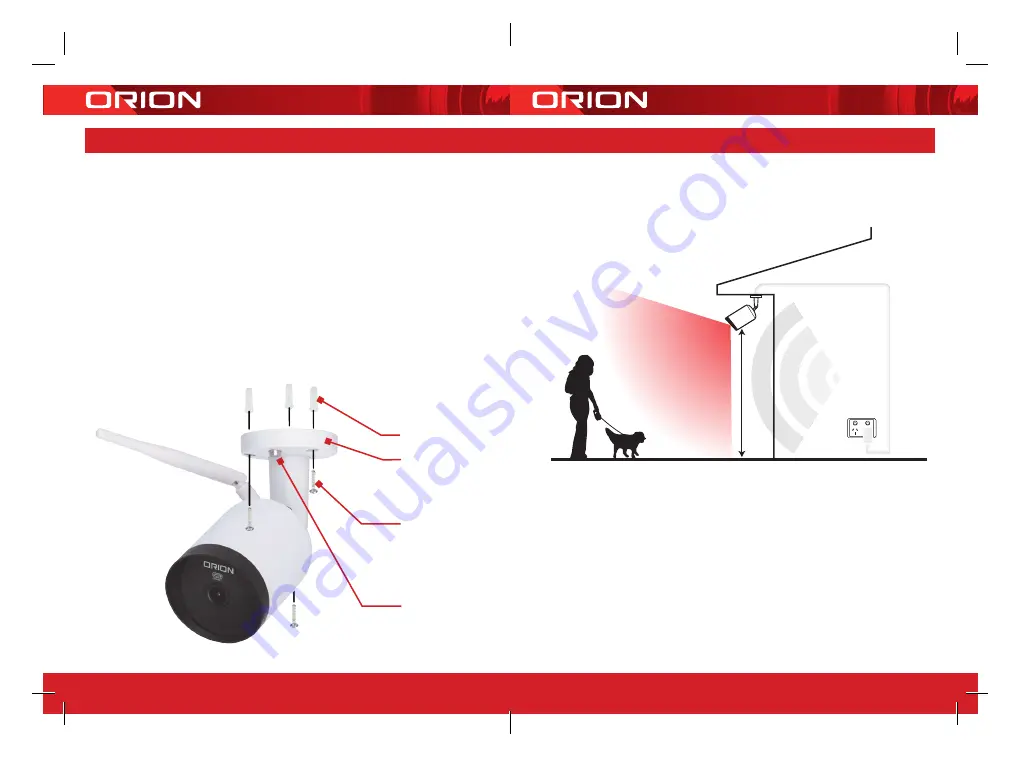
The camera can be mounted using the screws and wall plugs provided. 
1.  Position 12V d.c. power adaptor to a socket outlet as close to your mounting location 

as possible. Plan the route of the cable from your socket outlet and the camera. 

(Note: The power adaptor and its cable must be kept under eave). 

2.  Use the mounting base or provided drill template to mark the screw positions under 

your eave. Take into consideration where you’ll have the best view. Drill holes into the  
eave and push wall plugs into the holes. 

3.  Use the screws to secure the camera in place.

POSITIONING THE CAMERA

1.  Loosen the lock screw to adjust the camera’s orientation. Make adjustment with the 

help of the GRID APP until you get the desired live view.   

2.  Tighten the lock screw to secure in place by provided ‘L Shape’ screw driver. 

Wall Plugs

Mounting Base

Mounting Screws

Lock Screw

2-3m Ideal 

Mounting Height

Wi-Fi Coverage

Camera Field 

of View 125˚

To Power Sour

ce

Summary of Contents for GRID CONNECT SMART SC065WHA

Page 1: ...tock 4 colour process double sided CPIN005103 AUTOMATICALLY DETECTS TRACKS MOTION SEE RECORD EVERYTHING THAT HAPPENS USING YOUR SMARTPHONE QUICK START GUIDE IMPORTANT PLEASE READ THESE INSTRUCTIONS CAREFULLY SMART OUTDOOR SECURITY CAMERA SC065WHA ...

Page 2: ...e Play 1 x Smart Outdoor Security Camera 1 x Power Adaptor 1 x Mounting Stand 3 x Mounting Screws Wall Plugs 1 x L Shape Screw Driver 2 x Deterrent Stickers 1 x Drill Template Micro SD Card 16GB Class 10 required Max 128GB card supported 1INTRODUCTION 2CONTENTS DOWNLOAD PAIR USE Download from MONITOR FROM ANYWHERE 3IDENTIFICATION Power Cable Low volatge 12V Infrared LEDs Allow camera capture both ...

Page 3: ...gsm Gloss Art Stock 4 colour process double sided CPIN005103 4DOWNLOAD THE APP Scan download the GRID Connect App for free NEW ACCOUNT LOG IN SETUP Download and install GRID CONNECT App from Play store Android or App store iOS 5 4 ...

Page 4: ...ount login to account Open the GRID CONNECT App If you are a new user tap create new account and follow the prompts to complete account setup Note You must agree with the Privacy Policy to be able to use the App If you already have an existing account just tap login to account and enter your login details to continue 7 6 ...

Page 5: ...ll indicate as such with a solid red light You will hear a welcome sound Confirm the status light is red and rapidly blinking approximately 2 times per second The camera is now ready for pairing Once your camera is in pairing mode open the GRID CONNECT App Tap then select security in add device page Confirm the status light is red and rapidly blinking approximately 2 times per second before tappin...

Page 6: ...s Art Stock 4 colour process double sided CPIN005103 6 1 PAIRING YOUR DEVICE Enter the Wi Fi password and tap confirm to proceed If needed you can tap change network to switch to another suitable Wi Fi network for your camera confirm 11 10 ...

Page 7: ...15cm away from your mobile screen Press heard the beep after you hear a sound from your camera The status light should be blue and blinking refer to trouble shooting guide on page 20 if you don t hear the prescribed beep The GRID CONNECT App will start to connect to the camera automatically as indicated by the status light being solid blue scan QR code on screen 13 12 ...

Page 8: ...efore tapping done to finish the pairing process Once your camera is paired to your Wi Fi network your camera can be viewed at anytime from your smartphone as long as there is internet access If no device is found and the pairing process is not successful check below and repeat from Step 6 1 Wi Fi network is 2 4GHz 2 Wi Fi password entered is correct and the same Wi Fi network is used on the mobil...

Page 9: ...from SD card For more advanced features functions refer to grid connect com au for more details Access playback screen Access to SD card setting Enable sound motion detection alerts and adjust sensitivity of sound motion detection Tap to mute or hear the sound Tap to mute or hear the sound 7 OPERATING YOUR CAMERA Live Screen Playback Screen Feature Controls Feature Controls Back to Device Screen S...

Page 10: ...ion as possible Plan the route of the cable from your socket outlet and the camera Note The power adaptor and its cable must be kept under eave 2 Use the mounting base or provided drill template to mark the screw positions under your eave Take into consideration where you ll have the best view Drill holes into the eave and push wall plugs into the holes 3 Use the screws to secure the camera in pla...

Page 11: ... the connected Wi Fi network and the system will show the Wi Fi Frequency What can I do if I cannot scan the QR code or don t hear the prescribed beep 1 Ensure the status light is red and rapidly blinking approx 2 times per second before scanning QR code 2 Ensure your Wi Fi network is correct by checking the above sections 3 Ensure to keep your smart phone 15cm to 20cm away from your camera 4 It m...

Page 12: ... price you paid for the product Arlec will bear its own expenses of doing those things and you must bear any other expenses of claiming on the Warranty For goods purchased in Australia only The Warranty is in addition to other rights and remedies you may have under a law in relation to the product to which the Warranty relates Our goods come with guarantees that cannot be excluded under the Austra...

Page 13: ...CPIN005103 ...

Reviews: