background image

31

4

When playing back a CD containing a mixture of MP3
and JPEG files, only MP3 or JPEG files can be dis-
played on the file menu.

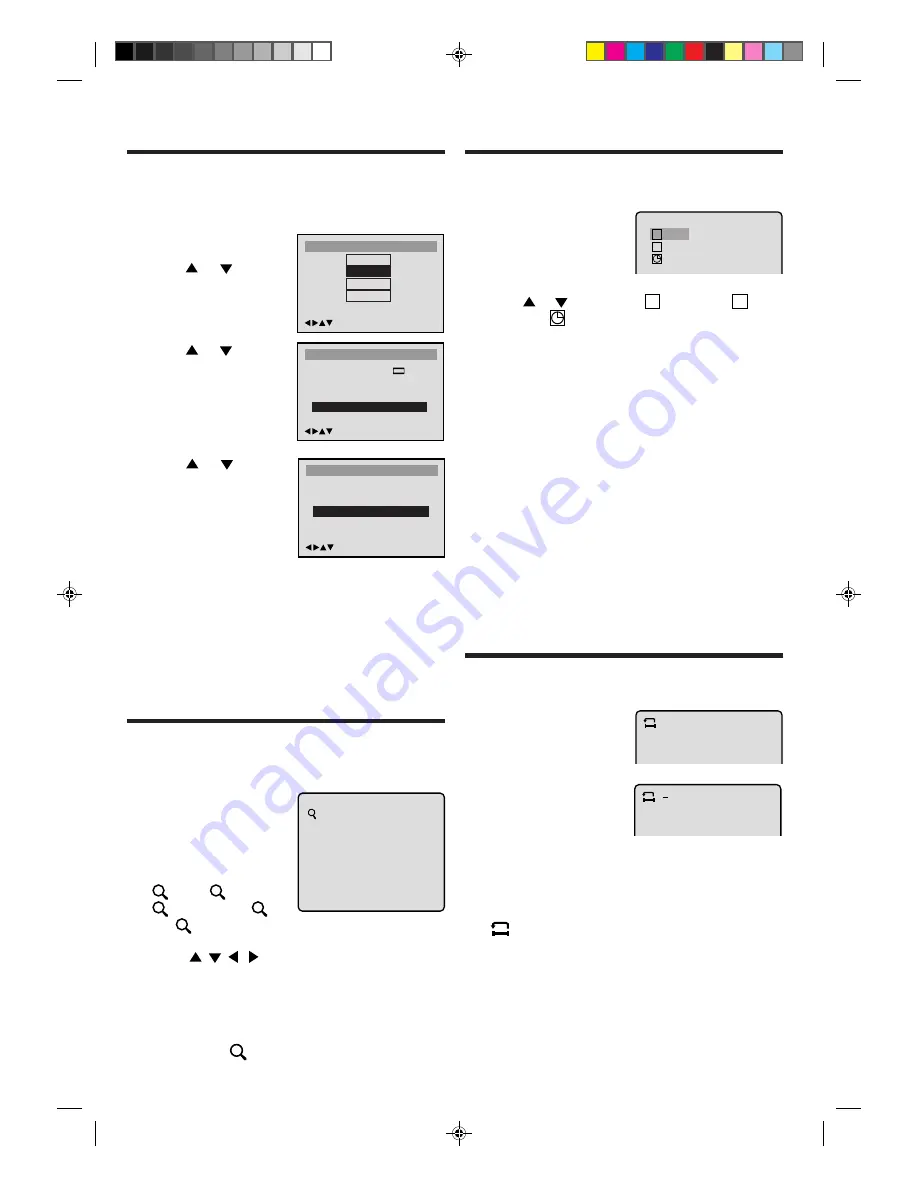
Press SETUP in the stop
mode.
Press 

 or 

 to select

“Imagen”, then press EN-
TER
.

Press 

 or 

 to select

“Selecc Ficheros”.
Press ENTER.

Press 

 or 

 to select

your desired file type.
Then press ENTER.

Todo:
Displays all files.

Solo Musica:
Displays only MP3 files.

Solo Imagen:
Displays only JPEG files.

To make SETUP screen disappear, press SETUP or
RETURN.

/Enter/Setup/Return

Idioma

Indice

Sonido

Menu Principal

Imagen

Pantalla Tv
Display

On

4:3

/Enter/Setup/Return

Imagen

Off

Intervalo JPEG

Selecc Ficheros Todo

/Enter/Setup/Return

Solo Musica

Solo Imagen

Todo

Selecc Ficheros

1

2

3

SETTING THE SELECT
FILES

Jump

0:00:00 / 2:02:31

1 / 8

_ _ / 19

T

C

1

NOTES:
• You can select the Pause, Slow or Search playback in

the zoom mode.

• Some discs may not respond to zoom feature.

In the zoom mode press ZOOM repeatedly to return
to a 1:1 view (

 Off).

1

Press ZOOM during
playback.
The centre part of the
image will be zoomed in.
Each press of ZOOM
will change the ZOOM

1 (X2), 

2 (X3) and

3 (X4). (JPEG: 

1

and 

2)

2

3

This unit will allow you to zoom in on the frame image.
You can then make selections by switching the posi-
tion of the frame.

Use the title, chapter and time recorded on the disc to
locate the desired point to play back.

Press 10 Number buttons to input the number.

• If you input a wrong number, press CANCEL.
• Refer to the package supplied with the disc to check

the numbers.

1

Press JUMP during
playback.

3

LOCATING DESIRED SCENE

Press ENTER.

• Playback starts.
• When you change the title, playback starts from

Chapter 1 of the selected title.

• Some discs may not work in the above operation.

4

Press 

/

/

/

 to view a different part of the

frame.
You may move the frame from the centre position to
UP, DOWN, LEFT or RIGHT direction.

2

Press 

 or 

 to select the “

C

 (Chapter)”, “

T

 (Title/

Track)” or “

 (Time)”.

ZOOMING

A

1

Press REPEAT A-B dur-
ing playback.
The start point is selected.

Repeat A-B playback allows you to repeat material
between two selected points.

A B

NOTES:
• Some discs may not work with the repeat  operation.
• In Repeat A-B mode, subtitles near point A or B may not

appear.

• You may not be able to set Repeat A-B, depending on

the scenes of the DVD.

• A-B Repeat does not work with an interactive DVD, MP3/

JPEG-CD and Video-CD with PBC.

2

Press  REPEAT A-B
again.
The end point is selected.
Playback starts at the

point that you selected. Playback stops at the end
point, returns to Point A automatically, then starts
again.

To resume normal playback press REPEAT A-B again.

 Off” appears on the screen.

REPEAT A-B

 5H00701A P26-31

12/11/03, 10:16 AM

31

Summary of Contents for COMBI 1415X

Page 1: ...rating Instructions Before operating the unit please read this manual thoroughly TV Video DVD Combination COMBI 1415X COMBI 2115 SI DIGITAL VIDEO MODEL COMBI 1415X 5H00701A Cover P02 12 11 03 10 14 AM...

Page 2: ...T IN HAZARDOUS RADIATION EXPOSURE DO NOT OPEN COVERS AND DO NOT REPAIR YOURSELF REFER SERVICING TO QUALIFIED PERSONNEL CLASS 1 LASER PRODUCT Este producto incorpora tecnolog a de protecci n del copyri...

Page 3: ...r On Auto Play Auto Rewind Auto Eject Dual Speed Picture Search 2 Speed SP LP Record Playback On Screen 5 Language Display Sleep Timer Auto Repeat Play Auto Video Head Cleaning DVD Player Digital Audi...

Page 4: ...vent overheating Do not block or cover these holes Especially avoid covering the holes with soft materials such as cloth or paper Place the unit on a flat stable level surface and never subject it to...

Page 5: ...VCR PLAY button VCR PLAY button DVD Phones socket VOLUME buttons REW Rewind button VCR STOP EJECT button VCR Main Power ON Switch Sub Power button STAND BY Indicator REC OTR Indicator TIMER REC Indic...

Page 6: ...Timer program 20 Cancel input data in the setting mode 12 15 31 32 F T B F T B 25 JUMP Locating desired scene 31 HOLD Hold 24 SP LP Sets the tape speed for recording 19 20 INDEX Search for INDEX mark...

Page 7: ...d batteries be replaced on a yearly basis or when remote operation becomes erratic Do not mix old and new batteries Weak batteries can leak and severely damage the remote control transmitter Always re...

Page 8: ...rial and you are uncertain of what to buy you should seek the advice of a local aerial contractor EXTERNAL AERIAL ANALOGUE ANALOGUE PRISE PERITEL OUTPUT SORTIE SCART RF IN PRISE PERITEL RF IN SCART Ae...

Page 9: ...surround decoder as listed above Center Speaker Front Speaker Left Front Speaker Right Subwoofer Surround Speaker Left Surround Speaker Right Coaxial Digital Audio Output To Coaxial Digital Audio Inp...

Page 10: ...es and subsequent hook up variations required they have not all been included in the suggested connection diagrams Press the AV button to select AV2 to use the TV as a monitor You ll need to consult e...

Page 11: ...ress or to select the AJUSTE DEL RELOJ mode then press ENTER 3 Press or 10 number buttons to select the current date then press The day of the week will not be correct until you have finished entering...

Page 12: ...hannel position 5 1Press MENU Press or to select the SINTONIZAR CANAL Then press ENTER 2Press or to select the CAMBIO Then press ENTER 3Press or 10 number buttons until the position number that you wa...

Page 13: ...press ENTER 9 Press MENU repeatedly until the TV picture appears on the screen Note Occasionally the auto search might catch a weak signal and stop If the TV station signal is weak you shouldn t stor...

Page 14: ...l count down and the picture will shut off at the set time but the recording continues 1 Press Sub Power Then press TV VCR to select TV VCR mode 2 Press 10 number buttons to select the channel 1 9 Pre...

Page 15: ...will turn ON the TV daily at the same time and to the same channel EXAMPLE Turning on the TV to channel 3 at 7 45 MONDAY FRIDAY 1 Press MENU Select the SINTONIZAR TV mode using or then press ENTER 2 P...

Page 16: ...F TIMER This feature allows you to have the TV turn OFF automatically at a predetermined time If you pro gramme the OFF TIMER once the TV will be automati cally turned off at the same time daily EXAMP...

Page 17: ...4 seconds on the screen To resume automatic tracking press ATR TRACK AUTO will appear for 4 seconds on the screen PLAYBACK TRACK AUTO TRACK MANUAL CH COLOR SYSTEM This unit can playback also tapes re...

Page 18: ...press TRK TRACK ING or to stabilize the still picture NOTES The audio output is muted during SPEED SEARCH and STILL A few noise bars will appear on the picture during SPEED SEARCH It is normal for the...

Page 19: ...setting then press 4 Set the start time end time channel and tape speed as in step 3 When you have finished setting all your recordings press ENTER Press MENU repeatedly until the TV picture appears...

Page 20: ...in the MENU then press ENTER Press or to select the unnec essary program and press CANCEL to cancel the program Press MENU twice to return to normal TV screen IF THE PROGRAM OVERLAPS ANOTHER NOTE Do n...

Page 21: ...NDICE 4 SALIR BUSQUEDA NO INDEX 1 9 RECEPTION DISTURBANCE Most types of television interference can be remedied by adjusting the height and position of the VHF UHF antenna Outdoorantennasarerecommende...

Page 22: ...r to select NICAM Then press orENTERtoselect AUTO NOTE NICAM menu appears only for COMBI 2115 SI 3 Press MENU repeatedly until the TV picture appears NICAM programmes are divided into 4 types as shown...

Page 23: ...R IN TO VIDEO IN TO AUDIO L IN RECORDING FROM DISC TO VIDEO TAPE With this unit it is theoretically possible to record from a DVD or CD to a video tape If the DVD disc has a Copy guard feature the dup...

Page 24: ...nel with the remote handset 2 Push TEXT MIX TV button The first push on the TEXT MIX TV button switches the Teletext on The second push on TEXT MIX TV displays the TV program and the Teletext together...

Page 25: ...reen s left lower corner will display To call sub page 2 enter 0 0 0 2 Your input will be displayed in the left lower corner 0002 It may take some time until sub page 2 is broadcast The sub page can o...

Page 26: ...er The titles can be subdivided into many sections Each section is called a CHAPTER Track An Audio CD can contain several items These are assigned to tracks Removing Disc from Case Be sure to hold the...

Page 27: ...starts from TV mode When using an amplifier switch on the amplifier 3 Press DVD to select DVD mode The DVD startup screen will appear on the screen STATUS DISPLAY OF DISC Press info CALL The status d...

Page 28: ...c cording to the disc contents the software producers de signed some playback features may not be available Also refer to the instructions supplied with the DVDs SPECIAL PLAYBACK Note There may be a s...

Page 29: ...usic data or non MP3 JPEG files can not be played back 1 Press OPEN CLOSE The disc tray will open Place a disc onto the tray 2 Press OPEN CLOSE or 1 PLAY The disc tray closes automatically On the TV s...

Page 30: ...his case if the first file is a JPEG file the first JPEG file is played back If the first file is an MP3 file only MP3 files are played back in order 4 Press ENTER The selected picture appears on the...

Page 31: ...tion of the frame Use the title chapter and time recorded on the disc to locate the desired point to play back Press 10 Number buttons to input the number If you input a wrong number press CANCEL Ref...

Page 32: ...u play a multilin gual disc Program menu Use 10 number buttons to enter the track s number you want to program then press ENTER The track number and total time are displayed Repeat this step to enter...

Page 33: ...lla TV then press or ENTER 3 Press or to select your desired screen type then press ENTER You have the following screen sizes to choose from 16 9 Wide screen A wide screen picture is displayed full si...

Page 34: ...ot limit playback Some discs may not be encoded with specific rating level information though its disc jacket says adult For those discs the age restriction will not work 1 Press SETUP in the stop mod...

Page 35: ...l Indice 8 Control Control 1234 10 Control Control 1234 TEMPORARY DISABLING OF RATING LEVEL BY DVD DISC 1 Load a DVD disc and press 1 1 1 1 1 PLAY see page 28 2 If the DVD disc has been designed to te...

Page 36: ...gian 2425 Thai 3018 Bihari 1218 Hungarian 1831 Oriya 2528 Tibetan 1225 Breton 1228 Icelandic 1929 Panjabi 2611 Tigrinya 3019 Bulgarian 1217 Indonesian 1924 Pashto Pushto 2629 Tonga 3025 Burmese 2335 I...

Page 37: ...are broken Recording does not work Timer recording does not work Connect Mains lead to AC outlet Set it to ON Set it to OFF TIMER REC indicator is off Wait for a few hours Connect the Mains lead to th...

Page 38: ...erations may prevent a proper progress of the contents It is in the mode of repeat playback memory playback etc The function is prohibited with the unit or the disc appears on the screen BEFORE REQUES...

Page 39: ...CD 4Hz 20KHz 90dB 0 06 Below Measurable Level Audio RCA 12 0 dBm 1Kohm Digital Audio 0 5Vp p 75 ohm CD Wavelength 775 805 nm Maximum output power 0 5 mW DVD Wavelength 640 660 nm Maximum output power...

Page 40: ...esponsabilidad que el Equipo TELEVIDEO DVD Ensamblado por WORLD ELECTRIC THAILAND LTD En TAILANDIA Marca ORION Modelo COMBI 1415X COMBI 2115 SI Objeto de esta declaraci n cumple con la normativa Sigui...

Reviews: