background image


16 

Installation and User’s Guide

http://www.orionimages.com 

7300 Bolsa Avenue, Westminster CA 92683 / Tel: 714-766-6300 / Fax: 714-766-6310 

pg16 


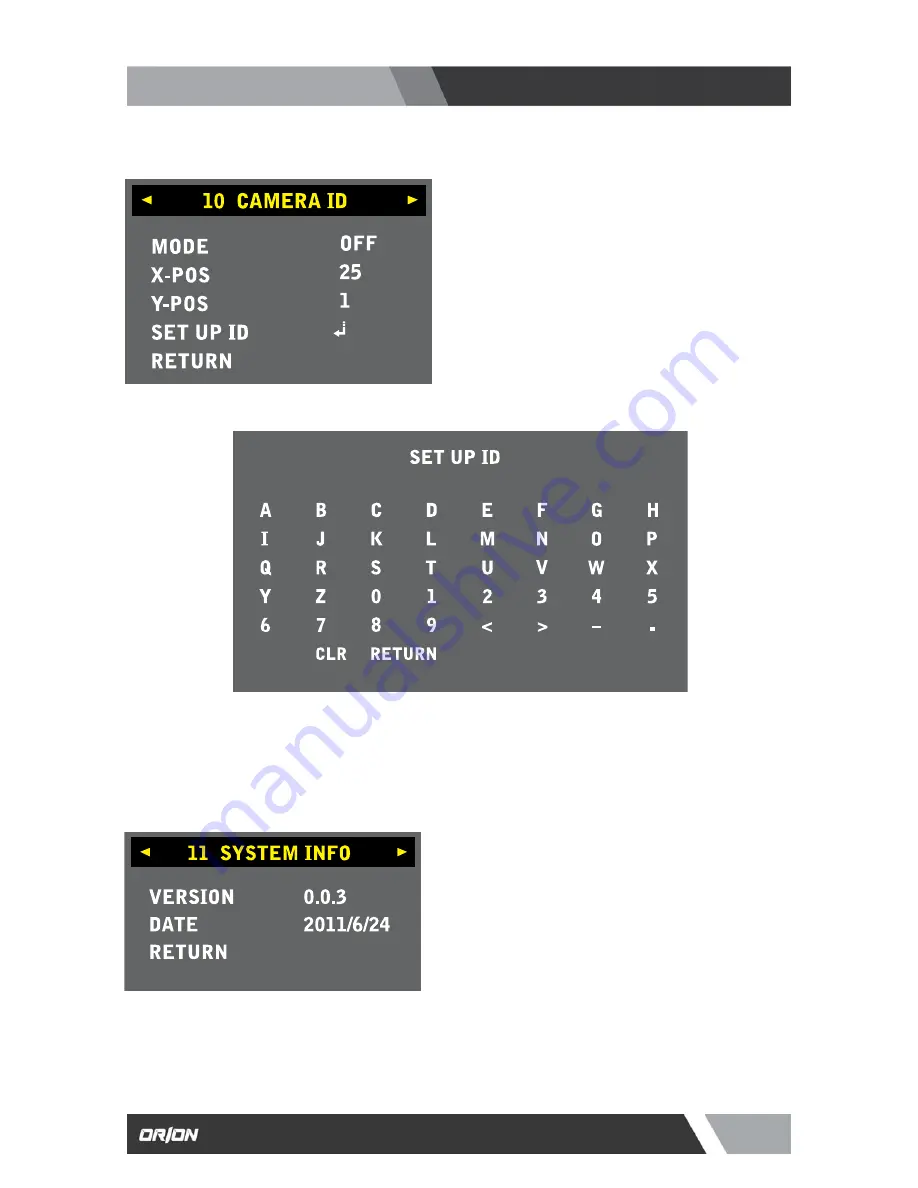
(10) CAMERA ID : 

This is to add the camera ID on the screen.   
 

z


MODE 

Turn ON to add the camera ID. 
 

z


X-POS 

This is to move the zone specifies under the ZONE 
NO vertically (in a range from 0 to 40). 
 

z


Y-POS 

This is to move the zone specifies under the ZONE 
NO vertically (in a range from 0 to 40). 

(11) SYSTEM INFO : 


z


VERSION 

0.0.3. 
 

z


DATE 

2011 / 6 / 24 
 

z


RETURN 

Press (E) button to go back previous menu. 

(12) RESET : 

This activates all settings go back to factory original value.


z


SET UP ID 

You can set your each camera ID by entering name. 


z


RETURN 

Press (E) button to go back to previous menu. 


Summary of Contents for CHDC-21BSDC

Page 1: ...rionimages com All contents of this document may change without prior notice and actual product appearance may differ from that depicted herein Installation and User s Guide CHDC 21BSDC HD CCTV CAMERA 1 3 CMOS HIGH SENSITIVE DAY NIGHT HD CCTV ...

Page 2: ...craftsmanship to provide long life and high quality performance if it is properly used and maintained as outlined in this manual This high performance HD CCTV camera is equipped with a 1 3 FHD CMOS sensor which has extremely wide range of uses in many different applications and conditions 1 Handling precautions 2 General 3 Package of Content 4 Features 5 Name of parts and functions 6 Operation 6 1...

Page 3: ...sion reception which can be determined by turning the equipment off and on the user is encouraged to correct the interference by one or more of the following measures CAUTION ANY CHANGES OR MODIFICATIONS NOT EXPRESSLY APPROVED BY THE PART RESPONSIBLE FOR COMPLIANCE COULD VOID THE USERS AUTHORITY TO OPERATE THE EQUIPMENT Disposal of used Electric and Electronic Equipment Applicable in the European ...

Page 4: ...owards the sun z Some types of lenses may hunt in adverse light conditions In such cases please re adjust the lens in line with the instructions in the manual z Because of the characteristics of the digital image device images may look unnatural at high temperatures this does not mean the camera is faulty This HD CCTV Camera is provided with a High performance 1 3 inch 2 1M CMOS sensor The camera ...

Page 5: ... other words almost all types of automatic iris CCTV lenses can be used 7 AUTOMATIC OR MANUAL WHITE BALANCE In addition to the Auto white balance this camera provide manually adjustment of Red Blue Gamma 8 ELECTRONIC SHUTTER A smooth control to compensate sensitivity variation with an electronically controlled Auto shutter Also manual shutter mode can be selected to capture the fast moving object ...

Page 6: ...d to mount the lens on the camera Many types of CS mount lens can be used These holes are used to install and fix the camera on the camera mounting or bracket Those can be also applicable to normal use tripods which have a quarter inch thread This mount located on the bottom and top of the camera CAMERA MOUNT SCREW HOLES The switch has two positions for a video controlled auto iris lens or a DC au...

Page 7: ...ERA SETUP FUNCTION SWITCHES Please refer to the operation chapter VIDEO OUTPUT CONNECTOR VIDEO OUT For HD SDI output from camera Connect this output to HDTV monitor or HDTV switcher etc This to be terminated with 75 ohms impedance at the last equipment in a loop when cascade bridge loop connection is made NTSC PAL OUTPUT Use a mini plug connector RS 232C This is for data value adjustment POWER IND...

Page 8: ...Screen Menu system Alteration of these function may be needed for some installations and we recommend that you should spend some time to become acquainted with these functions so that the best results can be obtained from this high performance HD CCTV camera 6 2 SETUP SWITCHES AND FUNCTIONS The push buttons and marked as the left are provided on the rear panel on the camera Up Switch U To be used ...

Page 9: ... the resolution format the frame CVBS aspect ratio and the color bar z SDI SCALE Classify the range of digital output signal FULL mode SDI FULL Range Out 0 255 usually applied on HDMI DVI IP all signal outputs COMP mode SDI Normal Range Out 16 235 Black 16 White 235 usually applied on SDI Setup Level goes up to 7 5 IRE z SDI FORMAT 1080p SDI output for resolution is 1920 x 1080p 720p SDI output fo...

Page 10: ...eturn to previous menu 2 LENS Select DC Video manual lens iris z MODE This has three positions DC For a DC auto iris lens VIDEO For a video controlled auto iris MANUAL For a manual iris lens z RETURN Press ENTER key E to exit and return to previous menu 3 SHUTTER AGC Select Auto Manual Shutter and adjust AGC z SHUTTER AUTO To set in Auto Shutter Mode MANUAL To set manual shutter speed in the value...

Page 11: ...w 3700 K Middle 5100 K or High 9500 K Also R Gain and B Gain can be adjusted in a range of 0 to 10 PRESET Activate a data stored in manual mode z COLOR TEMPERATURES IN DEGREES KELVIN Color Temperature is the standard method to describe characters of light and is normally expressed in degrees Kelvin K Large numbers show more bluish color Not directly related Brightness 2 hours from Dawn 1 hour from...

Page 12: ...otated Critical Evidence ACE z SHARPNESS Sharpness can be adjusted in a range of 0 to 20 Pressing R button will make sharper image z MIRROR This function is to reverse the left and right on the screen This feature can be used for the rear view vehicle application etc z FLIP This function is to reverse the top and the bottom on the screen This feature can be used for the microscope application etc ...

Page 13: ...ea horizontally The setting of range is from 0 to 20 z BLC POS Y This is to position the BLC area vertically The setting of range is from 0 to 20 z BLC SIZ X This is to increase the size of BLC area horizontally The setting of range is from 0 to 20 z BLC SIZ Y This is to increase the size of BLC area vertically The setting of range is from 0 to 20 z DNR Digital Noise Reduction This can be selected...

Page 14: ...e the zone number specified under ZONE NO For example if you need to erase zone number 2 set ZONE NO as 2 then set ZONE OP as ON z X POS This is to move the zone specifies under the ZONE NO horizontally in a range from 0 to 60 z Y POS This is to move the zone specifies under the ZONE NO vertically in a range from 0 to 40 z X SIZ This is to change a size of the ZONE specified in the ZONE NO horizon...

Page 15: ...ZONE in a range of 0 1 2 3 and 4 z RETURN Press E button to go back to previous menu 9 MOTION DET This is to set the area to be detected for the motion Up yo 4 zones can be assigned with any size over the screen z RESOLUTION This is for the level of resolution to detect a motion Level should be set 0 to 4 higher value to detect the details z SENSITIVITY This is for the level of sensitivity to dete...

Page 16: ...ve the zone specifies under the ZONE NO vertically in a range from 0 to 40 z Y POS This is to move the zone specifies under the ZONE NO vertically in a range from 0 to 40 11 SYSTEM INFO z VERSION 0 0 3 z DATE 2011 6 24 z RETURN Press E button to go back previous menu 12 RESET This activates all settings go back to factory original value z SET UP ID You can set your each camera ID by entering name ...

Page 17: ...nsation Built In Noise Reduction Built In Electric Shutter Auto Manual Manual 1 30 1 60 1 120 1 250 1 700 1 1000 1 1600 1 2500 1 5000 1 7000 1 10000 1 30000 sec Auto IRIS Function DC or Video Selectable Day Night Built In Mirror Image DC or Horizontal and Vertical Privacy Mask Function Built In Motion Detection Built In Camera ID Built In Lens Mount CS Mount C Mount Ring is provided as standard Po...

Page 18: ... Installation and User s Guide http www orionimages com 7300 Bolsa Avenue Westminster CA 92683 Tel 714 766 6300 Fax 714 766 6310 pg18 8 OUTLINE DIMENSION Side View Rear View Top View Front View Unit Inch ...

Page 19: ...t will first be judged whether the fault is repairable or not Charged servicing will then be made upon request of the user z Before you ask for servicing please ensure you read the instruction Manual If the unit still fails take note of the model number date of purchase problem etc In detail and inform your dealer or sales representative z If you have questions about the after sale service contact...

Reviews: