
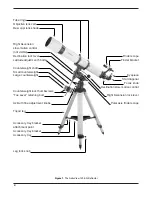
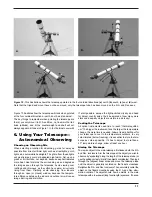

sary, use the R.A. and Dec. slow-motion controls to re-position the
object within the field-of-view of the main telescope’s eyepiece.
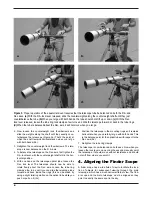
Focusing the Telescope
Practice focusing the telescope in the daytime before using it
for the first time at night. Start by turning the focus knob until
the focuser drawtube is near the center of its adjustment range.
Insert the star diagonal into the drawtube and an eyepiece into
the star diagonal (secure with the thumbscrews). Point the tel-
escope at a distant subject and center it in the field of view.
Now, slowly rotate the focus knob until the object comes into
sharp focus. Go a little bit beyond sharp focus until the image
just starts to blur again, then reverse the rotation of the knob,
just to make sure you hit the exact focus point. The telescope
can only focus on objects at least 50 to 100 feet away.
Do You Wear Eyeglasses?
If you wear eyeglasses, you may be able to keep them on while
you observe, if your eyepieces have enough “eye relief” to allow
you to see the whole field of view. You can try this by looking
through the eyepiece first with your glasses on and then with
them off, and see if the glasses restrict the view to only a por-
tion of the full field. If they do, you can easily observe with your
glasses off by just refocusing the telescope the needed amount.
Calculating the Magnification
It is desirable to have a range of eyepieces of different focal
lengths, to allow viewing over a range of magnifications. To
calculate the magnification, or power, of a telescope, simply
divide the focal length of the telescope by the focal length of
the eyepiece (the number printed on the eyepiece):
Magnification = Telescope Focal Length (mm)
Eyepiece Focal Length (mm)
For example, the AstroView 120mm, which has a focal length
of 1000mm, used in combination with a 25mm eyepiece,
yields a power of
1000 ÷ 25 = 40x.
Every telescope has a useful limit of power of about 45x-60x
per inch of aperture. Claims of higher power by some telescope
manufacturers are a misleading advertising gimmick and
should be dismissed. Keep in mind that at higher powers, an
image will always be dimmer and less sharp (this is a funda-
mental law of optics). The steadiness of the air (the “seeing”)
will limit how much magnification an image can tolerate.
Always start viewing with your lowest-power (longest focal length)
eyepiece in the telescope. After you have located and looked at the
object with it, you can try switching to a higher power eyepiece to
ferret out more detail, if atmospheric conditions permit. If the image
you see is not crisp and steady, reduce the magnification by
switching to a longer focal length eyepiece. As a general rule, a
small but well-resolved image will show more detail and provide a
more enjoyable view than a dim and fuzzy, over-magnified image.
Use of 2" Eyepieces
Another nice feature of the AstroView 120 is its ability to use
either 1.25" or 2" barrel-diameter eyepieces. At low powers
(long focal lengths), 2" eyepieces can give a wider field of
view than standard 1.25" eyepieces. This is especially desir-
able for observing deep-sky objects, as many of them appear
quite big, but faint. If you want to use 2" eyepieces, such as
the Orion Optiluxe 2" eyepieces, we recommend that you also
purchase a 2" star diagonal for refractors (#8773); this will
provide for a comfortable viewing angle.
To use 2" eyepieces, simply loosen the two large setscrews on the
focuser drawtube that are just in front of the setscrew that holds the
provided 1.25" star diagonal in place. Once these setscrews are
loosened, the entire back end of the focuser, including any 1.25
diagonal and eyepiece that may be attached, comes off, exposing
the 2" diameter focuser drawtube. Now, insert your 2" star diagonal
into the drawtube and secure with the two setscrews loosened pre-
viously. Insert a 2" eyepiece into the 2" diagonal, secure it in place
with the setscrew on the diagonal, and you’re ready to observe.
Let Your Eyes Dark-Adapt
Don’t expect to go from a lighted house into the darkness of the
outdoors at night and immediately see faint nebulas, galaxies,
and star clusters—or even very many stars, for that matter.Your
eyes take about 30 minutes to reach perhaps 80% of their full
dark-adapted sensitivity. As your eyes become dark-adapted,
more stars will glimmer into view and you’ll be able to see
fainter details in objects you view in your telescope.
To see what you’re doing in the darkness, use a red-filtered flash-
light rather than a white light. Red light does not spoil your eyes’
dark adaptation like white light does. A flashlight with a red LED
light is ideal, such as the Orion RedBeam LED flashlight (#5744),
or you can cover the front of a regular incandescent flashlight with
red cellophane or paper. Beware, too, that nearby porch and
street lights and car headlights will ruin your night vision.
“Seeing” and Transparency
Atmospheric conditions vary significantly from night to night.
“Seeing” refers to the steadiness of the Earth’s atmosphere at
a given time. In conditions of poor seeing, atmospheric turbu-
lence causes objects viewed through the telescope to “boil.” If
the stars are twinkling noticeably when you look up at the sky
with just your eyes, the seeing is bad and you will be limited to
viewing with low powers (bad seeing affects images at high
powers more severely). Planetary observing may also be poor.
In conditions of good seeing, star twinkling is minimal and
images appear steady in the eyepiece. Seeing is best over-
head, worst at the horizon. Also, seeing generally gets better
after midnight, when much of the heat absorbed by the Earth
during the day has radiated off into space.
Avoid looking over buildings, pavement, or any other source
of heat, as they will cause “heat wave” disturbances that will
distort the image you see through the telescope.
Especially important for observing faint objects is good “trans-
parency”—air free of moisture, smoke, and dust. All tend to
scatter light, which reduces an object’s brightness. Transparency
is judged by the magnitude of the faintest stars you can see with
the unaided eye (6th magnitude or fainter is desirable).
Note About Chromatic Abberation
Chromatic abberation literally means color distortion. Whenever
light passes through one material to another, light of different
wavelengths (color), is bent by different amounts. This is a prob-
12


