background image

4

•  Spring washer 
•  Flat washer 
•  Screwdriver (with interchangeable flat and Philips bit)
•  Dust cap

Assembly of the SkyScanner BL 135mm

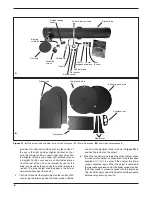
1.  Attach a side brace to the outside surface of a side panel 

with two assembly screws (

Figure 12

). Do this for both 

side panels. 

2.  Attach the front panel to the two side panels as shown in 

Figure 13

3.  Now bolt the top ground plate onto the panel assembly 

using 8 assembly screws, as shown in 

Figure 14

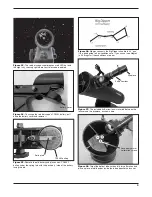
4.  Place top portion of base onto bottom ground plate, 

centering the hole in top ground plate over the pre-
installed center bolt in the bottom ground plate (

Figure 

15

). Then place the flat washer followed by the spring 

washer over the center bolt. Then thread on the tension 
knob (

16

). 

5.  Remove the nut and washer from each of the threaded 

ends of the carry handle. Then insert the handle into the 
two holes from the outside of the front panel. Place a 
washer on each exposed threaded end of the handle, 
followed by a nut. Tighten the nuts with a small adjustable 
wrench or pair of pliers (

 17

). 

6.  Attach the eyepiece rack to the front panel with two 

assembly screws (

Figure 17

).

7.  Install two altitude bearing cylinders on the inside surface 

of each side panel using assembly screws (

Figure 18

). 

The screws should be inserted from the outside of the 
panel.

8.  Now place the Dobsonian optical tube into the base, rest-

ing the tube’s two altitude hubs on the pairs of bearing 
cylinders you installed in the previous step (

Figure 19

). 

Then insert an altitude tension knob into the uppermost 
hole in each side panel and thread it into the tube’s alti-
tude hub (

Figure 20

).  

9.  Now install the red dot finder scope by sliding the bracket 

into the finder base on the optical tube as shown in 

Figure 9

10.  Finally, insert the 25mm eyepiece into the focuser draw-

tube collar and secure it with the thumbscrew (

Figure 10

). 

Getting Started

The SkyScanner BL telescopes were designed specifically 
for visual observation of astronomical objects in the night sky. 
Like all Newtonian reflector telescopes, they are not suited for 
daytime terrestrial usage because the image in the eyepiece 
is rotated or upside-down. 
One of the great assets of SkyScanner BL telescopes is their 
compact size and portability. For the 102mm model especially, 
due to its overall short height, you will find that viewing while 
sitting or kneeling next to the telescope is the most comfort-
able. If you wish to raise the telescope off the ground so that it 
can be used while standing or sitting in a chair, then you can 
set the telescope on a platform such as a milk crate or table, or 
even the hood of your car. It is not critical that the telescope be 
exactly level, but it should be placed on a relatively flat surface 
to ensure smooth movement.

Altitude and Azimuth (Aiming the Telescope) 

The SkyScanner BL’s altazimuth base permits motion along 
two axes: altitude (up/down) and azimuth (left/right) (

Figure 

21

). Simply grasp the front of the optical tube and move the 

telescope left or right so that the base rotates. Move the opti-
cal tube up or down in the same manner. Both motions can 
be made simultaneously and in a continuous manner for easy 
aiming. This way you can point to any position in the night sky, 
from horizon to horizon. 

Remove plastic 

sleeve!

Plastic disc

Altitude 

hub

Spring 

washer

Flat washer

Tension 

knob

Tension knob

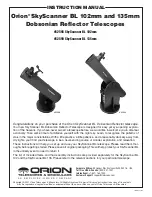
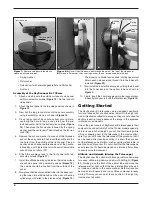
Figure 7. 

Remove and discard the plastic 

sleeve on altitude axis bolt. 

Figure 8. A)

 Insert the altitude axis bolt through the hole at the top of the side panel. 

B)

 Thread a flat washer, then a spring washer, then a tension knob onto the bolt.

A

B

Summary of Contents for 52598

Page 1: ...tor Telescope is designed for easy yet eye opening explora tion of the heavens If you have never owned a telescope before we would like to welcome you to amateur astronomy Take some time to familiarize yourself with the night sky Learn to recognize the patterns of stars in the major constellations With a little practice a little patience and a reasonably dark sky away from city lights you ll find ...

Page 2: ...r with interchangeable flat and Philips bit Dust cap Dust cap Optical tube Tension knob Tension knob Eyepiece rack Bottom ground plate Top ground plate Flat washers Spring washers 25mm Kellner eyepiece 3x Barlow lens Red dot scope 10mm Plossl eyepiece Assembly screws Side brace handle Side panel Screwdriver Figure 1 Parts of the SkyScanner BL 102mm Dobsonian Warning Never look directly at the Sun ...

Page 3: ...sion knob do not overtighten Figure 8B 9 Now install the red dot finder scope by sliding the bracket into the finder base on the optical tube as shown in Figure 9 10 Finally insert the 25mm eyepiece into the focuser draw tube collar and secure it with the thumbscrew Figure 10 With your telescope now fully assembled you can skip to the section titled Getting Started SkyScanner BL 135 Included Items...

Page 4: ... optical tube as shown in Figure 9 10 Finally insert the 25mm eyepiece into the focuser draw tube collar and secure it with the thumbscrew Figure 10 Getting Started The SkyScanner BL telescopes were designed specifically for visual observation of astronomical objects in the night sky Like all Newtonian reflector telescopes they are not suited for daytime terrestrial usage because the image in the ...

Page 5: ... image starts to blur again then reverse the rotation of the knob gradually until you ve nailed the exact focus point Aligning and Using the Red Dot Finder Scope The included red dot finder scope Figure 9 makes pointing your telescope almost as easy as pointing your finger It permits easy object targeting prior to observation in the higher power main telescope It superimposes a red dot generated b...

Page 6: ...tion the red dot on the object 6 When the red dot is centered on the distant object check to make sure the object is still centered in the telescope s eyepiece If it isn t re center it then adjust the finder scope s alignment again When the object is centered in the telescope eyepiece and on the finder scope s red dot the finder scope is properly aligned with the telescope The red dot finder scope...

Page 7: ... light such as street lights porch lights and automobile headlights The glare from these lights will greatly impair your dark adapted night vision Avoid viewing over rooftops and chimneys as they often have warm air currents rising from them Similarly avoid observing from indoors through an open or closed window because the temperature difference Bottom ground plate Center bolt Front panel Figure ...

Page 8: ... the eyepiece rack as shown Figure 21 The SkyScanner BL Dobsonians have two axes of motion altitude up down and azimuth left right Figure 22 The focuser on the SkyScanner BL 135mm Dobsonian has a 1 25 adapter which can be removed by loosening the thumbscrew With the adapter removed the focuser can accept optional 2 eyepieces Figure 19 Lift the optical tube into the base resting the altitude hubs o...

Page 9: ...s CR2032 battery pull down the battery cover and remove it Figure 25 Remove the old battery and place a new CR2032 battery under the spring tab with the positive side of the battery facing the tab Figure 27 The included 3x Barlow lens is inserted between the focuser and the eyepiece as shown here Figure 28 Orient the optical tube horizontally for collimation and place a piece of white paper inside...

Page 10: ...lescope to re center it Objects appear to move across the field of view faster at higher magnifications This is because the field of view becomes narrower Eyepiece Selection By using eyepieces of different focal lengths it is possible to attain many magnifications or powers with the SkyScanner BL Your telescope comes with two 1 25 eyepieces one with 25mm focal length and one with 10mm focal length...

Page 11: ...ope com or to charts published monthly in Astronomy Sky Telescope or other astronomy magazines Venus Jupiter and Saturn are the brightest objects in the sky after the Sun and the Moon Your SkyScanner BL is capable of showing you these planets in some detail Other planets may be visible but will likely appear star like Because planets are quite small in apparent size you will need to use high power...

Page 12: ...ur website for available collimating tools Figures 29B through 29D assume that you have an optional Cheshire eyepiece or collimation cap in the focuser Primary Mirror Center Mark You may have noticed that your SkyScanner BL has a small adhesive dot in the exact center of the primary mirror This center mark allows you to achieve a very precise collimation of the primary mirror you don t have to gue...

Page 13: ... on the primary mirror your primary mirror is collimated The view through the collimation cap should resemble Figure 29D Then very lightly tighten the three lock screws so that the primary mirror stays in that position A simple star test will tell you whether the optics are accurately collimated Star Testing the Telescope When it is dark point the telescope at a bright star and accu rately center ...

Page 14: ... composite base laminated Weight assembled 10 lbs 6 5 oz Tube Length 21 5 54 6cm Tube Outer Diameter 5 7 145mm SkyScanner BL 135mm Primary mirror 135mm diameter Secondary mirror 35mm minor axis Mirror coatings Aluminum with SiO2 overcoat Central obstruction 38mm 28 1 Focal length 1100mm Focal ratio f 8 1 Focuser 2 Rack and pinion accepts 1 25 and 2 eyepieces Eyepieces 25mm Kellner and 10mm Plossl ...

Page 15: ...15 ...

Page 16: ...he original retail purchaser only During this war ranty period Orion Telescopes Binoculars will repair or replace at Orion s option any warranted instru ment that proves to be defective provided it is returned postage paid Proof of purchase such as a copy of the original receipt is required This warranty is only valid in the country of purchase This warranty does not apply if in Orion s judgment t...

Reviews: