background image

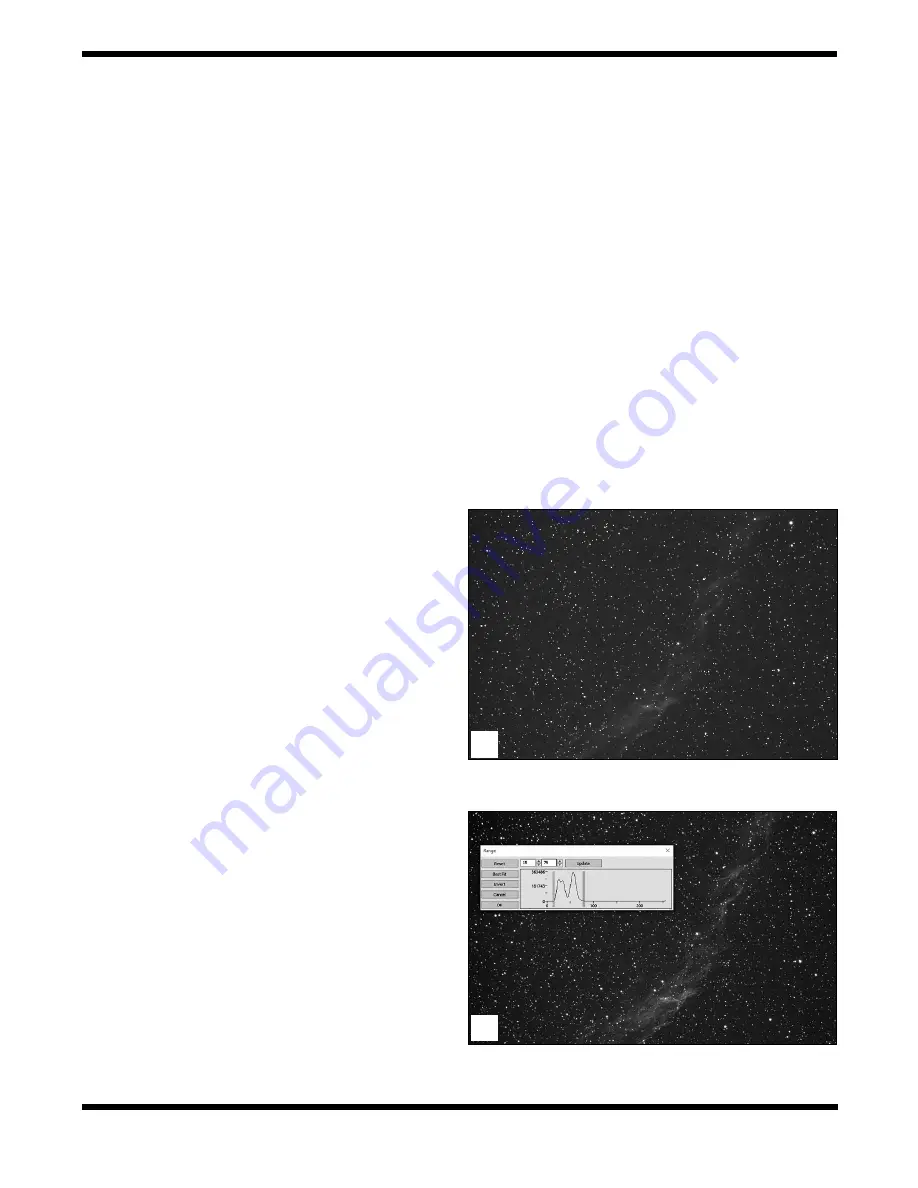
Figure 7a.

 120 second “raw” image of the Veil with no histogram 

stretch. Note the faint details that are barely visible. 

7b.

 After 

adjusting the Range bars to just wider than the histogram hump, 
more detail appears.

need to be adjusted for best the best possible result. For 
longer nebulae exposures, trigger mode is recommended.

2.  For a nebula or star cluster, choose something bright 

for your first target, and ideally an autoguider is already 
locked on and tracking a star, so your resulting images are 
well guided. Pick an object like the Ring Nebula (M57), 
Dumbbell (M27), or Orion Nebula (M42) since they are all 
very bright and easy to see in short exposures to make 
sure the framing is correct. Center the object and proceed 
to set the exposure.

3.  Set the analog gain slider to around 25% from the left 

(around 40), and a trigger mode exposure of 30 seconds, 
and make sure the bit depth is set to the highest bit depth 
possible. This is just a starting point, these numbers may 
have to be adjusted depending on your resulting image.

4.  Click Single and wait for the image to download.  You 

should see a rather grainy looking image of your target in 
the preview window on the right.  Now is the time to look 
at the histogram window, and determine what needs to 
change in order to get the best exposure. Scroll down the 
left side panel to find the histogram window.

5.  The histogram shows a graphical representation of the 

number and brightness of the pixels in the image.  The far 
left of the histogram is black, or no light on a given pixel, 
and the far right is full white, or fully maxed brightness for 
those pixels. A normal astrophoto has a lot of black in it, so 
the histogram bump should be left of center (approximately 
near the left 1/4 to 1/3 of the histogram for the hump) for 
a properly exposed photo of a nebulae with a lot of black 
sky around it 

(Figure 6a)

. If the hump is too far to the right, 

either the exposure or the gain is set too high, and you’re 
recording too much background light pollution. 

6.  Adjust the exposure to somewhere between 30 seconds 

and 180 seconds. For a CMOS chip like the G Series, 
individual exposures probably do not need to be longer 
than 180 seconds, especially when you’ll be stacking 
many shots together for the best results. The G16 color 
and G21 color camera are not quite as sensitive as the 
G10 color, so exposures longer than 180 seconds may 
be possible and advantageous to gather more light. 
The G16 mono is the most sensitive of all -- but since 
it is a monochromatic camera, in order to obtain a full 
color image you’ll need to shoot through red, green, and 
blue filters, and process the resulting frames together to 
produce a color image. If the histogram still doesn’t fall into 
the proper area, the gain can also be adjusted. Higher gain 
setting means more noise in the image, but it will provide 
more sensitivity for a given exposure. Finding the right 
exposure vs. gain combination is a matter of trial and error, 
and will vary depending on the telescope focal ratio and 
sky conditions.

7.  If you want to “screen stretch” the histogram, meaning 

change the black and white points in the image in order to 
see what kind of faint detail you have captured, grab the 
left and right edges of the histogram window, and slide the 
vertical bars closer to the histogram bump.  Moving the 
right edge bar closer to the end of the hump will raise the 

brightness of the entire image, and moving the left edge 
bar closer to the start of the hump will darken down the 
black point, boosting the contrast. 

(Figure 6b)

.  Note that 

the live histogram stretching will NOT change a trigger 
image that is displayed on the right.  It will affect the NEXT 
image that downloads from the camera, so take another 
exposure and check the results.

8.  Once you’ve dialed in the right histogram, it’s time to start 

a sequence so you can stack several images together.  
Remember that each individual image will have lots of 
noise, and only by stacking many images together will you 
get a smooth low noise image.

9.  In the Capture and Resolution window, click “Options” 

in the lower right corner of the window and choose a 
file location to save your resulting images. Make sure to 
save them as .fit files so 3rd party astro-imaging software 
can read them (.fit is a standard in the astro-imaging 
community).  Verify that the resolution you wish to image 
at is set, and also make sure RAW is set for the file type. 
RAW fits files are saved before color converting so other 
programs can read the raw files and provide the best data 
from the camera. Also, make sure “Light Frame” is selected 
in the window across the top, so the correct meta-data is 

7

7a

7b

7b.

 After adjusting the Range bars to just wider than the histogram 

hump, more detail appears.

Figure 7a.

 120 second “raw” image of the Veil with no histogram 

stretch. Note the faint details that are barely visible. 

Summary of Contents for 51452

Page 1: ...1863 G26 APS C Mono Corporate Offices 89 Hangar Way Watsonville CA 95076 USA Toll Free USA Canada 800 447 1001 International 1 831 763 7000 Customer Support support telescope com Copyright 2021 Orion Telescopes Binoculars All Rights Reserved No part of this product instruction or any of its contents may be reproduced copied modified or adapted without the prior written consent of Orion Telescopes ...

Page 2: ...ct tempera ture within the cooling range of the camera This allows you to take calibration images like dark frames at the exact same tem perature as your light frames making for the cleanest images possible Additionally since you can match the CMOS tempera ture at any time within the range of the cooler you have the freedom to take dark frames when it s most convenient for you so you don t have to...

Page 3: ...ale 42mm T threads G10 and above or male c mount threads StarShoot Mini Caution Be sure to always firmly tighten the thumbscrew s that secure the camera in the telescope focuser or it could fall out and onto the ground If your telescope has T or C threads for direct camera attachment a more secure connec tion can be made First unthread the 1 25 or 2 nosepiece from the camera body to expose the C o...

Page 4: ...ware Install the camera into your focuser and for the G10 and above connect any peripheral devices to the two USB 2 0 ports on the camera and connect the camera to power Please note the AC DC transformer has a relatively short DC cable length This prevents 12v voltage from dropping over longer runs but you may find it difficult to reach an AC outlet depending on your scope setup Use of an extensio...

Page 5: ...image capture and process ing program Excellent processing routines such as aligning stacking and dark flat bias handling An excellent choice for the beginning astro photogra pher getting into processing yet will carry over for more advanced users as well Orion StarShoot Image Capture Plug the camera into the USB 3 port and into AC power When you open Orion Starshoot Image Capture you ll be presen...

Page 6: ...istant galaxy will be in focus 5 If you wish to fine tune the focus further a Bahtinov mask is an ideal method of focusing with Orion StarShoot Capture as it is quite an accurate method using medium brightness stars Contact Orion or search for Bahtinov mask on www telescope com for more details and to purchase a Bahtinov mask for your specific telescope Your First Lunar Planetary Image The moon is...

Page 7: ...e G10 color so exposures longer than 180 seconds may be possible and advantageous to gather more light The G16 mono is the most sensitive of all but since it is a monochromatic camera in order to obtain a full color image you ll need to shoot through red green and blue filters and process the resulting frames together to produce a color image If the histogram still doesn t fall into the proper are...

Page 8: ...cond image of the Veil Nebula Figure 7a shows the full range select Menu Process Range to bring up a histogram of that image Notice how faint the nebulae looks That s not uncommon for a nebula to look like this right out of the camera as it is just barely brighter than the background light pollution Figure 7b is a Range adjusted shot to show fainter detail Notice how the left and right range lines...

Page 9: ...mages taken with no light coming into the camera A dark frame is typically taken with the telescope cap attached The only data in the image is the inherent camera noise The noise contains the dark current background noise level read noise noise introduced during camera readout and download hot pixels bright dots in the image and amp glow Figure 10 All of this noise exists in your raw astro image t...

Page 10: ...er allows the camera to be used with any of the programs listed above along with any others that support ASCOM cameras Please download the ASCOM platform from ascom standards org and make sure to install the camera ASCOM driver from Orion s website When in 3rd party camera control programs the camera gain settings can be controlled in the ASCOM setting window for the camera Open the ASCOM camera s...

Page 11: ...ge TEC 35 deg C from ambient 40 deg C from ambient Camera electronic power DC 5v from PC USB port DC 5v from PC USB port Cooler power 12v 3a 12v 3a G21 G26 Color Sensor Sony IMX 269 CMOS 4 3 format Sony IMX571 CMOS APS C format Resolution Up to 5280x3956 Up to 6224 x 4168 Pixel Size 3 3 microns 3 76 microns Diagonal Size of chip 21 8mm 28 3mm Bayer Matrix patter RGGB RGGB Exposure Range 0 1ms 3600...

Page 12: ...3mm Weight 718g Back Focus 17 5mm Cooling Regulated Two Stage TEC Regulated Two Stage TEC 35 deg C from ambient Camera electronic power DC 5v from PC USB port Cooler power 12v 3a StarShoot Mini 6 3mp cameras Sensor IMX 178 Color and Mono Resolution Up to 3040 x 2048 Pixel Size 2 4 microns Diagonal Size of chip 8 86 mm Bayer Matrix Pattern RGGB arrangement Exposure Range 0 244ms 1000s Partial frame...

Page 13: ... blocking Dimension 80mm x 103mm Weight 552g Back Focus 17 5mm Cooling Regulated Two Stage TEC 40 deg C from ambient Camera electronic power DC 5v PC USB port Cooler power 12v 3a G26 Mono Sensor Sony IMX 571 mono CMOS APS C format Resolution Up to 6224x4168 Pixel Size 3 76 microns Diagonal Size of chip 28 3mm Exposure Range 01ms 3600s Partial frame download Region of interest and Sub frame downloa...

Page 14: ...he original retail purchaser only During this warranty period Orion Telescopes Binoculars will repair or replace at Orion s option any warranted instrument that proves to be defec tive provided it is returned postage paid Proof of purchase such as a copy of the origi nal receipt is required This warranty is only valid in the country of purchase This warranty does not apply if in Orion s judgment t...

Reviews: