background image

5

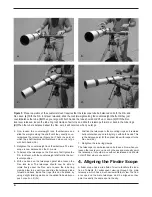
12. To place the finder scope in the finder scope bracket, first

unthread the two black nylon screws until the screw ends
are flush with the inside diameter of the bracket. Place the
O-ring that comes on the base of the bracket over the
body of the finder scope until it seats into the slot on the
middle of the finder scope. Slide the eyepiece end (narrow
end) of the finder scope into the end of the bracket’s cylin-
der that does not have the adjustment screws while pulling
the chrome, spring-loaded tensioner on the bracket with
your fingers. Push the finder scope through the bracket
until the O-ring seats just inside the front opening of the
bracket cylinder. Now, release the tensioner and tighten
the two black nylon screws a couple of turns each to
secure the finder scope in place.

13. Insert the base of the finder scope bracket into the dove-

tail slot on the top of the focuser housing. Lock the bracket
into position by tightening the knurled setscrew on the
dovetail slot.

14. Remove the cover cap on the end of the focuser. Insert the

chrome barrel of the star diagonal into the focuser and
secure with the thumbscrew on the drawtube.

15. Then insert an eyepiece into the star diagonal and secure

it in place with the thumbscrews on the diagonal. (Always
loosen the thumbscrews before rotating or removing the
diagonal or an eyepiece.)

16. Remove the objective lens dust cover and slide the metal

lens shade over the front of the objective lens cell. The
end of the lens shade with the 3 felt tabs should seat
directly on the lens cell.

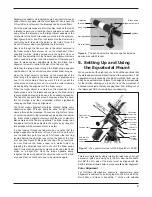
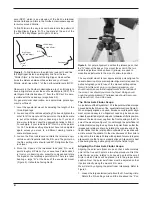
17. Install the polar axis finder scope into its housing inside

the R.A. axis of the equatorial mount (Figure 3). First
loosen the three setscrews on the housing, which is locat-
ed at the rear of the R.A. axis. Remove the rubber O-ring
from the finder and seat it in the groove that is just inside
the housing’s opening. Insert the front end of the polar
finder (the end without the eyeguard) into the housing and
through the O-ring so only about 1" of the polar finder
extends from the back of the housing. Do this slowly and
with a twisting motion to prevent the O-ring from becom-
ing unseated. If it does become unseated, you can
remove the entire housing from the mount to locate the O-
ring and reseat it. This is done by rotating the entire
housing counterclockwise. Once the polar axis finder
scope is in the housing, tighten the three setscrews on the
housing. These setscrews will be used later to align the
finder with the mount’s R.A. axis. Now thread the housing
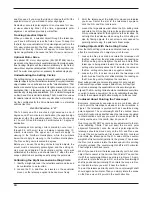
assembly back into the mount (Figure 4).

The Skywatcher 120 is now assembled and should appear as
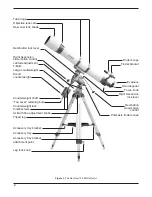
pictured in Figure 1.

3. Balancing the Telescope

To ensure smooth movement of the telescope on both axes of
the equatorial mount, it is imperative that the optical tube is
properly balanced. We will first balance the telescope with
respect to the R.A. axis, then the Dec. axis.

1. Keeping one hand on the telescope optical tube, loosen

the R.A. lock lever. Make sure the Dec. lock lever is locked,
for now. The telescope should now be able to rotate freely
about the R.A. axis. Rotate it until the counterweight shaft
is parallel to the ground (i.e., horizontal).

Setscrew

Pointer

R.A. setting circle

Polar scope 

alignment screw

Polar axis 

finder scope

Figure 3. The polar axis finder scope is shown here
installed in the right ascension (R.A.) housing of the mount.

Date circle

Ring of housing

containing time

meridian indicator

mark

Figure 4. You may find it easier to install the polar axis
finder scope by unthreading the rear part of the R.A.
housing, inserting the finder in it, then rethreading the
assembly back on the mount.

Summary of Contents for Skywatcher 120 EQ 9026

Page 1: ... Consumer Optical Products Since 1975 Customer Support 800 676 1343 E mail support telescope com Corporate Offices 831 763 7000 P O Box 1815 Santa Cruz CA 95061 INSTRUCTION MANUAL Orion Skywatcher 120 EQ 9026 Equatorial Refracting Telescope ...

Page 2: ...erweight shaft Toe saver retaining bolt Counterweight lock thumbscrews Azimuth fine adjustment knobs Tripod leg Accessory tray bracket Accessory tray Accessory tray bracket attachment point Leg lock knob Finder scope Finder bracket Eyepiece Star diagonal Focus knob Right Ascension lock lever Declination slow motion control Polar axis finder scope Figure 1 The SkyView 120 EQ Refractor ...

Page 3: ...tar clusters If you have never owned a telescope we are pleased to welcome you to amateur astronomy Take some time to familiarize yourself with the night sky Learn to recognize the patterns of stars in the major con stellations a star wheel or planisphere available from Orion or from your local telescope shop will greatly help With a little practice a little patience and a reasonably dark sky away...

Page 4: ...the holes in the tray 5 Next tighten the wingnuts at the top of the tripod legs so the legs are securely fastened to the equatorial mount Use the larger wrench and your fingers to do this 6 Orient the equatorial mount as it appears in Figure 1 at a latitude of about 40 i e so the pointer next to the latitude scale located directly above the Orion logo on one side of the mount is pointing to the li...

Page 5: ...hich is locat ed at the rear of the R A axis Remove the rubber O ring from the finder and seat it in the groove that is just inside the housing s opening Insert the front end of the polar finder the end without the eyeguard into the housing and through the O ring so only about 1 of the polar finder extends from the back of the housing Do this slowly and with a twisting motion to prevent the O ring...

Page 6: ...lance point for the optical tube with respect to the Dec axis 5d 7 Retighten the tube ring clamps The telescope is now balanced on both axes Now when you loosen the lock lever on one or both axes and manually point the telescope it should move without resistance and should not drift from where you point it 4 Aligning the Finder Scope A finder scope has a wide field of view to facilitate the loca t...

Page 7: ...the star or planet is also centered on the finder s crosshairs The finder scope is an invaluable tool for finding objects in the night sky its usage for this purpose will be discussed later in detail If when looking through the finder scope you notice that the images appear somewhat out of focus you will need to refo cus the finder scope for your eyes First loosen the lock ring located behind the ...

Page 8: ...nt The telescope should be moved only about its R A and Dec axes The Polar Axis Finder Scope A nice feature of the Skywatcher 120 is the polar axis finder scope housed inside the R A axis of the equatorial mount see Figure 3 When properly aligned and used it makes accurate polar align ment quick and easy to do Alignment need only be done once unless the polar finder gets bumped or otherwise shifts...

Page 9: ...riend hold the flashlight while you look through the polar finder For most accurate polar alignment you will need to know the approximate longitude of your observing site This information can be obtained by looking at a local map Now you must figure the difference between the longitude of your observing site and the closest standard time meridian The standard time meridians are 75 90 105 and 120 f...

Page 10: ... you know Center the star in the telescope s eyepiece Lock the R A and Dec lock levers 4 Loosen the large setscrew just above the R A setting circle and rotate the R A setting circle so the pointer indicates the R A coordinate listed for the bright star in the star atlas Do not retighten the setscrew when using the R A setting cir cles for finding objects the set screw is only needed for polar ali...

Page 11: ...t because asphalt radiates more heat Heat disturbs the surrounding air and degrades the images seen through the telescope Avoid viewing over rooftops and chimneys as they often have warm air currents rising from them Similarly avoid observing from indoors through an open or closed window because the tempera ture difference between the indoor and outdoor air will cause image blurring and distortion...

Page 12: ...im and fuzzy over magnified image Use of 2 Eyepieces Another nice feature of the Skywatcher 120 is its ability to use either 1 25 or 2 barrel diameter eyepieces At low powers long focal lengths 2 eyepieces can give a wider field of view than standard 1 25 eyepieces This is especially desir able for observing deep sky objects as many of them appear quite big but faint If you want to use 2 eyepieces...

Page 13: ...inter than 5th or 6th magnitude In addition to stars the atlas will show the positions of a number of interesting deep sky objects with different symbols representing the different types of objects such as galaxies open star clusters globular clus ters diffuse nebulas and planetary nebulas So for example your atlas might show a globular cluster sitting just above the lid of the Teapot pattern of s...

Page 14: ...to the T ring an eyepiece must be inserted and locked into the body of the camera adapter Start by using a medium low power eyepiece about 25mm you can increase the magnification later with a higher power eye piece Then connect the entire camera adapter with eyepiece inside to the T ring Insert the whole system into the tele scope s focuser drawtube and secure firmly with the setscrew Aim the tele...

Page 15: ...r and the finder scope is covered with foil or some other completely opaque material 9 Care and Maintenance If you give your telescope reasonable care it will last a life time Store it in a clean dry dust free place safe from rapid changes in temperature and humidity Do not store the tele scope outdoors although storage in a garage or shed is OK Small components like eyepieces and other accessorie...

Page 16: ...ption any warranted instrument that proves to be defective provided it is returned postage paid to Orion Warranty Repair 89 Hangar Way Watsonville CA 95076 If the product is not registered proof of purchase such as a copy of the original invoice is required This warranty does not apply if in Orion s judgment the instrument has been abused mis handled or modified nor does it apply to normal wear an...

Reviews: