

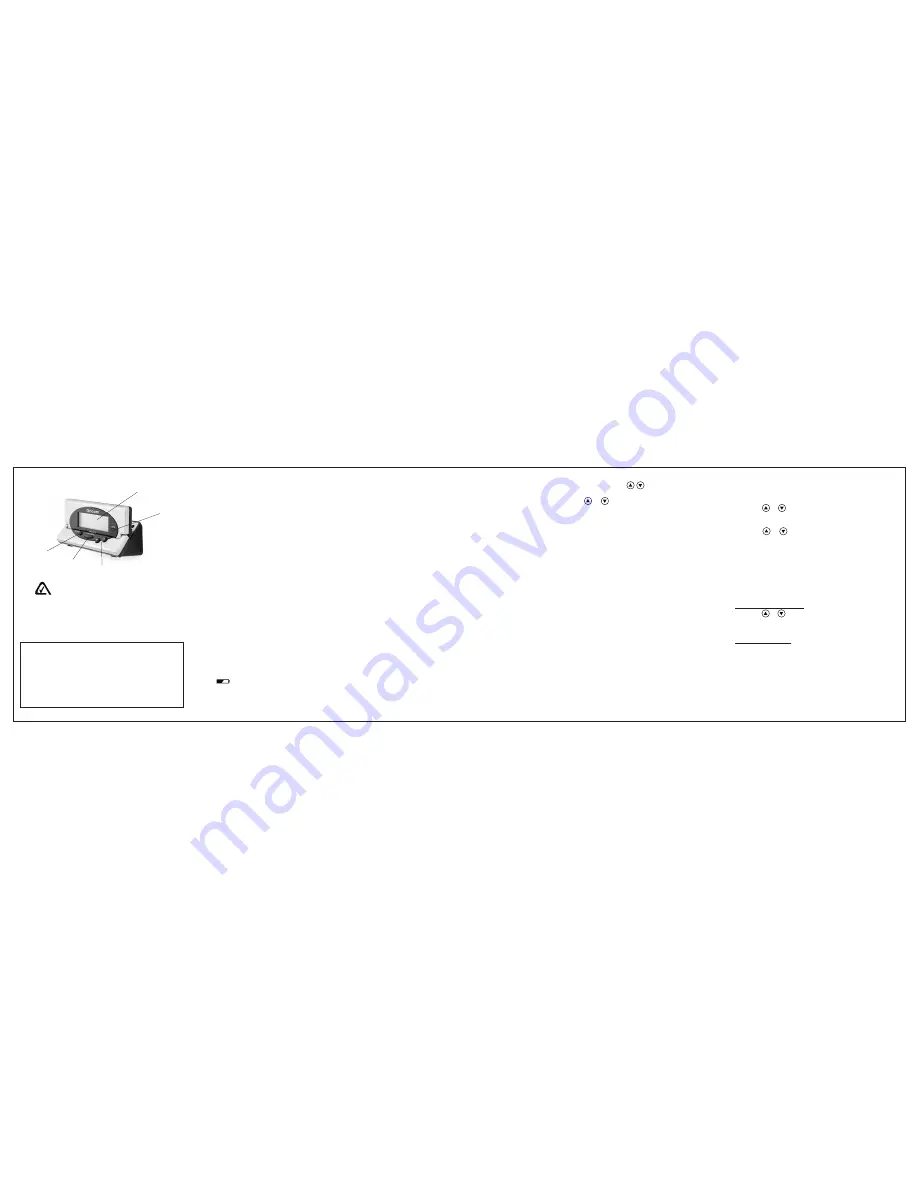
1
Large Display
2
New call record
3
Scroll up and Down
4
Call back button
5
Delete button
Warnings
•
Never remove the battery cover without
disconnecting the telephone from the telephone
line.
•
Do not burn or immerse batteries in water.
•
Do not mix old and new batteries, different types
of batteries (standard, alkaline, or rechargeable),
or rechargeable batteries of different capacities.
The A-Tick symbol shows this product complies with
all current Australian ACA standards.
1
2
3
4
5
Important!
To use this unit you must be in an area where Caller ID service
is provided by your telephone network operator and have a
subscription to the service. When you subscribe to this
service, between the first and second rings, the telephone
company sends the caller’s telephone number and the call’s
date and time.
The Caller ID unit receives and displays this information for
each call and updates the display with the current date and
time. Your Caller ID unit saves up to 99 call records, and then
replaces the oldest call record with each new one.
Installing Batteries
You need three AAA batteries (supplied) to power and protect
the Caller ID unit’s memory during a power failure.
1. Ensure unit is not connected to the telephone line.
2. Use a flat-blade screwdriver to lift the compartment door
on the bottom of the Caller ID unit.
2. Insert the 3 AAA batteries (supplied) into the compartment
as indicated by the polarity symbols (+ and –) marked
inside.
3. Replace the battery cover and snap it closed.
When the first call comes in, the time and date are
automatically set from the Caller ID information provided by
your phone company.
When
appears or the display dims, replace the batteries.
Location of controls
Important!
When you replace the batteries, do not press any buttons on
the Caller ID unit after you remove the old batteries. Doing so
could erase all stored information.
Connecting your CID99
Please connect the CID99 the telephone wall socket.
If you need to connect both telephone and CID99 to the same
wall socket it will be necessary to use a double adaptor (not
supplied).
Positioning the Caller ID Unit
You can set the Caller ID unit flat on a desk, shelf or table, or
mount the Caller ID unit on a wall. You need two screws (not
supplied) with heads larger than the keyhole slots on the
bottom of the base.
1. Drill two holes 38 mm apart at the mounting location.
2. Insert screws into the holes, letting the heads protrude
about 3mm from the mounting surface.
3. Align the keyhole slots on the bottom of the base with the
screws and slide the Caller ID unit down until it is secure.
4. Lift the Caller ID unit’s screen to adjust it to the desired
angle.
Adjusting the Display Contrast
1. Press and hold down
at the same time until
LCD
LCD
LCD
LCD
LCD
CONTRAST
CONTRAST
CONTRAST
CONTRAST
CONTRAST
and 1 2 3 4 5 appear, and 3 flashes.
2. Press
or
to select the contrast level (from 1 – 5).
3. Press
DELETE
to confirm.
Note: If no keys are pressed for 15 seconds, the Caller ID
unit exits setup.
CALLER ID OPERATION
Receiving Calls
During an incoming call,
NEW
appears and the red New Call
light flashes while the phone is ringing. The number of new
and total calls will be displayed. The New Call light flashes
slowly, until all calls are reviewed.
•
The caller’s phone number with the call time and date will
appear.
•
If an incorrect, invalid or incomplete signal is received,
- LINE ERROR -
- LINE ERROR -
- LINE ERROR -
- LINE ERROR -
- LINE ERROR -
appears.
•
If number is unlisted,
- WITHHELD CALL -
- WITHHELD CALL -
- WITHHELD CALL -
- WITHHELD CALL -
- WITHHELD CALL -
appears with
the call time and date.
•
If the number is not available,
- UNAVAILABLE -
- UNAVAILABLE -
- UNAVAILABLE -
- UNAVAILABLE -
- UNAVAILABLE -
appears with the call time and date.
•
For long distance calls,
LONG DISTANCE
LONG DISTANCE
LONG DISTANCE
LONG DISTANCE
LONG DISTANCE
appears.
Reviewing Call Records
Each call record includes the time and date of the call, the
call number (determined by the order in which the calls are
received), the caller’s telephone number.
1. Press
or
to review the calls. Once you have viewed
all the new calls,
END OF NEW CALL
END OF NEW CALL
END OF NEW CALL
END OF NEW CALL
END OF NEW CALL
appears. After you
view all the saved calls,
END OF LIST
END OF LIST
END OF LIST
END OF LIST
END OF LIST
appears.
2. Press
or
to view them again.
Note:
•
If
RPT
appears, you have multiple new calls from the
same number.
•
If you receive a call from a number previously stored in
memory, the old record’s data is replaced with the new
call’s time and date, and
NEW
appears.
Deleting Call Records
Deleting a Single Record
1. Press
or
until you see the record you want to delete.
2. Press
DELETE
twice to delete the record. The remaining
call records are renumbered automatically.
Deleting All Records
1. After reviewing all new messages, press and hold
DELETE
for about 3 seconds.
ERASE ALL CALLS?
ERASE ALL CALLS?
ERASE ALL CALLS?
ERASE ALL CALLS?
ERASE ALL CALLS?
appears.
2. While
ERASE
ERASE
ERASE
ERASE
ERASE
ALL
ALL
ALL
ALL
ALL
CALLS?
CALLS?
CALLS?
CALLS?
CALLS?
appears, press
DELETE
again.
-
-
-
-
-
NO CALLS
NO CALLS
NO CALLS
NO CALLS
NO CALLS
-
-
-
-
-
appears.
To cancel deletion, do not press any buttons. After about 20
seconds,
ERASE ALL CALLS?
ERASE ALL CALLS?
ERASE ALL CALLS?
ERASE ALL CALLS?
ERASE ALL CALLS?
disappears.
1
2
3
4
5


