background image


41 


WALL – MOUNTING 
 
 
If you wish to wall-mount your base, follow the steps below.  Be careful that your 
base is not too far away from power socket and you do not drill through any 
electrical wiring or cables. 
 
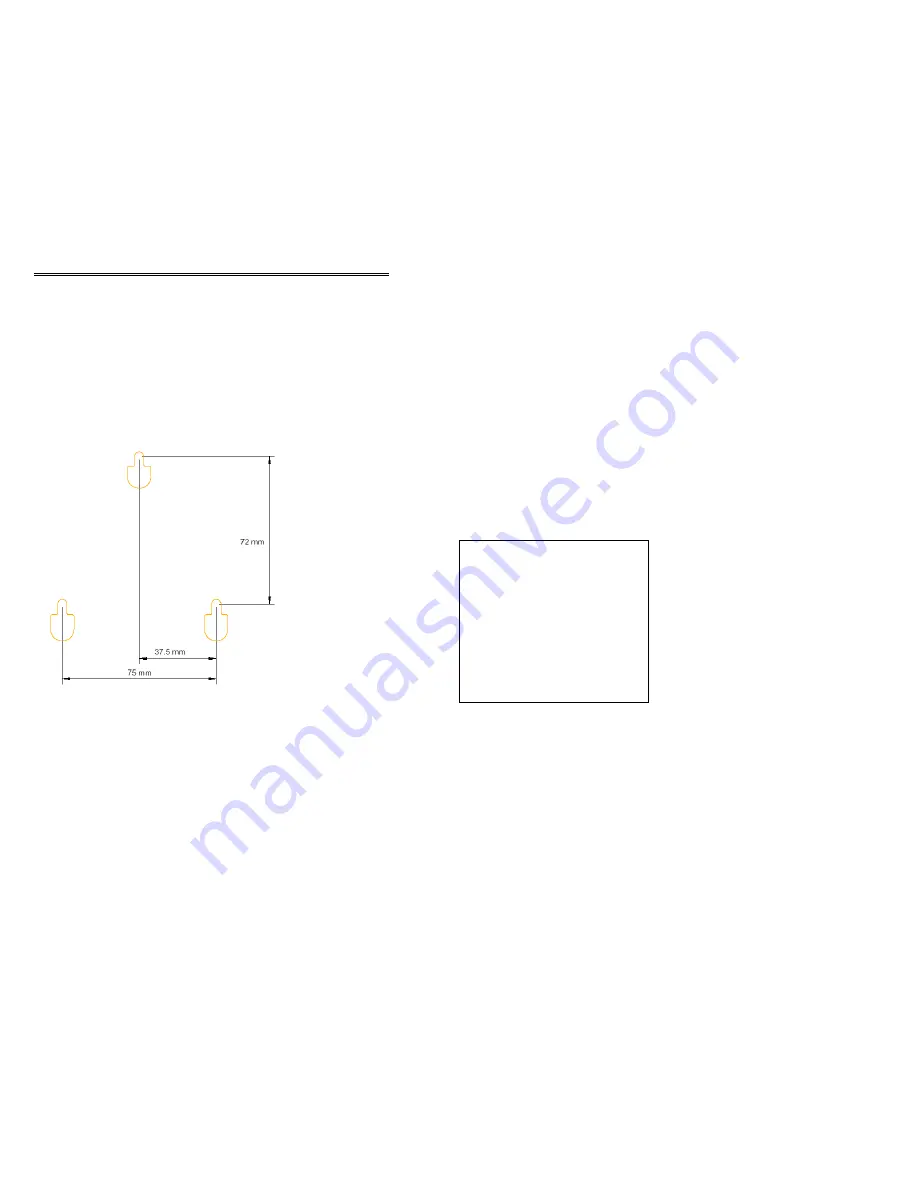
Step 1: Drill three holes using the template provided in the next page. 
 
Step 2: Insert three screws (not supplied) into the drill holes.  Leave   
            approximately 3 mm between the screw head and the wall. 
 
Step 3: Hook your base over the screws. Your base is now ready for use. 


Note:  Not drawn to scale.  For dimensional reference only. 


42 


Warranty Information 


This product is covered by a 12 month warranty against defective workmanship or 
parts. 


The warranty does not extend to damage caused by misuse, negligence, 

excessive voltage, faults on the telephone line or lightning. This guarantee in no 
way affects your statutory rights. Full details of the warranty are contained in the 
enclosed warranty card. 
 
If you feel this product is not working correctly please consult the user guide and 
ensure that you are using the product in accordance with the instructions. 
 
Remove all extra telephone equipment and connect only this telephone directly 
to the telephone socket. 
 
If the fault is still present, connect another telephone (if available) to the 
telephone socket. The results will show you whether the fault lies with this unit or 
with the telephone line.  If the product is working correctly the fault is on the 
telephone line. Please contact your network administrator for assistance 
 
To orders spare parts and in case of any technical issues you may have 
with the product please consult our website for further information or send 
us an email for a prompt response to your enquiry. In the unlikely event of 
a fault developing, please contact us for assistance. If the product is then 
found to be faulty you will be asked to return it directly to us with a copy of 
the purchase receipt. 


Australia 
 

Oricom International Pty Ltd 
PO Box 5681  
South Windsor, NSW 2756 

 
Customer support 

 
Email: [email protected] 
Web: www.oricom.com.au  
Fax: (02) 4572 0939   
Ph:  1300 889 785 


Summary of Contents for C1000 1.8 GHz

Page 1: ...ndby 13 Answering Calls 13 Making Calls 14 Traditional Dialing 14 Predialing 15 Redialing 16 Traditional Dialing 16 Predialing 16 Phonebook Dialing 18 Traditional Dialing 18 Predialing 20 Services Dia...

Page 2: ...er a radiator or heat register This product should not be placed in a built in installation unless proper ventilation is provided Use only the he type of power source indicated on the marking label of...

Page 3: ...sed electrolyte is corrosive and can cause damage to the eyes or skin It can be toxic if swallowed Avoid contact with rings bracelets keys or other metal objects when handling the battery pack These o...

Page 4: ...ling programming press to clear previous digit or press and hold to delete the entire string of numbers Press once to exit programming phonebook redial review Press and hold to exit to Standby from pr...

Page 5: ...turns on during Phone mode Program turns on during Programming mode turn on during Phonebook Programming mode Mute turns on for muted call during Phone mode Phonebook turns on when in Phonebook Ringe...

Page 6: ...for at least 15 hours before first use CAUTION Use only the power adaptors supplied with this product Incorrect adaptor polarity or voltage can seriously damage the unit For Base For POD Input 240 VA...

Page 7: ...maining counter displays 00 00 for a prolonged period of time or is severely inaccurate charge the POD for a full 15 hours and the counter should reset 3 When POD is being charged during talk mode no...

Page 8: ...shall be displayed The Scroll icon shall turn on You can enter up to 44 digits otherwise a reject tone will abort the digit entry 16 Redialing Redialing allows you to call the last dialed number You c...

Page 9: ...one numbers stored in phonebook Refer to the programming section for how to store or edit the phonebook numbers You can use traditional dialing or predialing to call phonebook numbers Traditional Dial...

Page 10: ...last dialed number if it is available vii Exit from the phonebook selection after a while 20 Phonebook Dialing Predialing Press PHONEBOOK key Press 0 9 to select the desired phonebook record The phon...

Page 11: ...nly the last 18 digits shall be displayed The Scroll icon shall turn on 22 Service Centre Quick Access The Service Centre quick access allows you to call a service centre e g your network provider s s...

Page 12: ...Change Dial Tone Pulse dialing can be changed temporarily to tone dialing during a call The phone shall return to pulse dialing when the call is ended Press and will be displayed after the previously...

Page 13: ...record has been selected after pressing PHONEBOOK key press CLEAR key to exit from the phonebook selection or the phone shall automatically exit from the phonebook selection after a while 26 Things y...

Page 14: ...to volume level 1 28 Storing Numbers in the Phonebook You can store up to 10 phone numbers in phonebook Each phone number can hold up to 44 digits The original phone number if any will be overwritten...

Page 15: ...ect tone 3 If there is an incoming call or paging from the base programming will be aborted Note If you have connected this product to an extension on your PBX you may need to dial a particular number...

Page 16: ...ection flashes Press PROGRAM key to confirm the selection Press CLEAR key to exit 32 Programming Users Phone Number Press and hold PROGRAM key during Standby Press 4 to select user phone number progra...

Page 17: ...e number Enter new numbers Press PROGRAM key to confirm the editing Press CLEAR key to exit 34 Programming Service Centre Number Press and hold PROGRAM key during Standby Press 6 to select service cen...

Page 18: ...ding equipment can be connected to the 2 5 mm recording jack on the base unit for call recording Out of Range Warning During phone mode the LED s on the POD flashes RED quickly and the signal icon fla...

Page 19: ...0 9 Press Numbers Dial Press to end call Network Service Press the network service number dial Service Centre Press and hold 0 the service centre number dial Storing a number in phonebook Enter numbe...

Page 20: ...onnected and turned on Sound quality is poor 1 Keep noisy equipment e g fans or computer s away from the base and POD units to avoid excessive noise 2 Terminate the call and call the other party again...

Page 21: ...working correctly please consult the user guide and ensure that you are using the product in accordance with the instructions Remove all extra telephone equipment and connect only this telephone dire...

Reviews: