Orgapack H-2386 Operating Instructions Manual Download Page 10

20

09.09/WE

ORGAPACK OR-T 400

+ / -

+ / -

Fig. 12

1

2

3

=

Fig. 14

1

2

3

=

Fig. 15

1

2

3

4

AUTO

MAN.

SOFT

Fig. 13

1

2

3

=

AUTO

MAN.

SOFT

AUTO

MAN.

SOFT

AUTO

MAN.

SOFT

  A)
  1 

9

 1200 1550  1900  2250  2600  2950  3300  3650 4000 N

 264    341    418    496    573    650    727   804   882 lbs.

  B)
  1 

9

 400    550    700    850   1000  1150  1300  1450 1600 N 

  88     121    154    187    220    253     286   319  353 lbs.

H-2386

1-800-295-5510

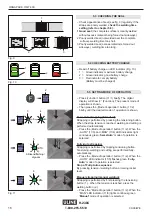
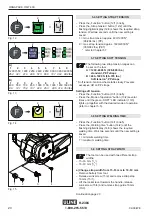
5.6  SETTING STRAP TENSION

–  Press the „Function“ button (12/1) brie

 y.

–  Press the „Strap tension“ button (12/2) until the  

 ashing digital display (12/3) shows the required strap  

  tension. Wait two seconds until the new setting is  
  saved.
  1 = min. strap tension approx. 400/1200 N* 
 

  (88/264 lbs.) (PP)

  9 = max. strap tension approx. 1600/4000 N*
 

  (353/882 lbs) (PET) 

    *  refer to Chapter 5.7

5.8  SETTING WELDING TIME

–  Press the „Function“ button (14/1) brie

 y.

–  Press the „Welding time“ button (14/2) until the     

 ashing digital display (14/3) shows the required  

  welding time. Wait two seconds until the new setting is 
  saved.
  1 = minimum welding time 
  7 = maximum welding time

5.7  SETTING SOFT TENSION

     The following two strap tension ranges can    
    be set on the tool:

A = 1200–4000 N (308–880 lbs.)


standard, PET straps

    B = 400–1600 N (88–335 lbs.)
     

Soft tension*, PP straps

*  Soft tension: tension wheel starts slowly. Prevents  
  excessive dirt on PP straps.

Setting soft tension:

–  Press the „Function“ button (13/1) brie

 y.

–  Press the „Mode of operation“ button (13/2) several  
  times until the green „SOFT“ LED indicator (13/3)  
  lights up together with the desired mode of operation  
  (refer to chapter 5.5).

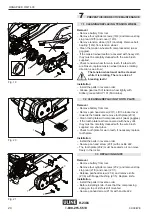
5.9  SETTING STRAP WIDTH

     The tool can be used with two different strap
    widths:
–  15–16 mm (

5

/

8

“)

–  18–19 mm (

3

/

4

“)

a) Change strap width from 15–16 mm to 18–19 mm

–  Remove battery from tool.
–  Release sunk screw (15/2) and remove strap stop
  16 mm (15/1).
–  Lift the rocker lever towards the handle, release
  sunk screw (15/4) and remove strap guide 16 mm
  (15/3).

Continuation page 23

Summary of Contents for H-2386

Page 1: ...T 400 BATTERY HAND TOOL FOR PLASTIC STRAPPING Before using the tool read the operating instructions carefully OPERATING INSTRUCTIONS Patent angemeldet Patent pending Brevet en cours H 2386 H 2386 1 8...

Page 2: ...r l o o T 3 6 7 Preventive and corrective maintenance 25 7 1 Cleaning replacing tension wheel 25 7 2 Cleaning replacing tooth plate 25 5 2 e f i n k g n i c a l p e R 3 7 7 2 g n i t o o h s e l b u o...

Page 3: ...temperature 10 C up to 40 C F 4 0 1 o t p u F 4 1 Relative humidity Up to 90 BATTERY CHARGER BATTERY Battery charger voltage 100 110 230 V Battery charger type BOSCH AL 1860 CV Charging time 20 45 mi...

Page 4: ...oper operation must also be observed CAUTION Used where there is danger to life and health WARNING Used for danger which can cause material damage NOTE Used for general information and information whi...

Page 5: ...from the strap Caution The lower strap will snap forward W Strap could break Do not stand in line with the strap while it is tensioned The strap could break Caution Only strap packed goods Do not put...

Page 6: ...utton Welding time 6 LED indicator Soft tension 7 LED indicator Manual strapping continuous green light 8 LED indicator for Semi Automatic strapping continuous green light Full Automatic strapping ash...

Page 7: ...days it should be remo ved from the tool and charged stored in the battery charger To remove battery from tool depress button on battery and at the same time pull out battery 5 2 OPERATING THE TOOL T...

Page 8: ...5 6 Tensioning welding To perform welding before the strap has been tensioned rst switch to operating mode Manual However the tensioning button must be pressed once before welding The digital display...

Page 9: ...by pressing the tensioning button When the strap tension is reached welding and cutting is performed automatically Press the Mode of operation button 11 2 When the AUTO 11 3 and MAN 11 4 LED indicator...

Page 10: ...n 14 2 until the ashing digital display 14 3 shows the required welding time Wait two seconds until the new setting is saved 1 minimum welding time 7 maximum welding time 5 7 SETTING SOFT TENSION The...

Page 11: ...SWITCH TOUCH PAD LOCK ON AND OFF The touch pad lock can be activated to prevent acciden tal changes to the settings Press and hold the Function button 17 1 and press the tension button 17 2 at the sa...

Page 12: ...heel lightly with Kl ber grease GBU Y 131 Microlube 7 2 CLEANING REPLACING TOOTH PLATE Removal Remove battery from tool Remove pan head screw 20 1 Lift the rocker lever towards the handle and remove t...

Page 13: ...SE Wrong battery ACTION Use the correct battery Restart by removing replacing the battery FAULT Battery too hot CAUSE Battery temperature above 60 C ACTION Let the battery cool down Replace the batter...

Reviews: