NE
3
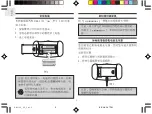
BATTERY INSTALLATION
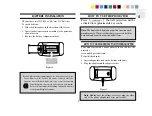
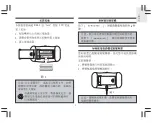
The unit uses two (2) UM-3 or “AA” size 1.5V batteries.
To insert batteries:
1. Slide the battery door in the direction of the arrow.
2. Insert the batteries strictly according to the polarities
shown therein.
3. Replace the battery compartment door.
Figure 2
Note
: Under normal circumstances, the batteries are good for
1 year. However, the battery life can be reduced vastly by
frequent use of the back light, projector or snooze function.
If not disposed of properly batteries can be harmful.
Protect the environment by taking exhausted batteries
to authorized disposal stations.
HOW TO USE THE PROJECTOR
Press [
], the wall projection will be
activated for approximately 8 seconds.
HOW TO USE THE PROJECTOR POWER ADAPTER
Your unit comes with a power adapter so you can use the
projector
for extended period of time.
To install the adapter:
1. Insert adapter into jack on the bottom of the unit.
2. Plug the adapter into the adapter socket.
Figure 3
Note:
The display backlight and projection function work
simultaneously. When [ ] is pressed both the
backlight and projection function will activate.
Note
: Making sure the voltage is correct, plug the other
end of the power adapter into a free wall socket.
313p en.indd 3
2006.9.19 4:32:43 PM
Summary of Contents for RA313P
Page 1: ...PROJECTION CLOCK Model RA313P User Manual...
Page 8: ...1 5 6 p P _ C T _ P 3 1 3 M R M P 9 2 2 4 0 9 8 2 1 RA313P...
Page 10: ...3 AA 1 2 3 8 1 2 UM 3 1 5V 2 3...
Page 15: ...1 RA313P 5 6 p P _ C S _ P 3 1 3 M R M P 5 4 2 6 0 9 8 1...
Page 17: ...3 UM 3 AA 1 5V 1 2 3 1 1 2 2 3 5 6 p P _ C S _ P 3 1 3 M R M P 7 4 2 6 0 9 8 3...
Page 22: ...2006 Oregon Scientific All rights reserved 086L004677 024 C...


