Oregon Scientific DS6310 User Manual Download Page 7


PLAYBACK MODE 

Use the Playback mode to review images you have captured and to review images 
in order to delete them. Select Playback mode by sliding the mode switch to the right. 
The last picture taken is displayed first. If the camera is empty, the display will say 
“No pictures on camera.” Only the active media (SD card or internal memory) is 
displayed. In order to review pictures in internal memory, the SD card must be 
removed. After a picture has been deleted, the camera will return to Playback mode. 
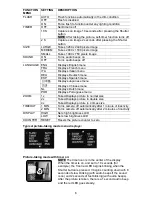
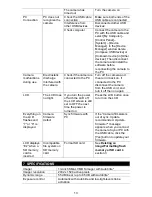
 

PLAYBACK MODE MENUS 

MENU SELECTION 

DESCRIPTION 

Delete 

Confirm delete of current image 

Select Yes or No 

Delete All 

Confirm delete of all images 

Select Yes or No 

Format 

Formats the SD memory card 

Select Yes or No 


USB MODE 

Use the USB mode to download images to your computer and to recharge the 
camera’s battery. The mode selection switch can be in either position (Picture-taking 
or Playback). Connect the mini USB plug to the mini USB socket on the camera and 
connect the larger size USB plug to the USB socket on your computer. You will hear 
a low-high beep when connecting and a high-low beep when disconnecting. All 
camera buttons are inactive during USB mode. 
 

USB MODE ACTIVITY 

ACTIVITY WHAT’S 

HAPPENING 

Blinking green LED 

Charging 

Solid green LED 

Fully-charged 

Medium blinking red LED 

USB waiting for connection 

Solid red LED 

USB connected and transfer data 

Fast blinking red LED 

When connecting camera to PC before 
driver is installed. Please install driver. 


NOTE

 See Section 5 on how to download images to your computer.


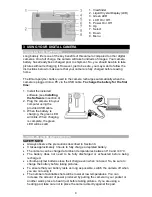
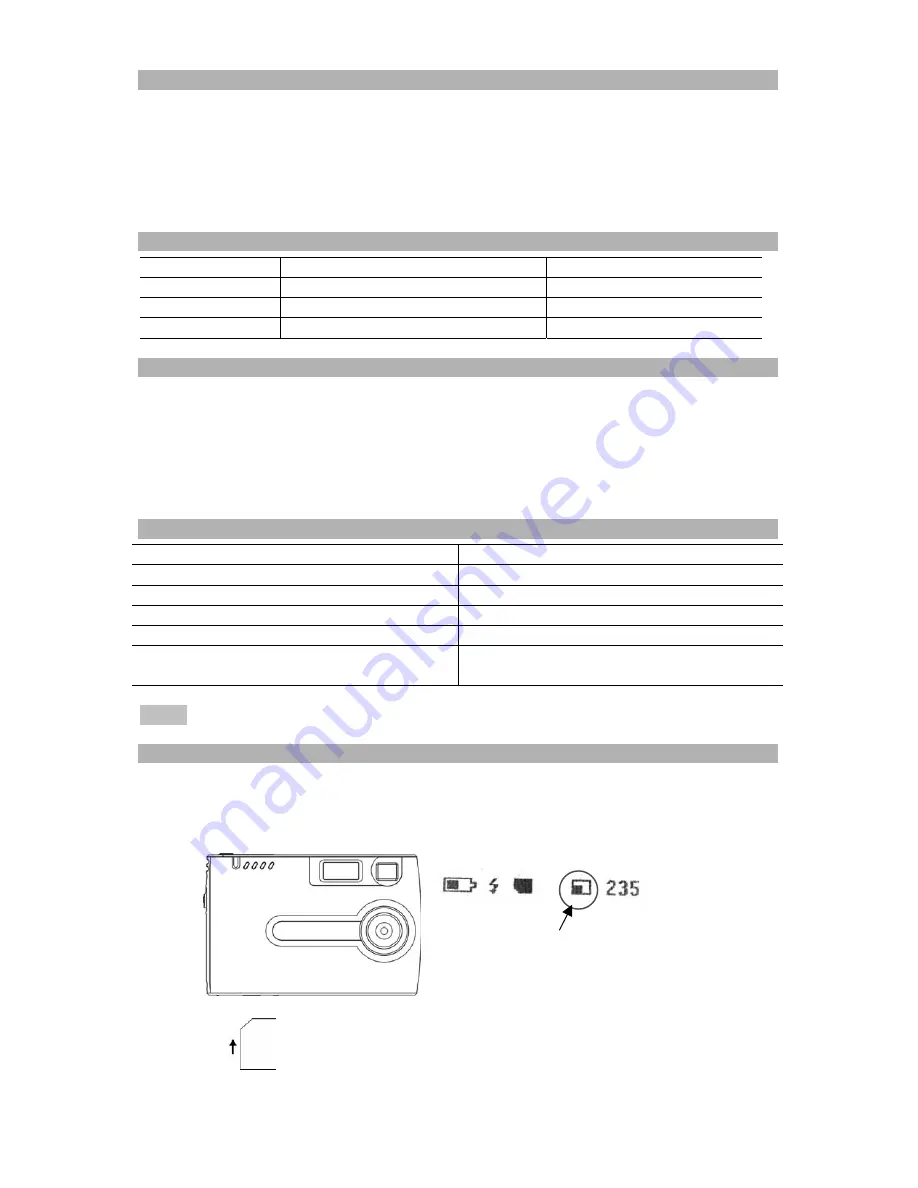
USING SECURE DIGITAL (SD) MEMORY CARDS 

Your camera is capable of storing images on Secure Digital (SD) memory cards. To 
use an SD card, insert the card into the SD slot in your camera. The LCD will show 
the SD card indicator when an SD card is in the slot. 


SD card icon is displayed 
When card is inserted


Insert SD card in the 
card slot 

Summary of Contents for DS6310

Page 1: ...k Mode 7 Playback Mode Menus 7 USB Mode 7 USB Mode Activity 7 Using Secure Digital SD Memory Cards 7 Changing Resolution 8 Turning the Sound On Off 8 Taking Pictures 8 Low Light Lock out 9 Deleting an...

Page 2: ...2 10 Trademarks 16 11 FCC Statement 17 Declaration of Conformity 17 12 EC Declaration of Conformity 17...

Page 3: ...G THE CAMERA CORRECTLY Due to the extremely compact size and light weight of the camera it is critical that you hold the camera securely in order to avoid camera shake The camera is particularly sensi...

Page 4: ...4 2 Plug the camera into your computer using the provided USB cable 3 When the battery is charging the green LED will blink When charging is complete the green LED will be solid LITHIUM POLYMER BATTER...

Page 5: ...ample charge The battery is approximately half charged Suggest charging it before next use The battery has no charge Please recharge immediately Secure digital card indicator Strobe indicator Flashes...

Page 6: ...ese menu NL Displays Dutch menu LANGUAGE POR Displays Portuguese menu 1x Takes Displays picture in normal size 2x Takes Displays picture in double size ZOOM 4x Takes Displays picture in 4 times size 1...

Page 7: ...ion switch can be in either position Picture taking or Playback Connect the mini USB plug to the mini USB socket on the camera and connect the larger size USB plug to the USB socket on your computer Y...

Page 8: ...web site SIZE RESOLUTION SIZE OF AVAILABLE SHOTS 16MB INTERNAL MEMORY Large 3264 x 2448 pixels 3 Medium 2000 x 1500 pixels 7 Small 1000 x 750 pixels 15 To change the resolution 1 Turn the camera on a...

Page 9: ...Mode Playback Mode to Playback 2 Press the Menu button and select Delete 3 Use the Up Down arrow buttons to select Yes to delete the image or No to save the image 4 Press the Select button to confirm...

Page 10: ...D ROM drive 2 The introduction screen will appear automatically 3 Click ArcSoft PhotoImpression 5 0 7 Click Next 4 Choose Setup Language 8 Click Next 5 Click Next 9 Click Finish 6 Click Yes NOTE To fi...

Page 11: ...ilable USB port using the provided USB cable The Windows operating system requires that you install drivers for the camera so that the camera and computer can communicate properly To do this 1 Connect...

Page 12: ...subject Image appears blurred or dark The lens is dirty Clean the lens with a soft cloth Flash has not finished charging Wait until the green LED is steady Flash does not go off as expected The flash...

Page 13: ...camera from the USB cord and turn it off then on again LCD The LCD does not light If you turn the power off with the LCD off the LCD screen is still set to OFF the next time the power is turned on Pr...

Page 14: ...ding protruding lens Weight Approx 80 grams Battery specification Lithium polymer battery rechargeable non removable Operation environment Temperature Approx 0 C 40 C 32 F 104 F Humidity 80 or less no...

Page 15: ...swallowed Flush your mouth thoroughly with water Drink large quantities of water and induce vomiting Then seek medical assistance HANDLING YOUR DIGITAL CAMERA SAFELY This camera contains precision el...

Page 16: ...with this product 9 ABOUT OREGON SCIENTIFIC Visit our website www oregonscientific com to learn more about Oregon Scientific products such as digital cameras MP3 players children s electronic learnin...

Page 17: ...uraged to try to correct the interference by one or more of the following measures Reorient or relocate the receiving antenna Increase the separation between the equipment and receiver Connect the equ...

Reviews: