background image

EN

5

•   Connection between the main unit and the sensor  
  that collects RF signals (   )
•   RF signal reception (   )
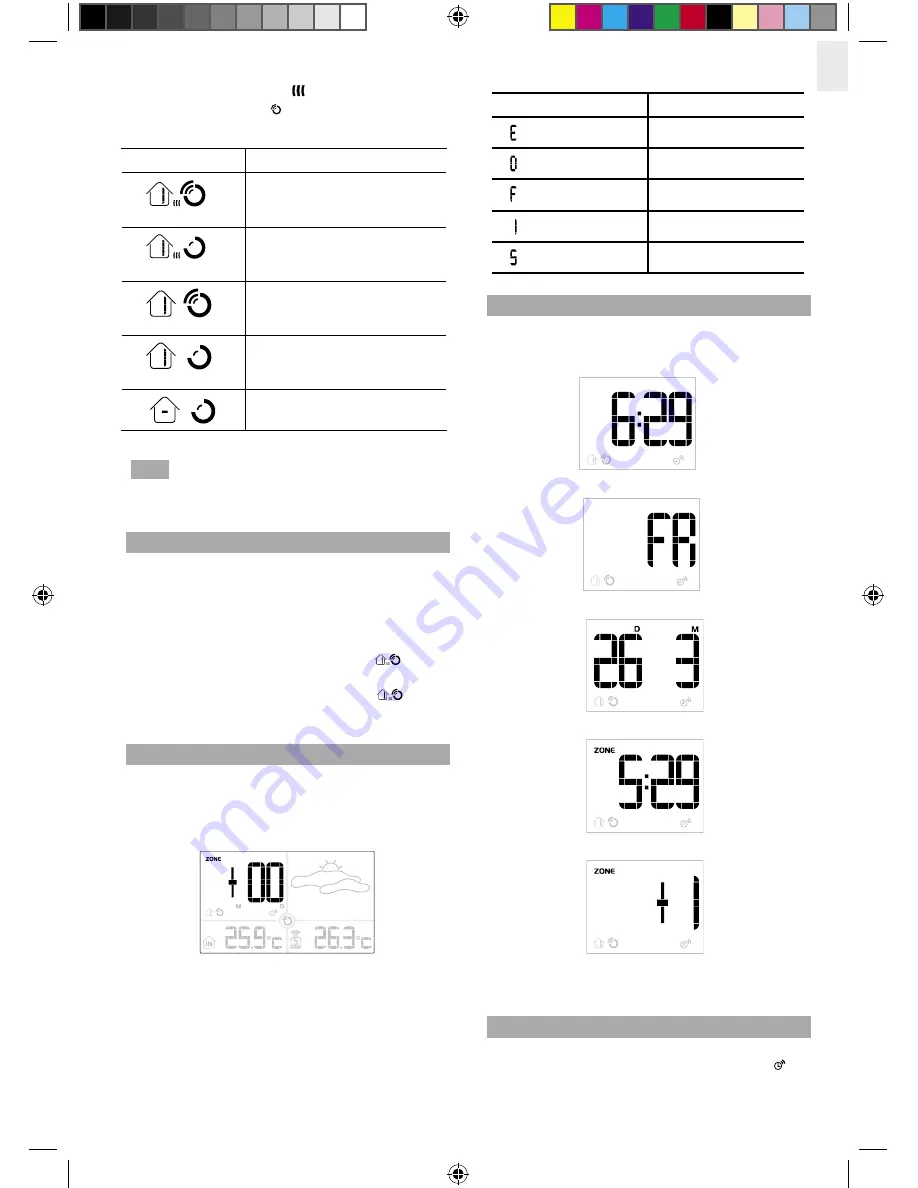
 How these signals work together:

ICON

MEANING


The unit has contact with 
the remote sensor and has 
synchronized the time.


The unit has contact with the 
remote sensor but the time has 
not been synchronized


The unit has lost contact with 
the remote sensor but the time 
is synchronized


The unit has lost contact with 
the remote sensor but the time 
is not synchronized


The unit cannot reach the 
remote sensor.

NOTE

  To  force  a  manual  search  for  the  RF  clock 

reception,  press  and  hold 

SEARCH

  on  the  sensor 

(RTHR328N).

TURN RADIO-CONTROLLED CLOCK ON / OFF

If  you  wish  to  manually  set  the  clock,  you  must  first 
disable  the  radio-controlled  feature. To  do  this,  make 
sure you are not in Setting Mode, then press and hold 

DOWN

 on the main unit for 2 seconds. To enable it, hold 

UP

 for 2 seconds.

•   When the RF clock is enabled this icon 

 will  

  appear on the display.
•   When the RF clock is disabled this icon 

 will  


NOT

 appear on the display.

SET CLOCK

You only need to do this if you have disabled the radio-
controlled clock, or if you are too far from a RF signal.
1.  Press and hold 

MODE / LIGHT

 for 2 seconds to  

  enter Setting Mode.

                   
2.  The setting will blink to indicate it can now be  
  changed.
3.  Press 

UP

 or 

DOWN

 to change the setting.

4.  Press 

MODE / LIGHT

 to confirm the setting and  

  move to the next one. The order of the settings is: 
  time zone hour offset (+ / -23 hours), 12 / 24 hour  
  format, hour, minute, year, date / month format,  
  month, date, display language and hourly chime  
  (

ON / OFF

).

You can select 1 of the 5 following languages:

SYMBOL

LANGUAGE

English

German

French

Italian

Spanish

SWITCH CLOCK DISPLAY

Press 

MODE / LIGHT

 to toggle between the following 

clock displays:

•  RF time with hour-offset time (HH:MM)


 •  Day of the week


•  Calendar

                          
•  RF time without offset 


•  Time-zone hour-offset setting

                          
Each display will be backlit for 5 seconds and will return 
to the main screen display after 10 seconds.

HOURLY CHIME

The hourly chime function when set to ON will beep once 
at the beginning of every hour, and the chime icon   will 
show on the display.

BAR283_EN.indd   5

3/17/06   6:33:48 PM

P/N: 086L004374-016_EN REV1

6/10

Summary of Contents for BAR283

Page 1: ...Jumbo Weather Station Model BAR283 User Manual P N 086L004374 016_EN REV1 1 10...

Page 2: ...step instructions as well as technical speci cations and warnings you should know Jumbo Weather Station Model BAR283 USER MANUAL CONTENTS Introduction 1 Product Overview 2 Front View 2 Back View 2 LCD...

Page 3: ...um minimum and current readings 3 Weather Forecast Area Animated weather forecast 4 Outdoor Temperature Area Maximum minimum and current readings sensor channel number Clock Alarm Calendar Area 1 2 3...

Page 4: ...ttery change To install the main unit batteries NOTE Do not use rechargeable batteries shows when batteries are low UNIT LOCATION Main Clock Alarm Calendar Area Remote Sensor Outdoor Temperature Area...

Page 5: ...periment with various locations to get the best results SENSOR DATA TRANSMISSION Data is sent from the sensor s every 60 Seconds The reception icon shown in the Outdoor Temperature Area indicates the...

Page 6: ...icon will NOT appear on the display SET CLOCK You only need to do this if you have disabled the radio controlled clock or if you are too far from a RF signal 1 Press and hold MODE LIGHT for 2 seconds...

Page 7: ...rometric pressure trend readings The LCD display shows an animated icon indicating the forecasted weather WEATHER FORECAST ICONS ICON DESCRIPTION Day Night Clear Day Night Partly cloudy Cloudy Rainy S...

Page 8: ...separately for special treatment is necessary NOTE The technical speci cation of this product and contents of this user manual are subject to change without notice Images not drawn to scale TROUBLESHO...

Page 9: ...the information you need on our website however if you re in the US and would like to contact the Oregon Scienti c Customer Care department directly please visit www2 oregonscienti c com service defau...

Page 10: ...2006 Oregon Scientific All Rights Reserved 086L004374 016 P N 086L004374 016_EN REV1 10 10...

Reviews: