background image

11

GB

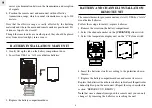
If you wish to disable the auto-reception feature, press the 

[ TIME /

 ]

 button for three seconds. The radio reception signal 

[ ] 

will

disappear. The unit will not respond to radio signals.

To enable the feature again, press the

 [ TIME / 

 ]

 button for three

seconds.

The radio reception signal [ ] will start blinking to initiate reception

automatically.

HOW TO SET THE CLOCK MANUALLY

To set the clock manually, hold 

[ MODE/SET ]

 for three seconds.

The  hour  digits  will  blink.

Press 

[ TIME / 

 ]

 or 

[ TIME / 

 ]

 select the hour. Keep pressing

the button to increase or decrease the value rapidly.

Press 

[ MODE/SET ]

 to confirm. The minute digits will blink.

Repeat  the  same  procedure  to  set  the  minutes,  hour,  current  day,
month, display language, weekday and hour offset for the 2nd time
zone.

Note:

 The time and date are displayed in 24-HOUR clock format.

For the language display, you can choose among English (E), German
(D), French (F) and Italian (I). Weekday is in the usual sequence of
Monday  through  Sunday.

For the 2nd time zone, which is indicated by the ZONE icon, enter

the hour offset using the 

[ TIME / 

 ]

 and 

[ TIME / 

 ]

 buttons

and the BAR122HG will calculate the second zone-time accordingly.

If there is an item you do not wish to change, simply press 

[ MODE/

SET ]

 to bypass the item.

When you are done, press 

[ MODE/SET ]

 to exit. The display will

return to the mode last chosen.

HOW TO SET AND ARM THE ALARMS

The BAR122HG has two alarms, ALARM 1 and ALARM 2. They
can  be  invoked  together  or  independently.

To set an alarm:

1.

Press 

 ]

 once to select ALARM 1 or again to select

ALARM 2.

 T

he last selected time of the alarm will be displayed.

If you have never set the alarm before, the time will be displayed
as 0:00.

2. Press  

[


]

 for three seconds. The hour digits will

blink.

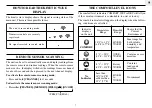
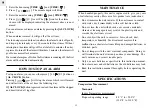
- Strong

- Weak

- No signal

- Receiving

Summary of Contents for BAR122HG

Page 1: ...mation in outdoor temperatures and relative humidity radio frequency RF controlled calendar clock clock display of 2nd time zone and dual daily alarms Also the main unit can support up to three remote sensors Other features include weekday display in four abbreviated languages four step crescendo alarm and interchangeable clock display modes MAIN FEATURES MAIN UNIT A B C G H 4 3 3 M H z C A B L E ...

Page 2: ...en the alarm time is displayed I TIME BUTTON Decreases the value of a setting J TIME BUTTON Advances the value of a setting K 24 hr OFF BUTTON Displays the alarm time or changes the alarm set time L ON OFF BUTTON TEMP RH ALARM Enables disables HI LO temp alarm and HI LO RH alarm M HI LO BUTTON TEMP RH ALARM Set the upper or lower temperature alarm limits of individual channels Confirms alarm setti...

Page 3: ... E RESET Returns all settings to default values F BATTERY COMPARTMENT Accommodates two AAA size batteries G BATTERY DOOR H WALL MOUNT HOLDER Supports the remote unit in wall mounting I REMOVABLE TABLE STAND For standing the remote unit on a flat surface BEFORE YOU BEGIN For best operation 1 Assign different channels to different remote units 2 Insert batteries for remote units before doing so for ...

Page 4: ... compartment door BATTERY AND CHANNEL INSTALLATION REMOTEUNIT The remote thermo hygro sensor unit uses two 2 UM 4 or AAA size alkaline batteries Follow these steps to install replace batteries 1 Remove the screws on the battery compartment 2 Select the channel number on the CHANNEL slide switch 3 Select the temperature display unit on the C F slide switch 4 Insert the batteries strictly according ...

Page 5: ...mote unit Wall mount Table Stand THE RESET BUTTON This button is only used when the unit is operating in an unfavorable way or malfunctioning Use a blunt stylus to hold down the button All settings will return to their default values GETTING STARTED Once batteries are placed in a given remote sensor unit it will start transmitting information at 40 second intervals Also for approximately a 3 minut...

Page 6: ...displayed in the box under the kinetic wave DISCONNECTED SIGNALS If without obvious reasons the display for a particular channel goes blank press CHANNEL MEMORY to enforce an immediate search If that fails check 1 The remote unit of that channel is still in place 2 The batteries of both the remote unit and main unit Replace as necessary Note that when the temperature falls below freezing point the...

Page 7: ...e Press and hold CHANNEL for 2 seconds To deactivate the remote sensor scanning mode Presseither CHANNEL MEMORY HI LO ON OFF TEMP RH AL THE COMFORT LEVEL ICONS The comfort level indicators COMFORT WET or DRY will tell you if the curent environment is comfortable too wet or too dry The comfort indicator will appear on the display when the follow ing conditions are satisfied Indicator displays on th...

Page 8: ...d 2 Press MEMORY once to display the maximum temperature and humidity and again the minimum temperature and humidity The respective indicators MAX or MIN will be displayed To clear the memory Press and hold MEMORY for 2 seconds Ifyoupress MEMORY now themaximumandminimumrecordings will have the same values as the current ones until different readings are recorded HOW TO USE CHANNEL 1 TEMPERATURE HU...

Page 9: ...e alarm If in another channel other than channel one is selected when the alarm activates the display will switch to channel 1 and the display will flash If left untouched the alarm will activate for a 1 minute Press CHANNEL MEMORY HI LO ON OFF to TEMP RH AL momentarily stop the alarm The alarm will activate again if the limit continues to exceed the set limit Note If a second limit is passed whil...

Page 10: ...l toggle the display in the above order Note The bottom line of the display will be replaced by the alarm time if the button is pressed ABOUT RADIO RECEPTION The BAR122HG is designed to automatically synchronize its calendar clock once it is brought within range of the Frankfurt DCF77 radio signal When the BAR122HG is within range its radio control mechanism will override all manual settings When ...

Page 11: ... date are displayed in 24 HOUR clock format For the language display you can choose among English E German D French F and Italian I Weekday is in the usual sequence of Monday through Sunday For the 2nd time zone which is indicated by the ZONE icon enter the hour offset using the TIME and TIME buttons and the BAR122HG will calculate the second zone time accordingly If there is an item you do not wi...

Page 12: ...utton is pressed instead the alarm will be stopped and deactivated all together MAINTENANCE When handled properly this unit is engineered to give you years of satisfactory service Here are a few product care instructions 1 Do not immerse the unit in water If the unit comes in contact with water dry it immediately with a soft lint free cloth 2 Do not clean the unit with abrasive or corrosive materi...

Page 13: ...ressly approved by the party responsible for compliance could void the user s authority to operate the equipment R TTE Compliance Note This device complies with the essential requirements of Article 3 of the R TTE 1999 5 EC Directive if used for its intended use and that the following standard s has been applied Electromagnetic compatibility Article 3 1 b of the R TTE Direc tive Applied standards ...

Page 14: ...14 GB COUNTRIES RTTE APPROVAL COMPLIED Austria Belgium Denmark Finland France Germany Greece Italy Luxembourg Netherlands Portugal Spain Sweden UK and Ireland ...

Reviews: