background image

23

Table des matières

Consignes de sécurité   

 24

Caractéristiques de l’appareil   

 26

Premiers pas  

 27

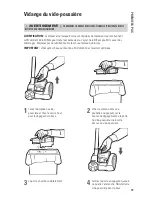
Vider la vide-poussière  

29

Dépannage   

 30

Garantie   

 31

SI VOUS AVEZ BESOIN D’AIDE

Veuillez appeler au 

1 800 989-3535

 (lundi au vendredi de 8 h à 17 h HNE) pour 

parler avec un représentant du service à la clientèle ou visitez notre site internet au 

OreckCommercial.com


GUIDE D’UTILISATION

Pour utilisation avec le modèle CK20110.

IMPORTANT :

 LISEZ ATTENTIVEMENT LE PRÉSENT GUIDE D’UTILISATION 

AVANT D’ASSEMBLER ET D’UTILISER L’APPAREIL. CE PRODUIT EST DESTINÉ 

À UN USAGE COMMERCIAL SEULEMENT.

Summary of Contents for CK20110

Page 1: ...Rechargeable Sweeper User Manual For use with model CK20110 IMPORTANT READCAREFULLYBEFOREASSEMBLYANDUSE THISPRODUCTISINTENDEDFORCOMMERCIALUSEONLY...

Page 2: ...hank you for choosing an Oreck Commercial product IF YOU NEED ASSISTANCE Please call 1 800 989 3535 Mon Fri 8am 7pm EST to speak with a customer service representative or visit our website at OreckCom...

Page 3: ...3 Table of Contents Safety Instructions 4 Product Features 6 Getting Started 8 Emptying The Dirt Cup 10 Troubleshooting 11 Warranty 12 Espa ol 13 Le Fran ais 23...

Page 4: ...e of dust lint hair and anything that may reduce air flow Keep hair loose clothing fingers and all parts of body away from openings and moving parts Use extra care when cleaning on stairs To avoid per...

Page 5: ...SPOSAL WARNING RISK OF EXPLOSION OR EXPOSURE TO TOXIC MATERIAL Upon removal cover the battery packs terminals with heavy duty adhesive tape Do not attempt to destroy or disassemble battery pack or rem...

Page 6: ...oduct Features A Handle Grip B Upper Handle Tube C Lower Handle Tube D Dirt Cup E Brushroll F On Off Button G Charger H Dirt Cup Handle I Dirt Cup Release Button J Charger Indicator Light K Charger In...

Page 7: ...7 A B G H J I K B C D E F PRODUCT FEATURES...

Page 8: ...1 Attach handle grip A to one of the upper handle tubes B 3 Next attach upper handle assembly to lower handle tube C 4 Last insert handle assembly into base 2 Then attach the other upper handle tube...

Page 9: ...4 hours before first use Charging 1 Connect wall charger to the outlet 2 Plug charger into charging inlet located on the base of the unit The indicator light will illuminate when cleaner is charging U...

Page 10: ...hroll IMPORTANT For best results empty after each use 1 Grasp dirt cup handle and pull up and out of base 3 The door will swing open 4 Press dirt cup door closed until it is latched into place Return...

Page 11: ...ting weak Charge the battery Dust escaping from sweeper 1 The dirt cup may be full Empty the dirt cup Battery will not charge 1 The power button may be in the ON position Press power button to turn to...

Page 12: ...of Oreck Commercial owner s acts or omissions use outside the country in which the product was initially purchased and resales of the product by the original owner This warranty does not cover pick u...

Page 13: ...NTY ndice Instrucciones de seguridad 14 Caracter sticas del producto 16 C mo comenzar 18 Vaciado de la copa de recolecci n de residuos 20 Resoluci n de problemas 21 Garant a 22 SI NECESITA AYUDA Llame...

Page 14: ...s cabello y cualquier otro elemento que pueda disminuir el flujo de aire Evite que el cabello la ropa suelta los dedos y cualquier otra parte del cuerpo entren en contacto con las aberturas y las piez...

Page 15: ...XICO Una vez que extraiga la bater a deber cubrir los terminales de los paquetes de la bater a con cinta adhesiva para servicio industrial No intente destruir ni desarmar el paquete de bater a ni extr...

Page 16: ...C Tubo del mango inferior D Copa de recolecci n de residuos E Cepillo giratorio F Bot n de encendido apagado G Cargador H Mango de la copa de recolecci n de residuos I Bot n de extracci n de la copa...

Page 17: ...17 A B G H J I K B C D E F CARACTER STICAS DEL PRODUCTO...

Page 18: ...ango A a uno de los tubos del mango superior B 3 A continuaci n conecte el conjunto del mango superior al tubo del mango inferior C 4 Por ltimo inserte el conjunto del mango en la base 2 Luego conecte...

Page 19: ...rimer uso Carga 1 Conecte el cargador de pared al tomacorriente 2 Enchufe el cargador en la entrada de carga ubicada en la base de la unidad La luz indicadora se iluminar cuando la aspiradora se est c...

Page 20: ...ecci n de residuos y tire de ella hacia arriba y afuera de la base 3 La puerta se abrir oscilando 4 Cierre la puerta de la copa de recolecci n de residuos hasta que encaje en su lugar Vuelva a colocar...

Page 21: ...tando la bater a Cargue la bater a Sale polvo de la barredera 1 Es posible que la copa de recolecci n de residuos est llena Vac e la copa La bater a no se carga 1 Es posible que el bot n de encendido...

Page 22: ...al actos u omisiones del propietario el uso fuera del pa s en el que se compr el producto originalmente y las reventas del producto por parte del comprador original Esta garant a no cubre la recolecci...

Page 23: ...ppeler au 1 800 989 3535 lundi au vendredi de 8 h 17 h HNE pour parler avec un repr sentant du service la client le ou visitez notre site internet au OreckCommercial com GUIDE D UTILISATION Pour utili...

Page 24: ...nipulez pas le chargeur y compris la fiche et les bornes ni l appareil si vous avez les mains mouill es N ins rez aucun objet dans les ouvertures N utilisez pas l appareil si les ouvertures sont obstr...

Page 25: ...NEZ LA SI VOUS NE POUVEZ TOUJOURS PAS L INS RER COMMUNIQUEZ AVEC UN LECTRICIEN QUALIFI POUR FAIRE INSTALLER UNE PRISE APPROPRI E NE MODIFIEZ LA FICHE EN AUCUN CAS AVERTISSEMENT RELATIF L LIMINATION DE...

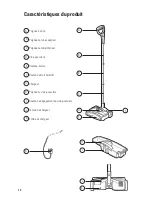
Page 26: ...e du tube sup rieur C Poign e du tube inf rieur D Vide poussi re E Rouleau brosse F Bouton de marche arr t G Chargeur H Poign e du vide poussi re I Bouton de d gagement du vide poussi re J T moin du...

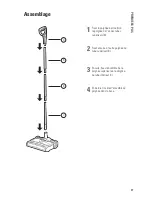
Page 27: ...rise A la poign e de l un des tubes sup rieurs B 3 Ensuite fixez l ensemble de la poign e sup rieure la poign e du tube inf rieur C 4 En dernier ins rez l ensemble de poign e dans la base 2 Fixez ensu...

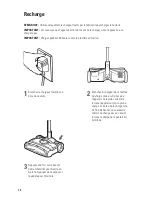
Page 28: ...ion Recharge 1 Branchez le chargeur mural une prise de courant 2 Branchez le chargeur dans l entr e de charge situ e sur la base de l appareil Le t moin s allumera lorsque l appareil est en cours de c...

Page 29: ...sation afin d obtenir des r sultats optimaux 1 Tenez la poign e du vide poussi re et tirez le vers le haut pour le d gager de la base 3 La porte s ouvrira compl tement 4 Fermez la porte en appuyant ju...

Page 30: ...ssi re s chappe de l appareil 1 Le vide poussi re est peut tre plein Videz le vide poussi re La pile ne se charge pas 1 Le bouton de marche arr t doit tre la position OFF Appuyez sur le bouton d alime...

Page 31: ...pays o le produit a t achet et la revente du produit par le premier propri taire La pr sente garantie ne couvre pas le ramassage la livraison le transport ni les r parations domicile Toutefois si vou...

Page 32: ...OreckCommercial com IMAGES MAY DIFFER FROM ACTUAL PRODUCT 2016 TECHTRONIC FLOORCARE TECHNOLOGY LIMITED 961152009...

Reviews: