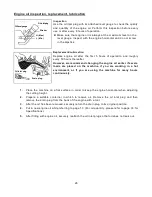
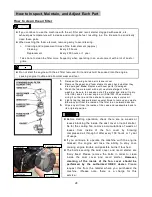
background image

19

6. 

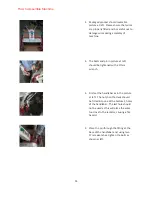
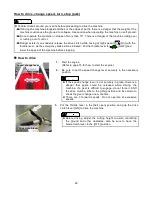
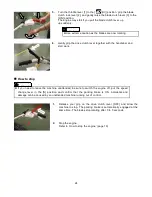
Grip the starter knob, pull slowly until you feel tension and then pull 
strongly from this position. 
Immediately after the engine has started, slowly return the start 
knob to its original position. 

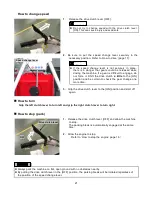
7.

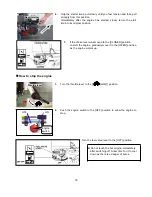
If the choke lever was moved to the [CLOSED] position 

to start the engine, gradually move it to the [OPEN] position 
as the engine warms up. 

„

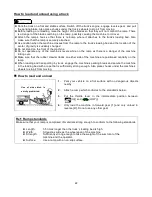
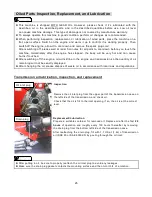
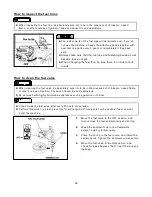
How to stop the engine 

1. 

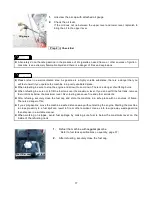
Turn the throttle lever to the [            (LOW)] position. 

2. 

Push the engine switch to the [OFF] position to allow the engine to 
stop. 

Turn the fuel valve lever to the [OFF] position. 

z

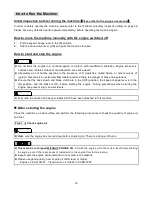
 Do not touch the hot engine immediately 

  after switching off. Allow time for it to cool   

down as there is a danger of burns. 

Throttle lever

WARNING

Recoil starter 

Engine 

switch 

ON 

OFF 

Summary of Contents for AHRC 663

Page 1: ...n you purchase this machine please ask the retailer to explain the safest way to operate it Please keep these operating instructions and the warranty safe so that they may be easily referred to at any...

Page 2: ...is machine is designed to cut overgrown weeds and brush it is not a lawn mower Therefore it can not offer the same quality cut as a finishing mower This machine is designed for agricultural areas and...

Page 3: ...25 Engine oil inspection replacement lubrication 26 How to Lubricate Each Part 27 How to Inspect Maintain and Adjust Each Part 28 How to clean the air filter 28 How to inspect the fuel lines 29 How t...

Page 4: ...ar maintenance and inspection as outlined on page 39 Warning Symbols The warning symbols are attached to the machine to draw attention to particularly serious dangers Please be sure to fully understan...

Page 5: ...talled engine will be slightly different In the case that these warning symbols become difficult to see please replace them so that they can be easily seen and understood 0220 70800 0220 70700 0220 70...

Page 6: ...owner s responsibility that the following measures are carried out The owner should explain how to operate the machine and have new operator fully read these instructions The owner should then guide...

Page 7: ...spills can cause fire and other accidents Do not remove the refueling nozzle from the fuel tank until you have finished refueling Fuel spills can cause fire and other accidents Caution when starting t...

Page 8: ...educe the possibility of accidents Long sleeves long pants Protective glasses Non slip shoes Gloves Helmet Ear protection Cuffs loose clothing and jewelry can become entangled in the machine Avoid wea...

Page 9: ...p the blades when not cutting weeds or brush Taking precautions can avoid injury and accidents The person using this machine should always operate it from behind handlebar side When this machine s eng...

Page 10: ...Look out for holes in the ground and protruding tree roots Also look out for obstructions that could be hidden in long weeds and brush The handlebars can be taken from your control causing injury and...

Page 11: ...orm comprehensive inspection and adjustment of such parts as drive clutch blade clutch brake throttle and gear change When rubber fuel lines become old they can split and dangerous fuel leaks can occu...

Page 12: ...ch lock lever 3 Blade clutch lever Throttle lever 10 Steering clutch lever 4 Speed change lever 5 Cutting height adjustment lever 6 Front wheels 7 Handlebar up down lever 9 Engine stop switch Guide ro...

Page 13: ...ise the blade clutch lever 3 until it is in the lock position To stop release your grip on the blade clutch lock lever 2 and the blade clutch lever will automatically return to its lowered position Po...

Page 14: ...l loss of power output Wear and tear of the blades occurs extremely quickly Blades may break soon 6 Front wheels The front wheels run freely enabling smooth steering on level ground 7 Handlebar up dow...

Page 15: ...with a 17mm wrench 3 First set the handlebar as in the picture at left The notch on the deck should be fitted into one of the bottom 3 holes of the handlebar The last hole should not be used as this w...

Page 16: ...ne 1 14x17mm Double Ended Wrench c One 1 Pair Anti Fog Safety Goggles d Four 4 Axle Pins Note When replacing axle pins please use only pins supplied by OREC for use on the AHRC663 These are specially...

Page 17: ...mable liquid and there is a danger of fires and explosions Ensure that the drive clutch and blade clutch are in the OFF position the speed change lever is in the N position and the brake is ON before...

Page 18: ...efueling be sure not to fill the fuel tank over the maximum level If you do overfill the fuel tank remove fuel until it sits below the maximum level Over fueling can cause fire and other accidents Aft...

Page 19: ...drive clutch lever and blade clutch lever are the OFF position 4 To start a cold engine move the choke lever to the closed position If the engine has been warmed up there is no need to use the choke 5...

Page 20: ...to start the engine gradually move it to the OPEN position as the engine warms up How to stop the engine 1 Turn the throttle lever to the LOW position 2 Push the engine switch to the OFF position to...

Page 21: ...er to LOW and lower the speed of the machine before stopping How to drive 1 Start the engine Refer to page 15 for how to start the engine 2 Be sure to put the speed change lever securely in the necess...

Page 22: ...nd be certain to check the gear change one more time 3 Grip the drive clutch lever to the ON position and start off again How to turn Grip the left clutch lever to turn left and grip the right clutch...

Page 23: ...the rubber crawler tracks on either side of the machine are positioned centrally on the ramp When loading and transporting by truck engage the machine s parking break and secure the machine in the loa...

Page 24: ...ying debris 1 Adjust the cutting height using the cutting height adjustment lever At first adjust the blades a little high then readjust the height to best suit the conditions while you are working 2...

Page 25: ...rt work How to stop If you need to leave the machine unattended be sure to switch the engine off put the speed change lever in the N position and confirm that the parking brake is ON Accidents and dam...

Page 26: ...g off the engine oil will still be in the engine and transmission so the quantity of oil remaining will not be exactly displayed After changing the oil please dispose of waste oil in accordance with l...

Page 27: ...ds are placed on the machine if you are working in a hot environment or if you are using the machine for many hours continuously 1 Place the machine on a flat surface in order to keep the engine horiz...

Page 28: ...ration will become difficult and the machine could be damaged if you neglect lubrication and allow oil to run out Steering clutch cable Crawler shafts grease Handlebar up down cable Brake cable Blade...

Page 29: ...dry After that soak it in new engine oil SAE10W 30 equivalent wring it out hard and then shake to remove any surplus oil 4 Lightly tap the paper element several times to remove any waste Blow any dirt...

Page 30: ...rt Accidents can be caused if dust and dirt enter the machine 1 Move the fuel valve to the OFF position and then remove the fuel sediment cup and O ring 2 Wash the sediment cup in non flammable solven...

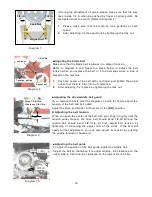
Page 31: ...er track tensioning bolt s lock nut located at the rear of the machine 2 Turn the crawler track tensioning bolt to tighten it 3 Adjust tension so that there is a clearance of 5 8in to 3 4 in along lin...

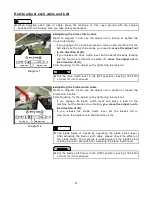
Page 32: ...he OFF position leaving 1 8 3 16in of room for it to maneuver Adjusting the blade clutch cable Refer to diagram 2 and use the adjust nut to tighten or loosen the blade clutch cable After adjusting fix...

Page 33: ...could drag while you are driving the machine or the brake could fail while you are on a slope causing the machine to run out of control Refer to diagram 5 and use the adjust nut to tighten or loosen t...

Page 34: ...ut Adjusting the drive middle belt guard If you replace the belt refer the diagrams 7 and 8 for how to adjust the tension of the belt and belt guard Adjust the drive and blade clutch levers to the ON...

Page 35: ...after the first 20 hours and then every 100 hours thereafter For belt size refer to page 33 Precautions in cold climate In winter be sure to remove any mud and debris from the machine and park it on...

Page 36: ...operated safely in a continuous state of vibration it is very dangerous Vibration can also cause damage such as cracks and breaks to each part of the machine How to inspect and replace the blades 1 S...

Page 37: ...use the machine 1 Loosen the drain bolt drain the fuel from inside the carburetor Remove fuel from fuel valve and fuel tank In a dry location store the machine 2 Use a cloth to wipe away any traces of...

Page 38: ...e Width6 3inch Pitch2 4inch No of links 24 2 Handlebars Square handlebars one touch adjustable 3 positions Brakes Equipped with parking brake and blade brake Speed mph Forward 1st 0 57 2nd 1 20 3rd 2...

Page 39: ...Middle belt 89 6123 006300 1 LB63 6 Blade belt 89 6123 003901 1 SB39 7 Throttle cable 0301 71100 1 Including throttle lever 8 Drive Blade cable 0304 70410 1 of each 9 Brake cable 0304 70610 1 10 Stee...

Page 40: ...tion Quantity cleanliness Oil quantity is suitable not dirty or mixed with any water or metals Oil leakage Oil seal and gasket are not leaking oil Engine Fuel Fuel leakage Fuel is not leaking Fuel fil...

Page 41: ...e rattling or loose or missing parts Drive Tires Wheels Air pressure and tread depth Standard values are observed Cracking damage wear and tear No cracks damage or wear and tear Metal stones etc stuck...

Page 42: ...elt tension Debris is clogged inside the blade cover Clean inside the blade cover Weed accumulation in the pulley Clean the pulley Belt wear and tear Replace with a new belt Machine does not change ge...

Page 43: ...rtage Refuel the machine Clogged air filter Clean the element Poor quality fuel Replace with good quality fuel Choke has not been fully opened Return the choke bar completely Put it in the position Co...

Page 44: ...tting width speed 2800 20 rpm made at Fukuoka Date october 20 2010 Signed Haruhiko Imamura Function Managing Director CONFORMITY DECLARATION I undersigned OREC CO LTD 548 22 HIYOSHI HIROKAWA MACHI YAM...

Page 45: ...parts If you have a request for replacement parts after this period has passed please consult with OREC for availability and prices If you have any question please talk to staff at the point of purch...

Page 46: ...rranty This warranty dose NOT cover tire replacement or repair caused by punctures from outside objects such as nails thorns stumps or glass During the warranty period the warranty holder is responsib...

Page 47: ...the dealer from whom they purchased the machine or to an authorized Orec America dealer 2 The owner must present the warranty registration sheet or the invoice or receipt received at time of purchase...

Reviews: