background image

EzPro 710 9-2

Service Manual

EzPro710

Service Manual

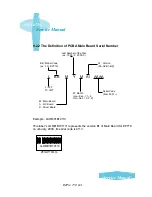
9.2 The Series Number System Definition

9.2.1 Serial Number Format

:

A = CTX Opto, B~Z = OEM

:

Product code (ex: 814=EzPro 710)

:

Y = Last number of the year (ex: 1999 - 9, 2000 - 0)

:

Week of Year

:

Panel vendor code

:

Electrical classification (1=110V, 2=220V, 0=universal)

:

B = BIOS version, E = PCB board version,

M = Mechanical version, O = Optical version

:

Serial code (from 0001~)

EX: A814001T01CAA1001

     This label “A814001T01CAA1001” represents the whole serial number for

EP710. It’s produced on 1st week of 2000 for universal area and its serial code

is 1001.

A  BBB  Y  WW  C  D  BEMO  EEEE

3

6

1

2

5

4

7

8

3

6

1

2

5

4

7

8

Summary of Contents for EzPro 710

Page 1: ...overview major system assembly com ponents description and the Troubleshooting makes explanations on how to detect errors It also includes a flow chart for checking or correcting faults No Warranty or representation either expressed or implied is made with respect to this documentation its quality performance merchant ability or fitness for particular purpose No event will the vendor be liable for...

Page 2: ...truction 3 1 3 1 Package Overview 3 1 3 2 Exploded Overview 3 3 3 3 Spare Parts Lists of Recommadation 3 9 4 Procedure of Disassembly 4 1 4 1 Disassemble Lamp Module 4 1 4 2 Disassemble the Main Body Unit 4 2 4 3 Dissassemble the DC Dc Board 4 3 4 4 Disasemble Control Panel Module 4 4 4 5 Disassemble Engine and Electronic Module 4 5 4 6 Disassemble Main Board and DMD Module 4 6 4 7 Disassemble Lam...

Page 3: ... 4 Test Display Modes Pattern 6 2 6 5 Function Test and Alignment Procedure 6 5 6 6 Hi Pot Grounding Test 6 7 6 7 Cleaning 6 7 6 8 EP 710 Display Specification Test Procedure 6 8 7 Troubleshooting Procedure 7 1 7 1 Equipment Needed 7 1 7 2 Main Procedure 7 1 8 Specification 8 1 8 1 DMD Specification 8 1 8 2 Lamp Specification 8 3 9 Appendix 9 1 9 1 Compatibility Modes 9 1 9 2 The Series Number Sys...

Page 4: ...lity with composite and S video terminals XGA SVGA VGA MAC PC98 FM Towns compatibility with XGA compression pan Auto image re sizing to 1024 768 full screen Auto detection of computer signal input Auto Image Auto tracking frequency contrast brightness position adjustment Powerful enlarge and freeze function Automatically saves adjustments for future use On screen menu with more than 6 languages On...

Page 5: ...70 85Hz 720 400 70 85Hz 640 480 60 72 75 85Hz 800 600 56 60 72 75 85Hz VESA XGA 1024 768 60 70 75 85Hz Apple Macintosh LC 13 1280 1024 compressed 60 75Hz Apple Macintosh II 13 640 480 67Hz Apple Macintosh 16 640 480 67Hz Apple Macintosh 19 832 624 75Hz NEC PC 98 series 1024 768 75Hz 640 400 56Hz 640 480 60 70Hz Fujitsu FM Towns 640 400 55Hz 640 480 60Hz Video Compatibility H Frequency V Frequency ...

Page 6: ...Audio Input One Phone Jack for Audio Input Audio Output One Phone Jack for Audio Line Input 5 lbs 2 3 kgs 3 54 8 58 9 9 inches 90 218 252 mm Temperature Operating 10 C to 40 C Storge 20 C to 60 C Maximum Humidity Operating 10 C to 40 C 80 RH ono condensing Storage 20 C 60 C 80 RH non condensing Acoustic noise level 42dB typical 45dB maximum Lamp life 2000 hours typital Altitude Operating 10 000ft ...

Page 7: ... Adjust color balance to compensate for ambient conditions using three submenus 7100o K The factory default Custom Color Modify the color temperature balance Saturation Magnify the color intensity Keystone Adjust image distortion caused by tilting the projector The only adjustment direction allowed is to narrow the top width of the image Image Freeze To freeze the display of the current image Note...

Page 8: ...f state Data only Audio Adjust the tone Volume Projection Select the project method picture in picture fuction Lamp Warning Reset When lamp s life end it will show a warning message When replace a new lamp reset the lamp hour 2 1 2 Service Manu Use to enter Service Manu Color wheel Adjust the index to charge the color combination Burn In Supply burn in function Luminance masure Supply luminance me...

Page 9: ...n Menu Press to open the on screen display OSD menus and to switch amoung different menus To exit OSD select the Exit Menu icon and press Enter button The projector saves any changes you made automatically Source Press Source to choose between video and computer sources Reset When you press Reset button the OSD menus shows message Reset All Yes NO Select Yes to confirm or select No to cancel This ...

Page 10: ...IP Picture in Picture Display video source image on a small screen Computer mode only Please refer to Page 20 for detail informations Zoom In Computer mode only Magnifies an image up to a factor of 32 on the projection screen When the Zoom icon displayed you can use four directional select keys to change the vertical or horizontal positioning of the image Zoom Out Computer mode only Diminishes the...

Page 11: ... 3 1 Conceptual Drawing 1 Projection Lens 7 Plastic PMMA Condenser Lens 2 TIR Prism 8 UV IR Filter 3 DMD Module 9 Hollow Integration Rod 4 Plastic PMMA Relay Lens 10 Color Wheel 5 Enhance Mirror 11 AR Coating Condenser 6 Enhance Mirror 12 OSRAM Elliptical Reflector UHP Lamp 120W ...

Page 12: ...source UHP Lamp 120W Plastic Condenser Condensing the light beam Lens Hollow Making the light beam uniform Integration Rod UV IR Filter Filtering UV IR out Plastic Relay Lens Lengthening optical path TIR Prism Reflecting all light beams inside Color Wheel Separating the light beam into and produce R G B colors AR Coating Condensing the light beam Condenser DMD Module Displaying component ...

Page 13: ...RAM SDRAM Color Wheel Control Color wheel driver Start 20Kv Normal 80 120V AC 90 132 195 255 400Vdc OSC EEPROM VVS VHS VPEN Y UV VCLK EN CHROMA LUMA COMP IRDAT R G B even odd GHS GVS GCLK GSOG GFBK D 0 15 A 0 18 EN THERMOSTAT FANEN 12V 5 V PWRGOOD CWINDEX Lamp Lit DMD Formatter Data R G B BIAS RESET Control VBIAS RESET VOFFSET DHD Data 0 63 DMD CLK Memory Control Address Vsync Reset CW Control Con...

Page 14: ...rence PLL to generate a pixel clock from HSYNC and programmable gain offset and clamp circuits DMD The DMD 1076 is a spatial light modulator that consists of a 1024 H 768 V array of aluminum micro mechanical mirrors on a 17 micrometer um pitch Each mirror can be individually deflected at an angle of 10 degrees about a hinged diagonal axis The deflection angle positive or negative of the mirrors ca...

Page 15: ...VT provides industry standard multi or single voltage dual supply operation Writing or erasing the device is done with either a 5V or 12V VPP Voltage while all operations are performed with a 3 3V or 5V VCC It is fabricated with Micron s advanced CMOS floating gate process The MT28F400B1 is organized into seven separately erasable blocks To ensure that critical firmware is protected from accidenta...

Page 16: ...EzPro 710 3 1 Service Manual EzPro710 Service Manual 3 1 Package Overview Chapter 3 Mechanical Construction ...

Page 17: ... E k c a J i n i M o t k c a J i n i M e l b a C 8 1 5 0 1 0 0 3 5 2 4 M 8 1 P 5 1 A G V e l b a C 9 2 0 0 0 1 1 0 5 2 4 o e d i V P P L m m 0 0 5 1 A C R e l b a C 0 1 1 0 0 4 0 7 0 5 2 4 S 0 4 8 w o h s z E M 2 A C R o t k c a J n i M e l b a C 1 1 2 0 0 1 0 4 1 8 5 4 5 6 H 6 5 W 4 2 1 L y e K 8 1 r e l l o r t n o C e t o m e R 2 1 1 0 0 7 2 0 0 0 1 5 e z i S m c 5 2 m c 3 3 r e p p i Z g a B E...

Page 18: ...EzPro 710 3 3 Service Manual EzPro710 Service Manual 3 2 Exploded Overview ...

Page 19: ... r o t a l u s n I l a m r e h T 0 1 1 0 0 2 0 4 1 8 2 5 t o o F r e b b u R r a e R 1 1 1 0 0 3 0 4 1 8 1 6 t e k c a r B r e d l o H e l d n a H 2 1 0 4 0 6 2 1 A 1 5 8 4 6 2 M h c e M n a P w e r c S 3 1 1 0 0 7 0 4 1 8 1 6 t 8 0 s u S t f e L t e k c a r B r e g n a h C p m a L 4 1 0 4 0 6 2 1 A 1 5 8 4 6 2 M h c e M n a P w e r c S 1 0 0 3 0 4 1 8 0 7 e l u d o M e n i g n E l a c i t p O 5 1...

Page 20: ... 1 8 2 5 2 3 F e b u t i m u S r e t a l u s n I 7 3 0 6 0 5 2 1 A 1 5 8 6 5 2 M h c e M n a P w e r c S 8 3 1 0 0 8 0 5 1 8 2 5 a r t a n i S m s i r P r o f n o r o P 9 3 1 0 0 9 0 5 1 8 2 5 t 0 2 n o c l i S n o i t c e j i r O t s u D D M D 0 4 2 0 0 3 0 5 1 8 1 6 e s a B e n i g n E l a c i t p O 1 4 1 0 0 9 0 5 1 8 1 6 t 5 2 0 1 0 3 s u S d o R r o f g n i r p S 2 4 0 6 0 5 2 1 A 1 5 8 6 5 2...

Page 21: ... 6 r e d l o H n a F p m a L 1 7 1 0 0 0 1 4 1 8 1 6 t 3 0 s u S r e t l i F R I V U r o f t e k c a r B 2 7 0 4 0 2 2 3 A 4 5 8 4 2 M h c e M t a l F w e r c S 3 7 1 0 0 2 1 4 1 8 1 6 g n i R y t f a S r e t p u r r e t n I 4 7 1 0 0 3 1 4 1 8 1 6 t 8 0 t e k c a r B g n i r p S r o t a v e l E 5 7 0 0 1 2 2 1 A 1 5 8 0 1 2 M h c e M n a P w e r c S 6 7 0 4 2 3 2 3 3 A 1 5 8 4 2 3 M h c e M n a P...

Page 22: ... l E 0 0 1 1 0 0 8 1 4 1 8 1 5 t o o F r o t a v e l E 1 0 1 1 0 0 9 1 4 1 8 1 5 r a e G r o t a v e l E 2 0 1 1 0 0 0 2 4 1 8 1 5 r e d l o H r o t a v e l E 3 0 1 1 0 0 1 2 4 1 8 1 5 n o i s n e t x E t f e L r o t a v e l E 4 0 1 1 0 0 2 2 4 1 8 1 5 n o i s n e t x E t h g i R r o t a v e l E 5 0 1 1 0 0 3 2 4 1 8 1 5 r a e G r e t a v e l E 6 0 1 0 5 0 3 2 5 A 0 5 8 5 3 M h c e M n a P w e r c...

Page 23: ... h c e M n a P w e r c S 1 3 1 1 0 0 8 0 4 1 8 1 6 t 8 0 s u S t h g i R 0 t e k c a r B r e g n a h C p m a L 2 3 1 0 4 0 6 2 1 A 1 5 8 4 6 2 M h c e M n a P w e r c S 1 0 0 8 0 4 1 8 0 7 e l u d o M r e g n a h C p m a L 3 3 1 0 6 0 6 1 A 1 5 8 6 6 2 M h c e M n a P w e r c S 4 3 1 1 0 0 5 1 5 1 8 3 2 W 0 2 1 p m a L P H U r o t c e l f e R l a c i t p i l l E M A R S O 5 3 1 1 0 0 5 0 4 1 8 5 3...

Page 24: ... M D M D 3 1 1 0 0 1 0 4 1 8 0 8 d r a o B n i a M A B C P 4 1 1 0 0 4 0 4 1 8 0 7 e l u d o M r e d l o H p m a L 5 1 1 0 1 3 1 7 0 8 3 4 1 Z P 2 2 D T X r e t p u r r e t n I h c t i w S 6 1 1 0 0 1 0 4 1 8 9 4 m m 3 2 0 6 0 6 n a F C D E M O H G N E H C 7 1 2 0 0 2 0 5 1 8 9 4 m m 0 2 0 4 0 4 n a F s s e l h s u r B C D n o n u S 8 1 2 0 0 3 0 5 1 8 9 4 r e w o l B C D o r c i M n o n u S 9 1 2...

Page 25: ...e of Disassembly 4 1 Disassemble Lamp Module 1 Loosen one screw on the Lamp Cover and remove the Lamp Cover 2 Push the white lamp connector up and loosen three screws of Lamp Module then take it off White Lamp Connector Lamp Cover 51 81411 001 Lamp Module 70 81408 001 1 2 ...

Page 26: ...ng Out 2 Unscrew two screws on the bottom of the projector 3 Unscrew two screws on the rear side projector 4 Push the Right Cover up disconnect the speaker connector from Main Board and detach the Right Cover from the Left Cover Elevator Body Housing 70 81406 001 Right Cover 70 81410 001 Left Cover 70 81402 001 3 1 2 4 ...

Page 27: ...4 3 Disassemble the DC DC Board 1 Unscrew two screws on the DC DC Converter Board 2 Unplug six Cables on Front side of DC DC Converter Module Unplug one Cable on Rear side of it 3 Remove the DC DC Converter Board DC DC Converter Module 75 81402 001 3 1 2 ...

Page 28: ... Control Panel Module 1 Unplug FPC Cable from Main Board and remove the Control Panel Module 2 Unscrew three screws on Keypad Board 3 Disconnect the Keypad Board Keypad and Control Panel FPC Cable Keypad Board Keypad Control Panel Control Panel Module 70 81407 001 3 1 2 ...

Page 29: ...rews on Left Cover 2 Take off the Cable Tie from cabes 3 Unscrew two screws on the Ballast Module for removing engine Module easily 4 Remove the Engine and Electronic Module 5 Take off Lens Cover and Focus Adjust Ring Cable Tie Lens Cover 51 81409 001 Focus Adjust Ring 51 81410 001 Engine Electric Module 3 1 2 5 4 ...

Page 30: ...ain Board and remove the Main Board 4 Unplug Color Wheel Control Cable from DMD Module and unscrew four screws on the Front side ofDMD Module unscrew two screws on the Rear side of it take off the Main Board Bracket 5 Detach the DMD Module and Optical Engine AV Board Module 70 81409 001 Snap Rivet 51 81429 001 Main Board Bracket 61 81402 001 Optical Engine 70 81411 001 DMD Module 75 81503 001 Main...

Page 31: ...crew two screws and remove another DC Fan 3 Unscrew two screws on the fan bracket and pull out the Switch Interrupter from Holder 4 Unscrew one screw on the Switch Interrupter and detach Switch Interrupter and Micro DC Blower DC Fan Lamp Fan Holder 61 81409 002 Thermal Switch Switch Interrupter 43 80713 101 Micro DC Blower 49 81503 002 49 81502 002 49 81401 001 3 1 2 4 ...

Page 32: ...ervice Manual 4 8 Disassemble Ballast Module 1 Remove the Ballast Module 2 Unscrew two screws on elevator holder and remove the Elevator Body Housing Elevator Body Housing 70 81406 001 Ballast Module 70 81405 001 Left Cover 51 81401 002 1 2 ...

Page 33: ...V A V 5 5 D N G d n u o r G 6 V 3 P 3 P V 3 3 7 D N G d n u o r G 8 V 3 P 3 P V 3 3 9 D N G d n u o r G 0 1 V 3 P 3 P V 3 3 1 1 D N G d n u o r G 2 1 V 3 P 3 P V 3 3 3 1 D N G d n u o r G 4 1 V 3 P 3 P V 3 3 5 1 D N G d n u o r G 6 1 V 3 P 3 P V 3 3 7 1 D N G d n u o r G 8 1 V 3 P 3 P V 3 3 9 1 K L C C K L C A G P F l o r t n o C 0 2 N E G O R P X m l e b o r P e l b a n E Chapter 5 Fuction of Boa...

Page 34: ...3 D N G d n u o r G 3 3 A T A D T C A e l b a n E a t a D 4 3 D N G d n u o r G 5 3 N I K L C K L C h t a p a t a D 6 3 D N G d n u o r G 7 3 I D B a t a D e u l B 8 3 D N G d n u o r G 9 3 3 U B a t a D e u l B 0 4 D N G d n u o r G 1 4 5 U B a t a D e u l B 2 4 D N G d n u o r G 3 4 7 U B a t a D e u l B 4 4 D N G d n u o r G 5 4 1 V R a t a D d e R 6 4 D N G d n u o r G 7 4 3 V R a t a D d e R ...

Page 35: ... S R _ L F w o L t e s e R 8 7 1 P T E K O P S 1 P T A G P F 9 7 O P T A G P F O P T A G P F 0 8 2 P T A G P F t u p t u o F P D 1 8 1 E R A P S _ N N O C n o i t c e n n o C o N 2 8 S A I B V e g a t l o V S A I B 3 8 D N G d n u o r G 4 8 A D S a t a D l a i r e S 5 8 L C S k c o l C l a i r e S 6 8 D N G d n u o r G 7 8 C N Y S P M A L c n y S p m a L 8 8 T I L P M A L t i L p m a L 9 8 N E P M...

Page 36: ... D N G d n u o r G 6 0 1 2 V R a t a D d e R 7 0 1 D N G d n u o r G 8 0 1 4 V R a t a D d e R 9 0 1 D N G d n u o r G 0 1 1 6 V R a t a D d e R 1 1 1 D N G d n u o r G 2 1 1 O Y G d n u o r G 3 1 1 D N G d n u o r G 4 1 1 2 Y G a t a D n e e r G 5 1 1 D N G d n u o r G 6 1 1 4 Y G a t a D n e e r G 7 1 1 D N G d n u o r G 8 1 1 6 Y G a t a D n e e r G 9 1 1 D N G d n u o r G 0 2 1 8 Y G a t a D n...

Page 37: ...L o t l a n g i S o e d i V n i P e m a N l a n g i S n o i t c n u F 1 R N I A G V l a n g i S d e R 2 G N I A G V l a n g i S n e e r G 3 B N I A G V l a n g i S e u l B 4 C N n o i t c e n n o C o N 5 D N G d n u o r G 6 D N G d n u o r G 7 D N G d n u o r G 8 D N G d n u o r G 9 C N n o i t c e n n o C o N 0 1 D N G d n u o r G 1 1 C N n o i t c e n n o C o N 2 1 T A D C D D a t a D C D D 3 1 ...

Page 38: ...L 5 3 D E L n o i t a c i d n I D E L 6 4 D E L n o i t a c i d n I D E L 7 5 D E L n o i t a c i d n I D E L 8 6 D E L n o i t a c i d n I D E L 9 D N G d n u o r G 0 1 4 y e K l o r t n o C d a p y e K 1 1 5 y e K l o r t n o C d a p y e K 2 1 6 y e K l o r t n o C d a p y e K 3 1 D N G d n u o r G 4 1 7 y e K l o r t n o C d a p y e K 5 1 8 y e K l o r t n o C d a p y e K 6 1 9 y e K l o r t n ...

Page 39: ...i t c n u F 1 C N Y S e l b a n E e l b a n E 2 D N G d n u o r G 3 t i L p m a L e l b a n E CN2 Thermal Connector n i P e m a N l a n g i S n o i t c n u F 1 1 n i p t a t s o m r e h T s u t a t S l a m r e h T 2 2 n i p t a t s o m r e h T D N G d n u o r G CN3 Fan Connector n i P e m a N l a n g i S n o i t c n u F 1 n a F V 2 1 V 2 1 2 D N G d n u o r G CN9 CN5 CN2 CN3 CN7 ...

Page 40: ...m a N l a n g i S n o i t c n u F 1 n a F V 2 1 V 2 1 2 D N G d n u o r G n i P e m a N l a n g i S n o i t c n u F 1 V 5 g o l a n a V 5 2 2 D N G g o l a n a V 5 2 D N G 3 V 2 1 V 2 1 4 D N G d n u o r G 5 V 5 l a t i g i d V 5 6 D N G d n u o r G 7 V 3 3 V 3 3 8 D N G d n u o r G 9 V 3 3 V 3 3 CN7 DC DC to DMD Formatter Board Connector CN9 Thermal Sensor n i P e m a N l a n g i S n o i t c n u ...

Page 41: ...ual EzPro710 Service Manual 5 2 2 Location of Connectors Side B AC DC output to DC DC input Connector n i P e m a N l a n g i S n o i t c n u F 1 C D V 0 0 4 C D V 0 0 4 2 N T R n r u t e R AC DC output to DC DC input Connector ...

Page 42: ...o i t a c i d n I D E L 5 3 D E L n o i t a c i d n I D E L 6 4 D E L n o i t a c i d n I D E L 7 5 D E L n o i t a c i d n I D E L 8 6 D E L n o i t a c i d n I D E L 9 D N G d n u o r G 0 1 4 y e K l o r t n o C d a p y e K 1 1 5 y e K l o r t n o C d a p y e K 2 1 6 y e K l o r t n o C d a p y e K 3 1 D N G d n u o r G 4 1 7 y e K l o r t n o C d a p y e K 5 1 8 y e K l o r t n o C d a p y e K ...

Page 43: ... 3 D N G A d n u o r G 4 D D V A V 5 5 D N G d n u o r G 6 V 3 P 3 P V 3 3 7 D N G d n u o r G 8 V 3 P 3 P V 3 3 9 D N G d n u o r G 0 1 V 3 P 3 P V 3 3 1 1 D N G d n u o r G 2 1 V 3 P 3 P V 3 3 3 1 D N G d n u o r G 4 1 V 3 P 3 P V 3 3 5 1 D N G d n u o r G 6 1 V 3 P 3 P V 3 3 7 1 D N G d n u o r G 8 1 V 3 P 3 P V 3 3 9 1 K L C C K L C A G P F l o r t n o C 0 2 N E G O R P X m l e b o r P e l b a...

Page 44: ...3 D N G d n u o r G 3 3 A T A D T C A e l b a n E a t a D 4 3 D N G d n u o r G 5 3 N I K L C K L C h t a p a t a D 6 3 D N G d n u o r G 7 3 I D B a t a D e u l B 8 3 D N G d n u o r G 9 3 3 U B a t a D e u l B 0 4 D N G d n u o r G 1 4 5 U B a t a D e u l B 2 4 D N G d n u o r G 3 4 7 U B a t a D e u l B 4 4 D N G d n u o r G 5 4 1 V R a t a D d e R 6 4 D N G d n u o r G 7 4 3 V R a t a D d e R ...

Page 45: ... S R _ L F w o L t e s e R 8 7 1 P T E K O P S 1 P T A G P F 9 7 O P T A G P F O P T A G P F 0 8 2 P T A G P F t u p t u o F P D 1 8 1 E R A P S _ N N O C n o i t c e n n o C o N 2 8 S A I B V e g a t l o V S A I B 3 8 D N G d n u o r G 4 8 A D S a t a D l a i r e S 5 8 L C S k c o l C l a i r e S 6 8 D N G d n u o r G 7 8 C N Y S P M A L c n y S p m a L 8 8 T I L P M A L t i L p m a L 9 8 N E P M...

Page 46: ... t a D d e R 5 0 1 D N G d n u o r G 6 0 1 2 V R a t a D d e R 7 0 1 D N G d n u o r G 8 0 1 4 V R a t a D d e R 9 0 1 D N G d n u o r G 0 1 1 6 V R a t a D d e R 1 1 1 D N G d n u o r G 2 1 1 O Y G d n u o r G 3 1 1 D N G d n u o r G 4 1 1 2 Y G a t a D n e e r G 5 1 1 D N G d n u o r G 6 1 1 4 Y G a t a D n e e r G 7 1 1 D N G d n u o r G 8 1 1 6 Y G a t a D n e e r G 9 1 1 D N G d n u o r G 0 2...

Page 47: ...M l e e h W r o l o C n i P e m a N l a n g i S n o i t c n u F 1 g o l a n a V 5 V 5 2 D N G d n u o r G 3 V 2 1 V 2 1 4 D N G d n u o r G 5 l a t i g i d V 5 V 5 6 D N G d n u o r G 7 V 3 3 V 3 3 8 D N G d n u o r G 9 V 3 3 V 3 3 0 1 D N G d n u o r G 1 1 V 3 3 V 3 3 2 1 D N G d n u o r G 3 1 d o o G r e w o P d o o G r e w o P 4 1 C N n o i t c e n n o C o N 5 1 X E D N I W C x e d n I l e e h ...

Page 48: ...roma meter 6 3 Test Condition Before function test and alignment each Projector should be run in and warmed up for at least 2 hours with the following conditions a In room temperature b With full white screen c With cycled display modes 640 350 H 31 47kHz V 70 09Hz 640 480 H 31 47kHz V 59 94Hz 800 600 H 46 9kHz V 75Hz 1024 768 H 48 4kHz V 60Hz 1024 768 H 56 5kHz V 70Hz 1024 768 H 60kHz V 75Hz Chap...

Page 49: ... 0 8 4 0 4 6 2 7 9 7 3 0 0 5 1 3 0 8 4 0 4 6 5 7 5 7 3 0 0 5 1 3 0 8 4 0 4 6 5 8 3 3 4 0 0 0 6 3 0 0 6 0 0 8 6 5 1 5 3 0 0 0 6 3 0 0 6 0 0 8 0 6 9 7 3 0 0 0 0 4 0 0 6 0 0 8 2 7 1 8 4 0 0 0 0 5 0 0 6 0 0 8 5 7 9 6 4 0 0 5 9 4 0 0 6 0 0 8 5 8 7 3 5 0 5 2 6 5 8 6 7 4 2 0 1 3 4 4 5 5 3 0 0 9 4 4 8 6 7 4 2 0 1 0 6 4 8 4 0 0 0 5 6 8 6 7 4 2 0 1 0 7 5 6 5 0 0 0 5 7 8 6 7 4 2 0 1 5 7 0 0 6 0 5 7 8 7 8 6 7...

Page 50: ...i t r e V f o n o i t i s o p t r e V d n a z r o H o t e l b a t s u j d a e b d l u h s o e d i v e m a r f n e e r c s e h t n i h t i w e b 3 e r u g i F 4 r o l o C B G R e c n a m r o f r e P r o l o C B G R s e i t i s n e t n I r o l o c B G R h c a e f o t s a r t n o C l a m r o n e b d l u o h s e r u g i F 6 5 4 5 y t i m r o f i n U n e e r c S r e k c i l F e t i h W l l u F e h t h ...

Page 51: ...4 Service Manual EzPro710 Service Manual Horizontal Vertical Thickness Pattern Figure 3 R G B Pattern Figure 4 R G B Pattern Figure 5 R G B Pattern Figure 6 Full White Pattern Figure 7 Dark Screen Pattern Figure 8 ...

Page 52: ...ee if it is workable The Auto Adjustment function is aimed to offer a better screen quality by built in ASIC For optimum screen quality the user has to adjust each Function manually 6 5 3 Frequency and Tracking Test Signal 1024 768 75Hz Test Pattern Line MoirePattern Check and see if the image sharpness and focus is well performed If not readjust by the following steps a Select and enter Frequency...

Page 53: ... c Be sure to select and enter Save and Return to save the changes 6 5 5 R G B Colors Contrast Test Signal 1024 768 75Hz Test Pattern R G B Color Intensities Pattern v Check and see if each color is normal and distinguishable v If not please return the unit to repair area 6 5 6 Screen Uniformity and Flicker Test Signal 1024 768 75Hz Test Pattern Full White Pattern Check and see if it is in normal ...

Page 54: ...econdary Display Modes Test Signal 640 350 70 09Hz 640 480 59 94 75 85Hz 720 400 70 08Hz 800 600 60 75 85Hz 832 624 75Hz 1024 768 60 75 85Hz 1152 870 75Hz 1152 900 66Hz v Normally when the primary mode 1024 768 75 is well adjusted and compliant with the specification the secondary display modes will be great possibile to be compliant with the pec But we still have to check with the general test pa...

Page 55: ...Minolta CL 100 Chroma meter 2 Test Item 1 ANSI Lumen The screen illumination shall be measured with a light meter whose sensor isplaced in and parallel to the plane of the focused image at the center of each of 9 rectangles see Fig 1 The average of the 9 reading in lux shall be multiplied by the number of square meters covered by the image at the plane of the meter readings The result is the light...

Page 56: ...on or lumi values obtained from a black and white checkerboard pattern consisting of sixteen equal rectangles see Fig 2 The white rectangles should be at full specified light output as previous measured with all controls at the same setting The illumination or luminance measurements in lux shall be made at the center of the bright white rectangles and dark black rectangles The average illumination...

Page 57: ...3 ANSI Colour 100 W R G B image Measure for each colour setting the chromaticity coordinates x y for the image positions 1 9 as defined in Fig 1 The ANSI Colour of the image for the setting is the average of the 9 colour readings for x and y 4 Distortion Horizontal Vertical W2 W W1 ...

Page 58: ...as shown above The distortion horizontal is defined as Dist h W1 W3 W3 100 And Dist h W2 W3 W3 100 Both results should be within the absolute specification tolorance Measure the dimensions H1 H2 and H3 with H3 at the haif image height as shown above The distortion horizontal is defined as Dist V H1 H2 2 H3 2 H3 100 H3 H2 H1 ...

Page 59: ... horizontal resolution patterns Adjust the resolution or text pattern till the display is clear legible and uniform Observe the display by turning the lens zoom in and out 3 Convergence Lateral Color Error The image convergence is defined as the maximum absolute distance of two corresponding pixels between the red green and blue image expressed in pixel units ...

Page 60: ...ervice Manual Chapter 7 Troubleshooting Procedure 7 1 Equipment needed 7 2 Main Procedure EP710 VGA Cable Power Cord PC Audio Input Video Input B Image Performance Troubleshooting Start Connect power cord VGA cable and audio signal then turn power on Is Lamp Light on Is Image on Is function found Yes Yes Yes NO NO NO A Power Troubleshooting C Function Troubleshooting 1 ...

Page 61: ...ual Service Manual Service Manual Service Manual Service Manual Service Manual EzPro710 Service Manual 1 Is Audio OK D Audio Troubleshooting Is Remote Control OK E Remote Control Troubleshooting Yes NO NO No Fault Found Yes End ...

Page 62: ...c e M a n u a l Service Manual EzPro710 Service Manual 7 2 1 A Power Troubleshooting Supply AC power No Change L P S Change Lamp Change M B Change L P S Yes Yes No Lamp is ok Reassemble lamp Start Is LED indicator ok Check power cord input power voltage Lamp assembly ok Change DC DC Change M B No Yes Yes Yes No No No No End End ...

Page 63: ...EzPro710 Service Manual 7 2 2 Performance Troubleshooting Have garbage pattern Change M B Change DMD Module Start Have image Uniformity ok Color ok Change M B Change DMD Module Change Engine Module Color Adjust Procedure No No Yes No No No Yes No Yes Change M B Change DMD Module No No No Optical Engine 1 ...

Page 64: ... l S e r v i c e M a n u a l S e r v i c e M a n u a l S e r v i c e M a n u a l Service Manual EzPro710 Service Manual Have dot defect Have line bar Have Noise Change DMD Module Adjust clock Change M B Adjust clock phase Change M B Yes Yes No Yes No No No No 1 End ...

Page 65: ... Manual Service Manual Service Manual Service Manual Service Manual EzPro710 Service Manual 7 2 3 Function Troubleshooting Start Does OSD show up Change M B Change Keypad Board Can function be adjusted Change M B No Yes Yes Yes No No End ...

Page 66: ... a l S e r v i c e M a n u a l S e r v i c e M a n u a l S e r v i c e M a n u a l Service Manual EzPro710 Service Manual 7 2 4 Audio Function Troubleshooting Start Hear Sound Change M B No Sound Clear without Noise NO Change Speaker Change Speaker No Yes Yes End ...

Page 67: ...l Service Manual Service Manual Service Manual Service Manual EzPro710 Service Manual 7 2 5 Remote Control Troubleshooting End Start Replace the battery Change the Remote Controller Change M B No No Yes End End Yes Yes Change Keypad End Yes No ...

Page 68: ...urrounding mirrors Unstable pixel A single pixel or mirror that does not operate in sequence with parameters loaded into memory The unstable pixel appears to be flickering asynchronously with the image Adjacent Defined as sharing a common border or common point Blue 180 test screen This screen is used to test for dark blemishes All areas of the screen are colored a Microsoft Paintbrush Blue 180 gr...

Page 69: ... i p k r a d t n e c a j d a o N 1 s l e x i p t h g i r b o N 2 s l e x i p e l b a t s n u o N 3 s l e x i p k r a d 4 4 s e h s i m e l b 6 5 h s i m e l B k r a D 0 8 1 e u l B t f o s o r c i M n a h t r e k r a d e b l l a h s h s i m e l b o N 1 0 8 1 e u l B t h g i r B h s i m e l B 0 3 y a r G t f o s o r c i M n a h t r e t h g i r b e b l l a h s h s i m e l b o N 1 0 3 y a r G Notes 1...

Page 70: ...mp life time 1000h According to the actual test results based on a lamp survival rate of 50 Will continuously be adapted due to ongoing efforts Integral lumen maintenance 70 typ At end of life v Rise time Rise time to 80 of the stabilized luminous output is 90 sec v Hot restrike 60 sec Ignition voltage 20KV 3KV goal 30 sec Thermal Fans may be switched on after lamp has been switched off v Environm...

Page 71: ...coordinates x 0 280 0 020 y 0 290 0 020 v Lamp driver data Input Voltage 1 nominal 100 240V ac 50 60 Hz Input Current 1 nominal 1 8 0 7 A Input Wattage nominal 180 W incl DC DC Input Wattage standby operation 8 W max Ignition pulse ca 2 X 10 kVp for max 4s Cooling method Forced air cooling at 1 m s minimum v Operating and measurement conditions Ballast type Testconditions stabilized at 120W with O...

Page 72: ... 1 8 4 2 7 A G V S A S E V 4 1 0 0 6 0 0 8 9 6 4 5 7 A G V S A S E V 5 1 0 0 6 0 0 8 7 3 5 5 8 A G V S A S E V 6 1 8 6 7 4 2 0 1 4 8 4 0 6 A G X A S E V 7 1 8 6 7 4 2 0 1 5 6 5 0 7 A G X A S E V 8 1 8 6 7 4 2 0 1 0 6 5 7 A G X A S E V 9 1 8 6 7 4 2 0 1 7 8 6 5 8 A G X A S E V 0 2 4 6 8 2 5 1 1 7 7 5 9 A G X A S E V 1 2 0 6 9 0 8 2 1 5 8 5 8 A G X A S E V 2 2 4 2 0 1 0 8 2 1 4 6 0 6 A G X S A S E V...

Page 73: ... Week of Year Panel vendor code Electrical classification 1 110V 2 220V 0 universal B BIOS version E PCB board version M Mechanical version O Optical version Serial code from 0001 EX A814001T01CAA1001 This label A814001T01CAA1001 represents the whole serial number for EP710 It s produced on 1st week of 2000 for universal area and its serial code is 1001 A BBB Y WW C D BEMO EEEE 3 6 1 2 5 4 7 8 3 6...

Page 74: ... 2000 0 BB Model Code ex LO EP710 A1 Version A1 AZ B1 BZ L LPP M LMT M Main Board A A V Board D Driver Board M Month Jan Sep 1 9 Oct Dec X Y Z Serial Code from 0001 L BB M Y M A1 AAAA LLOM01B10113 Example LKOM01B10113 This label LLOM01B10113 represents the version B1 of Main Board for EP710 on January 2000 Its serial code is 0113 25mm 14mm ...

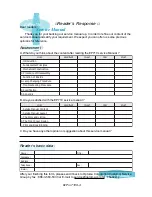
Page 75: ... Thanks e m a N e l t i T y n a p m o C s s e r d d A e n o h p e l e T x a F l i a m E t i n U t n e l l e c x E d o o G r i a F d a B n o i t c u d o r t n I 1 s e l p i c n i r P l a t n e m a d n u F 2 n o i t c u r t s n o C l a c i n a h c e M 3 y l b m e s s a s i D f o e r u d e c o r P 4 s d r a o B f o n o i t c n u F 5 e r u d e c o r P g n i g n a h C p m a L 6 e r u d e c o r P g n i ...

Reviews: