background image

English

Setup | Security

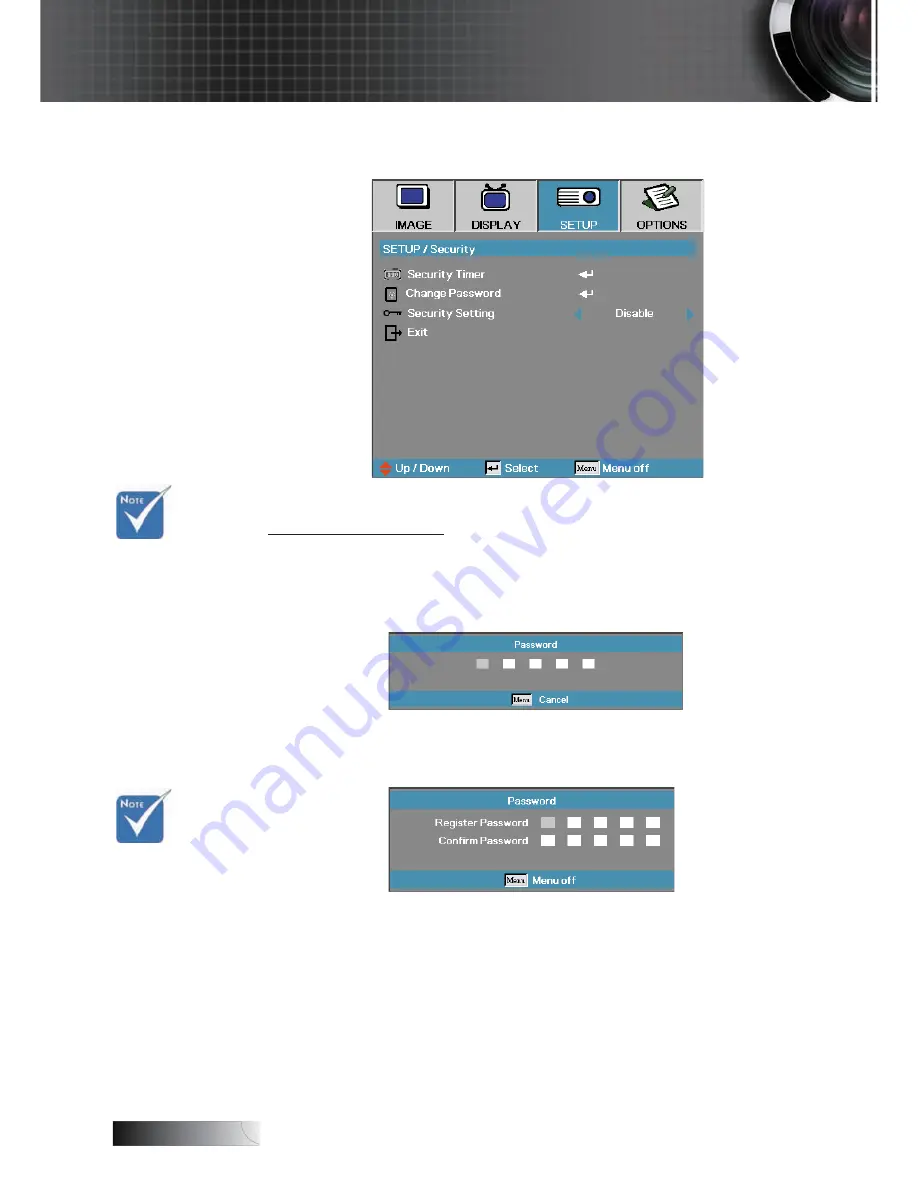
Change Password

Use this submenu to change the security password for the projector. 

1.  Select  Change  Password  from  the  Security  submenu.  The  Confirm 

Change Password dialog box displays.

2. Select 

Yes

3. Enter the default password <1> <2> <3> <4> <5>.

A second password screen displays.

4. Enter the new password twice for verification. 

v

 If the incorrect 

password is 

entered three 

times, the 

device auto 

shutdowns after 

10 seconds.

v

 If the new 

passwords 

do not match, 

the password 

screen redis-

plays.

User Controls

Meijer.com

Summary of Contents for EW674N

Page 1: ...tion Image Size 18 Adjusting the Zoom Focus 0 55 XGA Series 19 Adjusting Projection Image Size 19 Adjusting the Zoom Focus 0 65 WXGA Series 20 Adjusting Projection Image Size 20 User Controls 21 Contr...

Page 2: ...cordance with the manufacturer s instructions A Do not block any ventilation openings To ensure reliable operation of the projector and to protect it from overheating put the projector in a position a...

Page 3: ...authorized ser vice center near you 8 Do not let objects or liquids enter the projector as they may touch dangerous voltage points or short out parts that could result in a fire or electric shock 9 Se...

Page 4: ...the lamp module see page 47 Warning When switching the projector off please ensure the cool ing cycle has been completed before disconnecting the power Allow 90 seconds for the projector to cool down...

Page 5: ...he ventilation slots and openings on the unit v Do not use abrasive cleaners waxes or solvents to clean the unit v Do not use under the following conditions In extremely hot cold or humid environments...

Page 6: ...rs are located out of the line of sight from the screen to the audience this ensures that when presenters look at the audience they do not also have to stare at the projector lamp The best way to achi...

Page 7: ...SVGA VGA u Video Compatibility NTSC NTSC4 43 PAL PAL M PAL N SECAM SDTV and EDTV compatible HDTV compatible 720p 1080i 1080p u Auto source detection with user definable settings u Fully featured IR re...

Page 8: ...cover IR Remote Control with 2 x AAA Batteries Composite cable RCA Power Cord 1 8m VGA Cable 1 8m USB Cable 1 8m Carrying Case RGB to Component Adapter optional SCART to RGB S Video Adapter optional D...

Page 9: ...s 2 Zoom 9 Rear IR Receiver 3 Focus 10 Connection Ports RJ45 function is dependent on the model purchased 4 Front IR Receiver 5 Lens 11 Power Socket 6 Lens Cover 12 Power Switch 7 Elevator foot 13 Ken...

Page 10: ...NE 7 ENTER 2 SOURCE 8 AV MUTE 3 LAMP LED 9 VOLUME 4 KEYSTONE 10 MENU 5 POWER LED 11 POWER 6 RE SYNC AV MUTE MENU VOLUME POWER LAMP POWER ENTER KEYSTONE R E S Y N C S O U R C E KEYSTONE 1 2 3 4 5 6 7 1...

Page 11: ...Video Input Connector 7 Audio Input Connector left and right 8 Audio In 9 Audio Out 10 USB Connector Connect to PC for Remote Mouse function 11 12V Relay 12 RJ 45 Connector RJ45 function is dependent...

Page 12: ...Four Directional Select Keys 7 Re Sync 8 Page Down 9 Volume 10 Zoom 11 AV mute 12 Video Source 13 VGA Source 14 Freeze 15 S Video Source 16 DVI I 17 Brightness 18 Menu 19 Keystone 20 Source 21 Enter...

Page 13: ...A Cable 4 RGB out 5 USB Cable 6 Audio in RCA Type cable 7 Audio in mini jack 8 12V Relay Cable 9 RJ45 Cable RJ45 function is dependent on the model purchased 10 Power Cord v Due to the difference in a...

Page 14: ...optional 4 VGA Cable 5 RCA Type audio cable optional 6 SCART to RGB S Video Adapter optional 7 S Video Cable optional 8 Audio out RCA Type cable optional 9 Composite Video Cable v Due to the differenc...

Page 15: ...button to turn on the projector v The startup screen displays in approximately 10 seconds 4 Turn on your source computer notebook video player etc The projector will detect your source automatically...

Page 16: ...the power cord from the electrical outlet and the projector 5 Do not turn on the projector immediately following a power off procedure Warning Indicator v When the POWER LED indicator repeatedly blink...

Page 17: ...r button u 2 Raise the image to the desired height angle v then release the button to lock the elevator foot into position 3 Use screw in foot w to fine tune the display angle To lower the image 1 Pre...

Page 18: ...4 69 4cm 92 96 236 1cm 150 37 381 9cm 210 52 534 7cm 273 4 694 4cm 306 21 777 8cm Min 23 43 59 5cm 79 68 202 4cm 128 89 327 4cm 180 45 458 34cm 234 35 595 25cm 262 47 666 7cm Screen size Max WxH 21 87...

Page 19: ...73 4cm Hd Screen Diagonal Max 26 04 66 14cm 88 53 224 87cm 143 21 363 76cm 200 5 509 3cm 260 38 661 4cm Min 22 57 57 34cm 76 75 194 95cm 124 16 315 37cm 173 82 441 51cm 225 75 573 4cm Screen size Max...

Page 20: ...Hd Screen Diagonal Max 30 74 78 1cm 104 54 265 5cm 169 11 429 5cm 236 75 601 3cm 307 46 780 9cm Min 26 68 67 7cm 90 72 230 4cm 146 75 372 7cm 205 45 521 8cm 266 82 677 7cm Screen size Max WxH 26 07x16...

Page 21: ...the Power On Off the Projector section on page 15 AV MUTE Momentarily turns off on the audio and video MENU Press MENU to launch the on screen display OSD menu To exit OSD Press MENU again RE SYNC Aut...

Page 22: ...the pro jector L Button Mouse left click R Button Mouse right click Page Use this button to page up Page Use this button to page down Enter 8 Confirm your item selection Source Press Source to select...

Page 23: ...mage DVI I Press DVI I to choose source from DVI A DVI D or DVI I connector VGA Press VGA to choose source from VGA IN connector AV Mute Momentarily turns off on the audio and video S Video Press S Vi...

Page 24: ...displayed use keys to select any item in the main menu While making a selection on a particular page press or Enter to enter sub menu 3 Use keys to select the desired item and adjust the settings by...

Page 25: ...English 25 Menu Tree User Controls Meijer com...

Page 26: ...ny further adjustments by the user in User1 2 will be saved in this mode for future use Brightness Adjust the brightness of the image 4 Press to darken image 4 Press to lighten the image Contrast The...

Page 27: ...ss to increase the amount of red in the image Color Setting Enter the Color Setting menu Select the Red Green Blue Gain for bright ness adjustments and Bias for contrast adjustments for the whole pict...

Page 28: ...ing colors 4 Red increase or decrease the bias value for red 4 Green increase or decrease the bias value for green 4 Blue increase or decrease the bias value for blue Color Set values for the followin...

Page 29: ...ater 4 Video for video or TV source 4 Graphics for image source 4 PC for PC or computer source Color Temp Adjust the color temperature Cold temperature the screen looks colder with Warm temperature th...

Page 30: ...o the next menu as below and then use or to select Press Enter to finalize the selection The projector will not search inputs that are de selected v If all sources are deselected the projector cannot...

Page 31: ...is format is for 16x9 input sources like HDTV and DVD enhanced for Wide screen TV 4 16 9 II XGA series 16 10 WXGA series The non standard wide screen display format of the projector Part of the origin...

Page 32: ...Shifts the projected image position horizontally 4 Press to move the image left on the projected screen 4 Press to move the image right on the projected screen V Image Shift 16 9 only Shifts the proje...

Page 33: ...ses the image so you can project behind a translucent screen 4 Front Ceiling When you select this function the projector turns the image upside down for ceiling mounted projection 4 Rear Ceiling When...

Page 34: ...it projector ID from 0 through 99 Audio Enter the Audio menu Set audio level properties See page 40 for more information Advanced Enter the Advanced menu Select the screen display during startup See p...

Page 35: ...English 35 Setup Language Language Choose the multilingual OSD menu Press ENTER into the sub menu and then use the Left or Right key to select your preferred language User Controls Meijer com...

Page 36: ...e this function to make an adjustment Phase Phase synchronizes the signal timing of the display with the graphic card If you experience an unstable or flickering image use this function to cor rect it...

Page 37: ...urity Timer Once activated the projector requires a password on the specified dates and times to allow power on and access to the security menu If the projector is in use and the Security Timer is act...

Page 38: ...Confirm Change Password dialog box displays 2 Select Yes 3 Enter the default password 1 2 3 4 5 A second password screen displays 4 Enter the new password twice for verification v If the incorrect pas...

Page 39: ...abled the current password is required to power on the projector and access the Security menu 4 Disabled no password is required for any function When security is enabled the following screen displays...

Page 40: ...oice Press to increase the volume of voice Mute Toggle the audio on or off 4 Off the speaker volume is turned on 4 On the speaker volume is turned off Audio Input Enter the Audio Input menu Select the...

Page 41: ...ector 2 Select Logo Capture from the Advanced menu A confirmation screen displays 3 Select OK Screen capture in progress Screen capture succeeded displays The captured screen is saved as User in the L...

Page 42: ...ay network information 4DHCP On Assign an IP address to the projector from the DHCP server automatically Off Assign an IP address manually 4 IP Address Select an IP address 4Subnet Mask Select subnet...

Page 43: ...e are rec ognized as an input source High Altitude Adjust the fan speed to reflect the environment 4 On increases fan speed for high temperature humidity or altitude 4 Off regular fan speed for normal...

Page 44: ...keypad functions as normal Background Color Select the desired background color for the projected image when no source is detected Advanced Enter the Advanced menu See page 45 for more details Lamp S...

Page 45: ...Power Off Set the Auto Power Off interval The projector powers off the lamp after 15 minutes of no signal by default The following warning is displayed 60 seconds before power off Sleep Timer Set the...

Page 46: ...amp Reminder Enable or disable the lamp life span reminder 4 On a warning message displays when remaining lamp life is less than 30 hours 4 Off no warning message displays Brightness Mode Select the l...

Page 47: ...g Lamp Reset After replacing the lamp reset the lamp counter to accurately reflect the new lamp s life span 1 Select Lamp Reset A confirmation screen displays 2 Select Yes to reset the lamp counter to...

Page 48: ...nction of the projector through a network such as re motely manage Power On Off Brightness and Contrast settings Also projector status information such as Video Source Sound Mute etc LAN_RJ45 1 Connec...

Page 49: ...ur Local Area Connection and select Property 4 In the Properties window select the General tab and select Internet Protocol TCP IP 5 Click Properties 6 Fill in the IP address and Subnet mask then pres...

Page 50: ...bnet Mask 255 255 255 0 4 Gateway 0 0 0 0 4 DNS Server 0 0 0 0 10 Press Apply Enter to confirm settings 11 Open a web browser ex Microsoft Internet Explorer 12 In the Address bar input the IP address...

Page 51: ...e Sync on the remote 4 If you are using a PC For Windows 95 98 2000 XP 1 Open the My Computer icon the Control Panel folder and then double click on the Display icon 2 Select the Settings tab 3 Verify...

Page 52: ...may deactivate their own screens when a second display device is in use Each has a different way to be reactivated Refer to your computer s manual for detailed information Image is unstable or flicke...

Page 53: ...and try the different settings Image has slanted sides 4 If possible reposition the projector so that it is centered on the screen and below the bottom of the screen 4 Press Keystone button until the...

Page 54: ...ture 5 1 Ballast shot circuit in output detected 5 2 End of lamp lift detected 5 3 Ballast lamp did not ignite 5 4 Lamp extinguished during normal operation 5 5 Lamp extinguished during run up phase 5...

Page 55: ...to within 7m 23 ft of the projector 4 Make sure the batteries are inserted correctly 4 Replace weak batteries in the remote control Audio Problems There is no sound 4 Adjust the volume on the remote c...

Page 56: ...f the new lamp doing so may shorten its operation life Warning 4Besuretoturnoffandunplugtheprojectoratleastanhourbefore replacing the lamp Failure to do so could result in a severe burn 1 Loosen the t...

Page 57: ...You can purchase optic lens cleaner from most camera stores Refer to the following to clean the pro jector lens 1 Apply a little optic lens cleaner to a clean soft cloth Do not apply the cleaner direc...

Page 58: ...2 80 85 1 832 x 624 72 75 1024 x 576 50 60 XGA 1024 x 768 60 70 1 72 75 85 87 1152 x 864 60 70 75 85 75 HD720 1280 x 720 50 60 75 85 WXGA 1280 x 768 60 70 75 85 WXGA 800 1280 x 800 60 SXGA 1280 x 1024...

Page 59: ...72 o o o o 800x600 75 o o o o 800x600 85 o o o o 1024x768 60 o o o o 1024x768 70 o o o o 1024x768 75 o o o o 1024x768 85 o o o o 1280x720 60 o o o o 1280x720 75 o o o 1280x720 85 o o o 1280x768 60 o o...

Page 60: ...English 60 RS232 Commands RS232 VGA In Connector Pin No Name I O From Projector Side 1 NC _ 2 RXD IN 3 TXD OUT 4 NC _ 5 NC _ 6 NC _ 7 RS232 RTS 8 RS232 CTS 9 NC _ Appendices Meijer com...

Page 61: ...2D 35 30 50 a 35 30 XX28 n 7E 30 30 32 38 20 a 0D Green Bias n 50 a 2D 35 30 50 a 35 30 XX29 n 7E 30 30 32 39 20 a 0D Blue Bias n 50 a 2D 35 30 50 a 35 30 XX30 n 7E 30 30 33 30 20 a 0D Cyan n 50 a 2D...

Page 62: ...nput Mini Jack XX89 1 7E 30 30 38 39 20 32 0D RCA XX82 1 7E 30 30 38 32 20 31 0D Logo Optoma XX82 2 7E 30 30 38 32 20 32 0D User XX83 1 7E 30 30 38 33 20 31 0D Logo capture XX88 1 7E 30 30 38 34 20 31...

Page 63: ...nction Projector Return Description when Standby Warming Cooling Out of Range Lamp fail INFOn n 0 1 2 3 4 Standby Warming Cooling Out of Range Lamp fail READ from projector 232 ASCII Code HEX Code Fun...

Page 64: ...owing specifications Refer to the following diagram to ceiling mount the projector Appendices v Damage to the projector as a result of incor rect installation voids the war ranty v Ensure at least 10c...

Page 65: ...ess Park Watford Hertfordshire WD18 8QZ UK Tel 44 0 1923 691 800 Fax 44 0 1923 691 888 www optoma eu Service Tel 44 0 1923 691865 Service service tsc europe com France B timent E 81 83 avenue Edouard...

Page 66: ...2 34430005 Japan 3 25 18 0120 46 5040 E mail info osscreen com www os worldwide com Taiwan 5F No 108 Minchiuan Rd Shindian City Taipei Taiwan 231 R O C Tel 886 2 2218 2360 Fax 886 2 2218 2313 www opt...

Page 67: ...ause harmful interference to radio or television reception which can be determined by turning the device off and on the user is encouraged to try to correct the interference by one or more of the foll...

Page 68: ...us complies with Canadian ICES 003 Remarque l intention des utilisateurs canadiens Cet appareil numerique de la classe B est conforme a la norme NMB 003 du Canada Declaration of Conformity for EU coun...

Reviews: