background image

English

Introduction

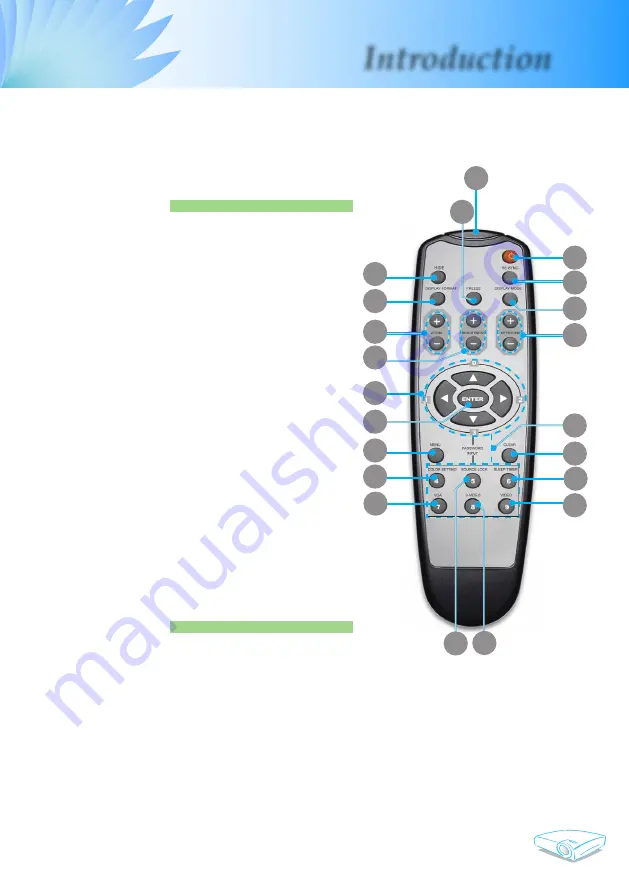
Wireless Remote Control

1.  IR LED

2.  Power

3.  Re-Sync 

4.  Display Mode

5.  Keystone Correction

6.  Number Buttons

7.  Clear

8.  Sleep Timer

9.  Video

10.  S-Video Source

11.  Source Lock 

12.  VGA Source

13.  Color Setting

14.  Menu

15.  Enter

16.  Four Directional 

Select Keys

17.  Brightness

18.  Zoom

19.  Display Format

20.  Hide

21.  Freeze 


21

1


4


5


6


9

2


7


8


3


15


13


12


16


14


17


18


19


20


10


11

Summary of Contents for EP709

Page 1: ...rusted dependable name in projector lamp sales http www myprojectorlamps com http www myprojectorlamps ca http www myprojectorlamps eu The following projector manual has not been modified or altered i...

Page 2: ...rojector 13 Powering Off the projector 14 Warning Indicator 14 Adjusting the Projected Image 15 Adjusting the Projector Image Height 15 Adjusting the Projector Zoom Focus 16 Adjusting Projected Image...

Page 3: ...proper ventilation For example do not place the projector on a bed sofa carpet or similar surface that may block the ventilation openings Do not put it in an enclosure such as a bookcase or a cabinet...

Page 4: ...he life of the lamp itself Please be sure to change the lamp when it shows warning messages refer to page 34 Warning Reset the Reset Lamp Hours function from the On Screen Display Management II menu a...

Page 5: ...roduct is not being used for a long period of time Don t Block the slots and openings on the unit provided for ventila tion Use abrasive cleaners waxes or solvents to clean the unit Use under the foll...

Page 6: ...s are located out of the line of sight from the screen to the audience this ensures that when presenters look at the audience they do not also have to stare at the pro jector lamp The best way to achi...

Page 7: ...NTSC NTSC4 43 PAL PAL M PAL N SECAM and HDTV compatible 480i p 576i p 720p 1080i Multi Auto functions Auto detection Auto image and Auto saving the adjustments Full function remote control User friend...

Page 8: ...own below Check to make sure your unit is complete Contact your dealer immedi ately if anything is missing Carrying Case Documents User s Guide Quick Start Card Warranty Card 2 x AAA Batteries Due to...

Page 9: ...ion 1 Control Panel 2 Zoom Lever 3 Focus Ring 4 Power Socket 5 Zoom Lens Main Unit Product Overview 9 10 10 6 Elevator Foot 7 Elevator Button 8 IR Receivers 9 Connection Ports 10 Tilt Adjusting Feet 1...

Page 10: ...tion Control Panel 1 Power Indicator LED 2 Temp Indicator LED 3 Lamp Indicator LED 4 Keystone Correction 5 Menu On Off 6 Power Standby 7 Four Directional Select Keys 8 Re Sync 9 Source 10 Enter 4 5 9...

Page 11: ...ection Ports 1 DVI D Input Connector with HDCP 2 PC Analog signal SCART RGB HDTV Component Video Input Connector 3 S Video Input Connector 4 Composite Video Input Connector 5 RS232 Connector 6 Kensing...

Page 12: ...Keystone Correction 6 Number Buttons 7 Clear 8 Sleep Timer 9 Video 10 S Video Source 11 Source Lock 12 VGA Source 13 Color Setting 14 Menu 15 Enter 16 Four Directional Select Keys 17 Brightness 18 Zoo...

Page 13: ...bility Modes section on page 36 S Video Output Video Output DVD Player Settop Box HDTV receiver 5 1 6 RGB 1 Power Cord 2 VGA Cable 3 DVI to DVI Cable Optional Accessory 4 Composite Video Cable Optiona...

Page 14: ...Green The first time you use the projector you can select your preferred language from quick menu after the startup screen display 4 Turn on your source computer notebook video player etc The projecto...

Page 15: ...button to turn off the projector lamp you will see a message displayed on the projector s screen Press the Power Standby button again to confirm otherwise the message will disappear after 5 seconds P...

Page 16: ...or adjusting the image height To raise the image 1 Press the elevator button 2 Raise the image to the desired height angle then release the button to lock the elevator foot into position 3 Use to fine...

Page 17: ...cm 162 6 x 122 0 413 0 x 309 8cm 243 9 x 182 9 619 6 x 464 7cm Min WxH 27 8 x 20 8 70 5 x 52 9cm 55 4 x 41 6 140 9 x 10⁵ 7cm 92 5 x 69 4 234 8 x 176 1cm 129 4 x 97 1 328 7 x 246 5cm 147 9 x 110 9 375...

Page 18: ...ource Press Source to choose RGB Component p Component i S Video Composite Video and HDTV sources Menu Press Menu to launch the on screen display OSD menu To exit OSD press Menu again Keystone Adjusts...

Page 19: ...from PC Movie Game sRGB and User Keystone Adjusts image distortion caused by tilting the projector 15 degrees Brightness Adjust the brightness of the image Zoom Press D Zoom button to zoom in of an i...

Page 20: ...English 19 User Controls Sleep Timer Sets the countdown timer interval VGA Press VGA to choose VGA connector S Video Press S Video to choose S Video source Video Choose composite video source...

Page 21: ...yed use keys to select any item in the main menu While making a selection on a particular page press or Enter key to enter sub menu 3 Use keys to select the desired item and adjust the settings by key...

Page 22: ...English 21 User Controls Menu Tree...

Page 23: ...English 22 User Controls Language Language Choose the multilingual OSD menu Use the or key to select your preferred language Press Enter to finalize the selection...

Page 24: ...e projector reverses and turns the image upside down at same time You can project from behind a translucent screen with ceiling mounted projection Source Lock When this function is turned off the proj...

Page 25: ...uested to enter your pass word again Change Password Use number buttons to select your password and then press Enter key to confirm your selection 1 Scroll down to highlight Change Password and press...

Page 26: ...fans at full speed continuously to allow for proper high altitude cooling of the projector Direct Power On Choose On to turn on Direct Power On mode Operates the pro jector will automatically power on...

Page 27: ...ee of difference between the lightest and darkest parts of the picture Adjusting the contrast changes the amount of black and white in the image Press the to decrease the contrast Press the to increas...

Page 28: ...he amount of saturation in the image Sharpness Adjusts the sharpness of the image Press the to decrease the sharpness Press the to increase the sharpness Film Mode Choose On to turn on Film Mode to el...

Page 29: ...move the image down Press the to move the image up Degamma This allows you to choose a degamma table that has been fine tuned to bring out the best image quality for the input Aspect Ratio Use this fu...

Page 30: ...osition up or down when you select the aspect ratio of 16 9 Press the to move the image down Press the to move the image up Ver Shift 16 9 Image Position at window mode will also be moved ac cordingly...

Page 31: ...ure will be set as User automatically And this set User is the same for all display mode Different color setting will be memorized at 4 different source groups But they will be same under same source...

Page 32: ...g a PC For Windows 3 x 1 In the Windows Program Manager double click the Windows Setup icon in the Main group 2 Verify that your display resolution setting is less than or equal to 1280 x 1024 For Win...

Page 33: ...tion If you are using a Notebook PC Some Notebook PCs may deactivate their own screens when a second display device is in use Each has a different way to be reactivated Refer to your computer s docume...

Page 34: ...on your DVD player please select 4 3 aspect ratio in the on screen menu Problem Image is reversed Select Management Projection from the OSD and adjust the projection direction Problem Lamp burns out...

Page 35: ...English 34 Appendices Problem Message Reminders Fan failed Replacing the lamp Temperature Error...

Page 36: ...Warning To reduce the risk of personal injury do not drop the lamp module or touch the lamp bulb The bulb may shatter and cause injury if it is dropped Lamp Replacing Procedure 1 Turn off the power t...

Page 37: ...7 9 VESA SVGA 800 x 600 56 35 2 56 35 2 VESA SVGA 800 x 600 60 37 9 60 37 9 VESA SVGA 800 x 600 72 48 1 72 48 1 VESA SVGA 800 x 600 75 46 9 75 46 9 VESA SVGA 800 x 600 85 53 7 85 53 7 VESA XGA 1024 x...

Page 38: ...nt kit please ensure the screws used to attached a mount to the projector met the following specifications Screw type M2 6 Maximum screw length 10mm Minimum screw length 8mm Warning 1 If you buy the c...

Page 39: ...44 0 1923 691 888 www optomaeurope com Service Tel 44 0 1923 691865 Service service tsc europe com Taiwan 5F No 108 Minchiuan Rd Tel 886 2 2218 2360 Shindian City Taipei Taiwan 231 Fax 886 2 2218 2313...

Reviews: