background image


26


4.2 Installation Steps           


4.2.1 Installing the Condenser 

Unscrew  the  captive  screws  on  the 

condenser  a  certain  distance  before 

aligning the tube with the dovetail groove of 

the  condenser,  then  pushing  lightly  to  the 

lowest position horizontally. and tighten the 

set screws.   


4.2.2 Installing the Phase Contrast Slider   

With  the  sign  facing  up,  push  the  phase 
contrast 

slider 

horizontally 

into 

the 

condenser socket, and notice the adjusting 
screw  side  of  the  phase  contrast  slider  is 
facing the operator side. 

Push  into  the  process,  when  you  hear  the 

"click" sound, it indicates the phase contrast 

slider  and  the  optical  axis  position  are 

accurate. 


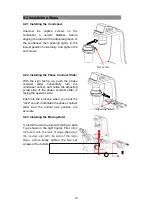
4.2.3 Installing the Moving Ruler 

1) Install the moving ruler according to path 

1  (as shown  in  the  right figure).  First, 

align 

the face A with tick mark of stage

, then a

lign 

the  moving  ruler  with  the  side  of  the  large 

stage  surface

,finally  tighten  the  two  set 

screws at the bottom. 


Set screw 

Adjusting screw 

Summary of Contents for A14.1063

Page 1: ...n satisfactory performance please study this instruction manual thoroughly before start to use your instrument A14 1063 A14 1064 Inverted Biological Microscope A16 1063 A16 1064 Inverted LED Fluorescent Microscope Instruction Manual ...

Page 2: ...tch Optional functions 12 3 3 Adjusting the Illumination Brightness 13 3 4 Specimen Placement and Stage Knob Adjustment 13 3 4 1 Mechanical Stage 13 3 4 2 Pallet 14 3 4 3 Auxiliary Stage 14 3 5 Adjusting the Interpupillary Distance 14 3 6 Focusing on the Specimens 15 3 6 1 Focus Knobs 15 3 6 2 Focus Knob Tight Adjustment 15 3 7 Adjusting the Diascopic Illumination Aperture Diaphragm 16 3 8 Switchi...

Page 3: ...3 4 2 3 Installing the Moving Ruler 23 4 2 4 Installing the Objective 24 4 2 5 Installing the Eyepiece 24 4 2 6 Installing the LED Light Box 24 4 2 7 Installing the Camera 25 4 3 Assembly Episcopic Illumination Microscopy 26 4 3 1 Installing the Filter Cube 26 4 3 2 Installing the Fluorescence LED Unit 26 4 3 3 Replacing the Fuse 26 Chapter 5 Maintenance and Storage 27 5 1 Cleaning 27 5 1 1 Cleani...

Page 4: ...ening box prevent lens glass to stick to fingerprint perspiration other factors influence observation prevent lens and other attachment drop damaged 2 Avoid placing the microscope in place with direct sunlight high temperature or high humidity dust and strong vibration Ensure that the stage is flat horizontal and strong enough 3 If a bacterial solution or water spatters spill on the stage objectiv...

Page 5: ...ear of the main body Do not hold any other parts such as the upper part of the illumination pillar focus knobs eyepiece tube or stage when carrying the microscope Doing so might result in dropping or failure of this microscope Care and Maintenance 1 All lenses have been calibrated please do not disassemble by yourself 2 The structure of objective converter and coarse and fine focus mechanism are p...

Page 6: ... Cover up must wait for the lamp room to cool down 9 The microscope usage environmental requirements a For indoor use b The environment temperature range 10 35 c Maximum relative humidity 80 at 31 linear temperature down to 34 is 70 60 at 37 50 at 40 10 Microscope to store and transport environment requirements a the environment temperature range 40 70 b relative humidity range 10 100 c atmospheri...

Page 7: ...trast Hoffman Phase Contrast Head Seidentopf Viewing Head Inclined At 45 Interpupillary Distance 48 75mm Eyepiece Tube Dia 30mm Eyepiece F O V EW10x 22mm Diopter Adjustable Dia 30mm EW15x 16mm Diopter Adjustable Dia 30mm EW20x 12mm Diopter Adjustable Dia 30mm Nosepiece Quintuple Nosepiece Dovetail Interface Coded Quintuple Nosepiece Dovetail Interface LWD Infinity Plan Objective 4x 0 10 W D 30 0mm...

Page 8: ...scent Objective 4x 0 13 W D 17 0mm Cover Glass 10x 0 30 W D 7 4mm Cover Glass1 2mm 20x 0 45 W D 8 0mm Cover Glass1 2mm 40x 0 60 W D 3 3mm Cover Glass1 2mm 60x 0 70 W D 1 8 2 6mm Cover Glass1 2mm Focusing System Coaxial Coarse Fine Adjustment Tension Adjustable At Right Hand Fine Division 0 002mm Coarse Focusing Range Up 7mm Down 1 5mm Max Up To 18 5mm After Removing Focusing Limit Working Stage Pl...

Page 9: ...itted Illumination 3W S LED Critical Illumination Transmitted Illumination 3W S LED Kohler Illumination Reflected Illumination 3W LED For Epi Fluorescence Phase Contrast Centering Telescope 10x Tube Dia 30mm Phase Slider For 4x 10x 20x 40x Phase Slider For 10x 20x 40x APO Objectives Phase Slider For 4x 60x APO Objectives Emboss Contrast DIC Emboss Contrast Slider For 10x 20x 40x Universal Emboss C...

Page 10: ...t 485nm Filter Cube V LED Unit 525nm Filter Cube FITC Filter Cube DAPI Filter Cube TRITC Photo Port Head Side Camera Port Switchable 100 0 0 100 Photo Adapter 1 0x C Mount 0 5x C Mount 0 7x C Mount Power Supply AC 100 240V 50 60Hz ECO Function Auto Power Off 15 Minutes After No Operator Working LCD Screen LCD Screen On Front Of Body Display Using State Of Microscope Including Magnification Light I...

Page 11: ...ype A14 1063 A14 1064 A16 1063 A16 1064 Magnification 4 10 20 40 10 20 40 numerical aperture N A 0 10 0 25 0 40 0 60 0 30 0 45 0 60 Work distance mm 30 10 2 12 2 2 7 4 8 3 6 Cover glass thickness 0 17 0 17 0 17 0 17 1 2 1 2 1 2 Conjugate distance mm 1 1 3 Electricity parameter Item A14 1063 A14 1064 A16 1063 A16 1064 1 Input voltage AC100 240V 50 60 Hz 2 Fuse Size T500 mA 250 V 3 LED light 3W S LE...

Page 12: ... Components The microscope A14 1063 components following diagrams A14 1064 add LCD based on A14 1063 A14 1063 Eyepiece Viewing head Mainframe Moving stage Objective Condenser Universal holder Nosepiece Stage ...

Page 13: ...64 components following diagrams A16 1063 remove LCD based on A16 1064 A16 1064 Eyepiece Viewing head Mainframe Universal holder Condenser Fluorescence illumination Objective Moving stage Filter Cube turret Stage Nosepiece LCD ...

Page 14: ... Contrast slider 8 Coarse focus knob 3 Upper lighting shading part only FL 9 Condenser brightness adjuster 4 Stage 10 Up down illumination switch Transmitted illumination for biological model 5 Power switch 11 Power indicator 6 Nosepiece 12 Camera mount 2 10 3 4 4 5 11 1 6 7 8 9 12 A16 1063 ...

Page 15: ...le only FL 10 Universal bracket holder 3 Elastic adjustment knob 11 Condenser set screw 4 Bracket horizontal movement knob 5 Bracket vertical movement knob 6 Fuse 7 Outlet 8 Built in fluorescent light source part and fuse only FL 5 11 1 3 4 7 2 6 10 9 8 A16 1063 ...

Page 16: ...ersal bracket holder set screw 11 intelligent adjuster only A14 1064 series 4 Stage bracket holder 12 Power indicator 5 Fluorescence cube turret only FL 13 Camera mount 6 Power switch 14 LCD only A14 1064 series 7 Turntable cover only FL 8 Nosepiece clamp screw 2 3 4 4 6 1 8 9 10 7 5 11 12 13 14 A16 1064 ...

Page 17: ...Universal bracket holder 9 Nosepiece 3 Emboss contrast slider 10 Moving ruler Measuring head 4 Elastic adjustment knob 11 Upper lighting shading part only FL 5 Bracket horizontal movement knob 12 Condenser set screw 6 Bracket vertical movement knob 7 Outlet 6 12 4 5 7 8 1 3 9 11 2 10 A16 1064 ...

Page 18: ...ion device can sense objects within 0 5m in front of it The blue light is shown and the light source of the microscope will not go out when one is observing within 0 5m in front of it When the person leaves and without any other object within 0 5m in front the blue light is off automatically And after 15 minutes the LED will be off Press the ECO function key to open the lighting again Closing ECO ...

Page 19: ...cimen because of the short working distance of specimen observation 3 4 1 Moving stage The Moving stage is mounted and used on the plain stage The specimen can be moved in the X axis and Y axis directions by operating the stage knobs A 128 80 mm micro plate can be placed on the Moving stage Attaching the different specimen holders enables you to observe various types of specimens The upper is the ...

Page 20: ... 4 3 Auxiliary stage Connect the auxiliary stage to the left and right of the stage to expand the stage width After connecting the auxiliary stage the stage width is 300 mm 3 5 Adjusting the Interpupillary Distance By rotating the binocular part while looking through the eyepieces adjust the distance between the eyepieces so that the right and left view fields overlap to a single image from eyepie...

Page 21: ...bout 4 mm trip to limit The traveling distance of the objective for each knob is as follows Rotation of knob Distance traveled by objective Fine focus knob 1 rotation 0 2 mm Coarse focus knob 1 rotation 37 7 mm CAUTION Never attempt the following operations as they might result in product malfunction Rotating the left and right focus knobs in opposite directions Rotating the coarse and fine focus ...

Page 22: ...sult in an appropriate contrast and a favorable image The iris aperture adjusting handle is marked with the aperture of the diaphragm 3 8 Nosepiece Turn the nosepiece until it clicks in place stays in the specified position can switch the objective Before rotating the converter check the objective height to prevent collision with specimens or stage Normally the objective is mounted by rotating the...

Page 23: ...ragm image with the phase ring image in the objective Decentering the phase ring and the PH annular diaphragm Basically the phase ring and the PH annular diaphragm should be adjusted so that they are concentric However slightly decentering them will produce a shadowing effect resulting in a three dimensional image Annular diaphragm Centering hold on the side Hollow position Centering hold on the s...

Page 24: ... telescope to the eyepiece tube enables you to view a sector diaphragm image Insert the condenser side emboss contrast slider into the condenser slider slot 3 10 2 Eyepiece tube side Emboss Contrast Slider The eyepiece tube side emboss contrast slider has position markings For emboss contrast microscopy insert the slider into the microscope until it reaches the position of the same number as the m...

Page 25: ...and switch the filter cube by rotating the filter cube switching unit 3 11 3 Filter cube switching unit Rotating the filter cube switching unit switches the filter cube When the filter cube is switched the fluorescence LED unit is switched automatically Fluorescent positions 1 to 3 and a bright field position are alternately allocated to the turret The turret clicks each time a filter cube is brou...

Page 26: ...lter BP filter a barrier filter BA filter and a dichroic mirror DM Referring to the following items as a guide select a desired combination of filter cubes according to the characteristics of the specimen and fluorophore You can select a combination of an excitation filter and a barrier filter even if you are using the same excitation method Excitation filters barrier filters and dichroic mirrors ...

Page 27: ...te scale figures flash then click the button hour scale figures become flashing When the time figures flash three times it means setting successful Double click locking brightness or unlocking When it is locking you can not adjust brightness every objective unless double click again rotating changing brightness Press and rotating up meantime Transmitted illumination Pressing and rotating down mean...

Page 28: ...omponent is shown in the following figure and the digital indicate the installation step Save the supplied hexagonal spanner You need it when you change parts CAUTION Before installation make sure all the parts are free of dust and dirt Do not scratch any part or surface of the glass ...

Page 29: ...horizontally into the condenser socket and notice the adjusting screw side of the phase contrast slider is facing the operator side Push into the process when you hear the click sound it indicates the phase contrast slider and the optical axis position are accurate 4 2 3 Installing the Moving Ruler 1 Install the moving ruler according to path 1 as shown in the right figure First align the face A w...

Page 30: ...tive is very sensitive to dust When operating use 10 objective to search for samples and focus and then need to switch to other magnification of the objective for observation When switching the objective rotate the objective until it clicks to ensure that the desired objective enters the center of the optical path 4 2 5 Installing the Eyepieces Insert the eyepiece into the eyepiece tube until the ...

Page 31: ...ra to prevent fall and break As shown on the right figure there are two types of relay lenses to choose from Relay lens magnification Configuration 1 0 Standard 0 5 Optional When replacing the relay lens please turn out the camera then unscrew the M4 screw and remove the relay lens part Please refer to the installation of the above camera installation steps 1X Relay lens Dust cover Camera M4 Screw...

Page 32: ...oscope and remove the cover 2 Mount the LED unit corresponding to the desired wavelength at the position that matches the address of the filter cube The back cover of the LED unit is marked with position number The corresponding position is as below Sign LED light 1 G light 2 B light 3 U light 3 Remount the cover in the original position 4 3 3 Replacing the Fuse Open the cover and in the fluoresce...

Page 33: ...mmersion oil from objectives Do not use petroleum benzene to wipe the prism surface of the eyepiece tube or filters 5 1 1 Cleaning the Lenses Keep the lenses free of dust fingerprints and other dirt Any dirt on lenses and filters will degrade the image If the lenses become dirty clean them according to the following procedure Cleaning off minor dirt such as dust 1 Use a blower or similar tool to b...

Page 34: ...sposal If a sample comes into contact with this product check the sample is hazardous or not If the sample is hazardous follow the standard procedure of your laboratory 5 2 Storage Store this product in a place that is low in humidity and therefore less prone to mold Store this product in a temperature range of 20 to 60 C and a relative humidity of up to 90 no condensation Store objectives and eye...

Page 35: ... reversely Turn it over A lens the objective condenser eyepiece or collector is dirty Clean it The aperture diaphragm is too large Appropriate down Dirt or dust on the eyepiece Clean it The aperture diaphragm is too small Appropriate up One side of image is blurred Condenser is not properly centered Center the condenser with the centering screw The nosepiece is not properly engaged Engage the nose...

Page 36: ...y Distance does not adjust Adjust the Interpupillary Distance correctly the illumination is not appropriate Adjust illumination switch 6 3 Electrical System TROUBLE CAUSE SOLUTION The bulb cannot light No power supply Check the power cord connection The pin of the bulb doesn t insert properly Insert the pin deeply The bulb broken Replace with a new one The bulb burns out suddenly The bulb is not t...

Reviews: