


5
1. IR remote control
(1).
Power:
Press this button to turn the monitor on/off.
(2).
Zoom
:
Press this button to toggle between the
different picture formats:
Full/Zoom/Subtitle/Regular/Panorama
(3).
Mute:
Press this button to disable the sound.
Press this button again to turn the sound on again.
(4).
Freeze
:
Press this button to freeze the picture .
Press this button again to
disable the freeze picture and to re-establish
the normal picture.
(5).
PC/HD, AV1/AV2, SV:
You can select the appropriate signal
source directly (PC = VGA/DVI).
(6).
Item:
Hot key for OSD adjustments of volume,
contrast, brightness, hue, saturation, sharpness,
and Red Green Blue .
(7).
Source:
To switch the video inputs (or sub picture source in pip mode),
please use the IR remote control included in the delivery
Th
is button is also used as „Enter“ and „Select“ function in the OSD menu.
and to confirm your selected settings in the OSD menu.
(8).
OK / Menu:
Press this button to call-up the OSD menu.
This button is also used as “Exit“.
Note: The menu button is also used to return to the previous menu.
(9).
Select ▲/▼:
Directional buttons up/down.
(10).
Display:
Press this button to call-up screen information such as resolution, signal source, etc.
(11).
Picture:
Press this button to toggle between the different picture modes:
User, Standard, Movie, Vivid.
(12).
PIP:
Press this button to select the picture-in-picture function. Define the size of the sub picture:
Small, Medium, Large, POP Full, POP 4:3, OFF.
(13).
Swap:
When in PIP mode, press the swap button to switch the main picture and the sub picture.
The swap button is only active if you have defined a sub-picture before .
(14).
Position:
When in PIP mode, press the position button to define the position of the sub-picture:
Either in one of the four screen corners or centered.
(15).
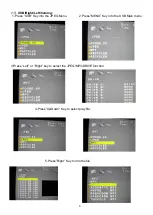
ID:
Can be control several monitors are installed in the same area.
In ID mode, press ID key, then input setting number(01~99), to unlock
“ID” function.
Please press
“ID” key again to lock “ID” function.
(16).
0~9:
For ID setting number used.