background image

2

1

Exercise Information

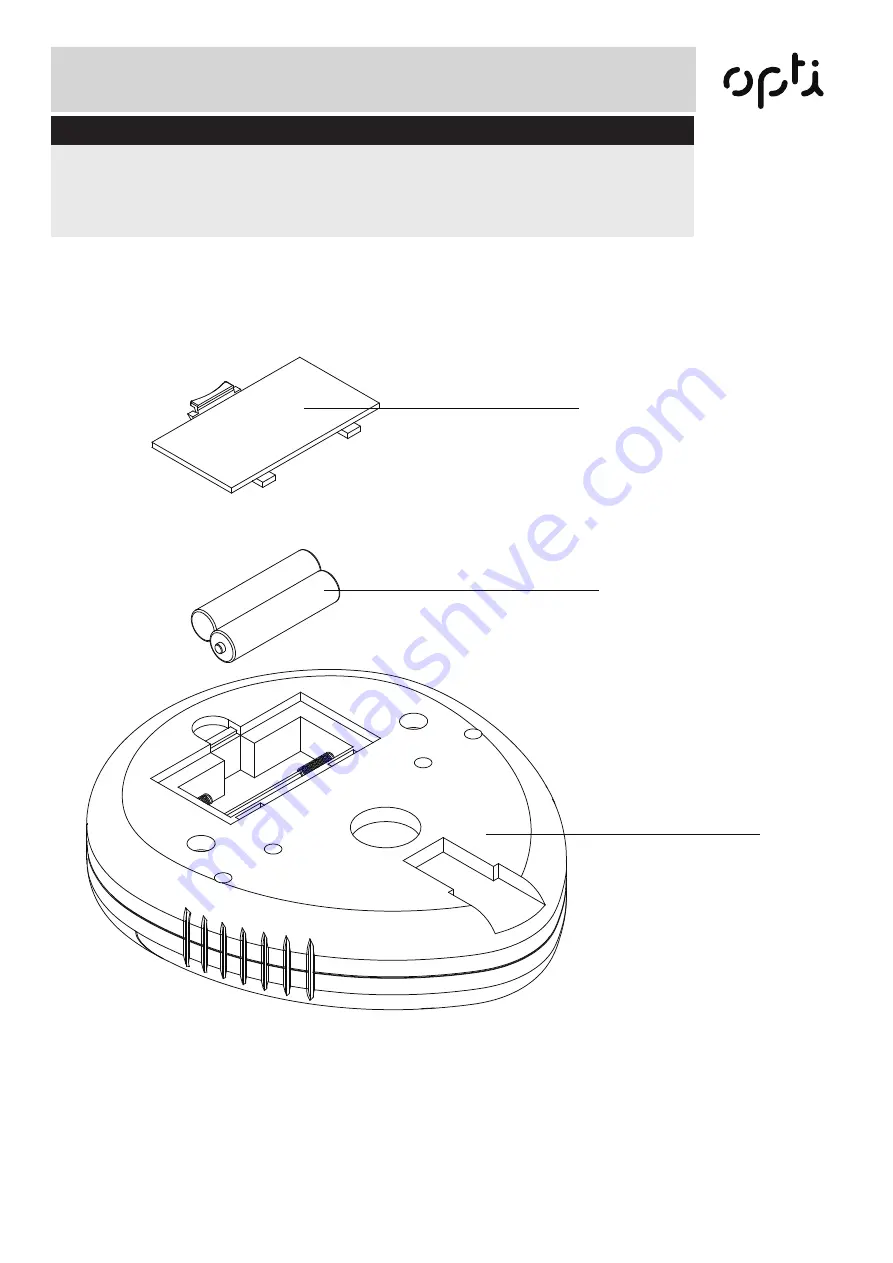
Remove the Back Cover (A) of the Computer (21) and install 2 x AA

A

 battery (B) 

into the 

battery compartment.  Replace the Back cover (A) to the Computer (21).

Note: The 2 pcs of AAA battery are not included with the equipment.

Replacing the batteries

A

B

21

Summary of Contents for 619/5775

Page 1: ...ch will help you get the best from your equipment and ensure safe and correct assembly use and maintenance If you need help or have damaged or missing parts call the Customer Helpline 0345 600 1714 or...

Page 2: ...Assembly Instructions Workout area Exercising Information 2 3 4 7 14 15 18 19 Before starting Muscle chart Warming up and cooling down Console Operation Adjustment of Resistance Care and Maintenance E...

Page 3: ...ng parts If any of the adjustment devices are left projecting they could interfere with the user s movement Before using the equipment to exercise always perform stretching exercises to properly warm...

Page 4: ...with pre existing health problems no responsibility for personal injury or property damage sustained by or through the use of this product Over exercising may result in serious injury or death If you...

Page 5: ...er components may be pre fitted to larger components Please check carefully before contacting Argos regarding any missing components 28 Main Frame x 1 24 Fixed Handlebar x 1 25 Handlebar Upright x 1 2...

Page 6: ...sing fixings S17 Round Cap x 2 10 S19 Round Cap x 2 13 M17 Wave Washer x 2 48 M8 x 25mm Allen Bolt x 2 50 S13 Round Cap x 4 51 1 2 Shouldered Bolt 1 x 49L 1 x 49R 49 M10 x 45mm Hex Bolt x 4 57 M8 x 40...

Page 7: ...all the xings listed below Note Some of the xings are pre tted to the larger components Please check carefully before contacting Argos regarding any missing xings 78 M8 x 20mm Allen Bolt x 3 79 M8 x...

Page 8: ...t 145cm 21 Exercise Monitor 11 Footplate L R 22 Dual Action Handlebar upper R 23 Dual Action Handlebar upper L 24 Fixed Handlebar 25 Handlebar Upright 26 Dual Action Handlebar lower L R 28 Main Frame...

Page 9: ...ch the Front and Rear Stabilisers 29 30 to the Main Frame 28 using 4 x M8 x 65mm Carriage Bolts 62 4 x 8 5x16 Curved Washers 69 4 x 8 5x13 Spring Washer 70 and 4 x M8 Dome Nuts 76 for each Stabilizer...

Page 10: ...am Connect the Lower Sensor Wire 45 to the Exercise Monitor Sensor Wire 46 ensuring a tight connection Carefully lower the Handlebar Upright 25 onto the Main Frame 28 then loosely fit 2 x M8 x 60mm Al...

Page 11: ...plate Align the Footplates and tighten the fitting Bolts and Nuts securely Note There are two possible mount positions for the Footplates The holes furthest forward will give a more angled pedaling st...

Page 12: ...2 L R for each side to secure the complete assembly Note Cap the Nylon Nut with 1 x Round Cap 13 to each side One Bolt is supplied with a RIGHT HAND THREAD for the RIGHT HAND SIDE and must be fitted b...

Page 13: ...place with 1 x M8 x 20mm Allen Bolt 78 1 x 8 5x13 Spring Washer 70 1 x 8 5 x 25 Flat Washer 66 and 1 x 19 5 x 28 D Washer 65 for each side Fit the correctly labeled L or R Dual Action Handlebar Upper...

Page 14: ...Assembly Instructions 13 Step 6 Fit the Fixed Handlebar Frame 24 onto the Handlebar Upright 25 using 2 x M8 x 25mm Allen Bolts 50 securing with 2 x M8 Spring Washers 70 and 2 x M8 Curved Washers 69...

Page 15: ...nnect the Sensor Wires A and B together And insert the Hand Pulse Sensor 7 into the Jack Plug Socket marked PULSE on the back of the Exercise Monitor 21 Attach the Exercise Monitor 21 onto the Handleb...

Page 16: ...0 6m greater than the training area This is a space where you can safely dismount without obstruction in case of an emergency Where two pieces of equipment are positioned adjacent to each other the fr...

Page 17: ...performance Intermediate aerobic Effective fat burning Up to 55 55 to 65 65 to 85 85 to Max rst few months of your exercise program keep your heart rate near the low end of your target zone as you exe...

Page 18: ...rcise routine Weight training helps tone build and strengthen muscle If you are working above your target zone you may want to do a lower number of reps Targeted Muscle Groups The exercise routine tha...

Page 19: ...or 15 counts then relax Repeat 3 times for each leg Stretches Hamstrings lower back and groin Toe touch stretch Stand with your knees bent slightly and slowly bend forward from your hips Allow your ba...

Page 20: ...achilles tendons and ankles Quadriceps stretch With one hand against the wall for balance reach back and grasp one foot with your other hand Keeping your bent knee pointing directly heel towards your...

Page 21: ...y shut off if there is no signal received after 4 minutes 3 The monitor will be auto powered on when starting to exercise push button with signal in 4 The monitor will automatically start calculating...

Page 22: ...e Back Cover A of the Computer 21 and install 2 x AAA battery B into the battery compartment Replace the Back cover A to the Computer 21 Note The 2 pcs of AAA battery are not included with the equipme...

Page 23: ...22 Exercise Information Adjustthe resistance by turning the eight level tension knob either to for increasement or for decreasement Adjustment of Resistance...

Page 24: ...etain your purchase receipt These symbols indicate that equipment with these symbols should not be disposed of as general household waste If you want to dispose of the product or battery please consid...

Page 25: ...24 Exploded Parts Diagram...

Page 26: ...xed Handlebar Handlebar Upright Dual Action Handlebar lower L R Footplate Support Bar L R Main Frame Front Stabilizer Rear Stabilizer Crankshaft Footplate Support Bar Pivot Bracket Main Shaft Idle Whe...

Page 27: ...contained in this manual It must be used solely for domestic purpose The guarantee will be rendered invalided if the product is re sold or has been damaged by inexpert repair Specifications are subjec...

Reviews: