


3
Owner’s guide
Rev. 2.3
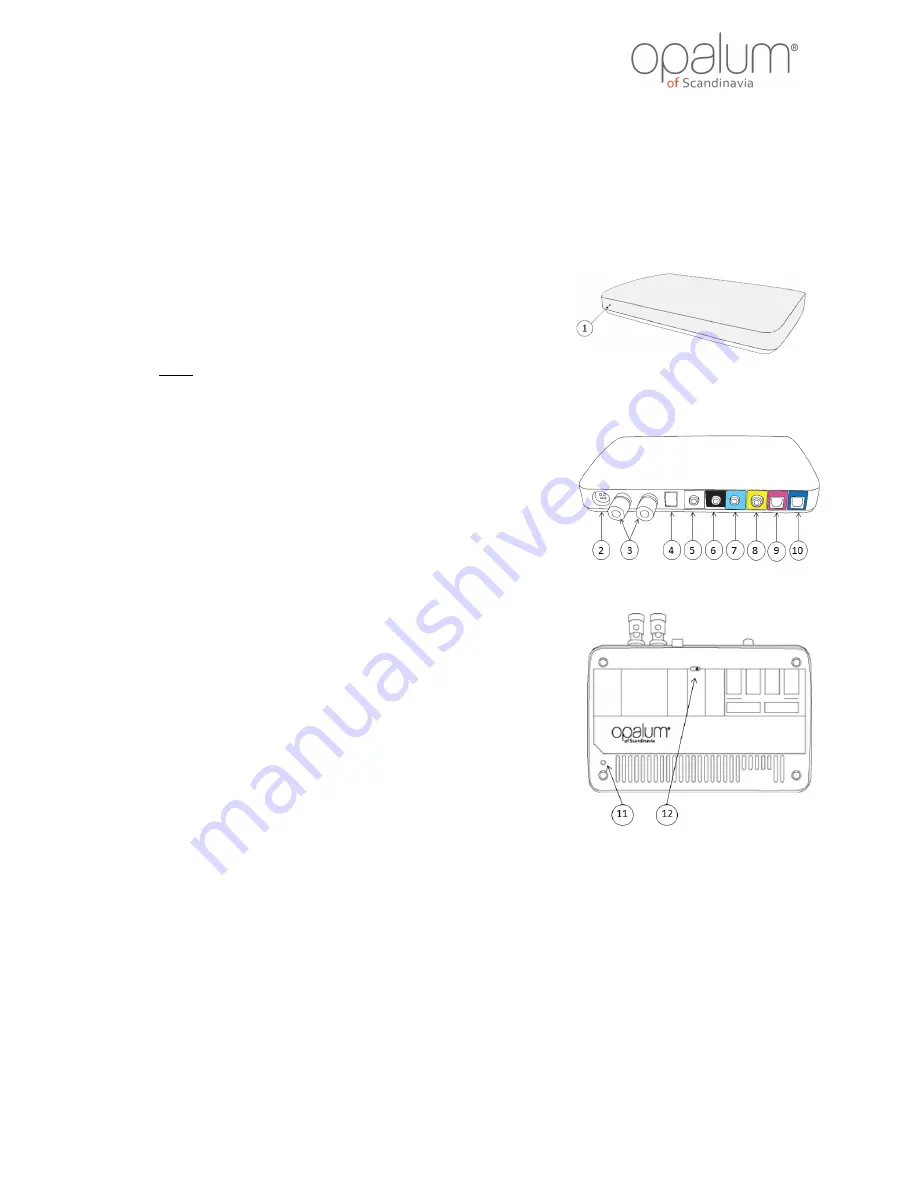
1.
The Control Hub
1.
Status indicator
Indicates the current status using different colors and flash modes. For
details see section 2.
2.
Power socket
Connection for included 24V DC power supply. Make sure connector is
firmly attached.
3.
Speaker output, Actiline® Digital Link
Do ONLY connect Actiline® enabled speakers to this output. (E.g.
Opalum FLOW, BREEZE or STREAM series).
4.
Master volume adjustment
The master volume can be adjusted using this rocker switch. When in
standby, this switch can also be used to turn on the system.
5.
IR/RS232
Connection for controlling the system through either external IR or
RS232.
6.
Analog subwoofer output
Optionally connect this line level output to the analog input of an active
subwoofer. At normal listening levels adding a subwoofer is not needed
thanks to the Actisonic® technology. This output will sense if a
subwoofer is attached and automatically match the sub-woofer and
Opalum speakers using a high precision digital crossover at 80 Hz and 24
dB/octave. If the subwoofer has its own adjustable low-pass filter it
should be set to the highest possible frequency in order not to interfere
with the digital crossover of the Opalum Control Hub.
7.
Analog stereo line input
Connection for analog line level equipment (e.g. MP3-player, notebook,
phones, etc.). This can also be used to connect the output of your
surround receiver.
8.
Digital input, coaxial*
Connection for digital S/PDIF equipment (e.g. computer, CD, DVD
TM
,
Blu-ray
TM
, flat screen TV, etc) using coaxial cabling. (These are
trademarks of their respective owners).
9.
Digital inputs, optical*
10.
Digital inputs, optical*
Connection for digital S/PDIF equipment (e.g. computer, CD, DVD
TM
,
Blu-ray
TM
, flat screen TV, etc) using optical fibre (TOSLINK
TM
). (These are
trademarks of their respective owners).
11.
IR Learning/Factory reset button
Button to tell the control hub to go into IR learning mode. This is also the
button to reset the unit to factory settings.
12.
Electrical IR/RS232 mode switch
Selects if the IR/RS232 connector is used for electrical IR or RS232..
* NOTE:
Use uncompressed stereo PCM audio data only. Data rates of 44.1, 48, 88.2 and 96 kHz are supported in 16 and 24
bits. Both 176.4 and 192 kHz in 16 and 24 bit are also supported using digital coax input. If connecting a multi-channel
source (such as a TV, DVD player, computer, etc.) setup this source to output uncompressed two channel (stereo)
PCM data.