background image


7


Multiroom Capability


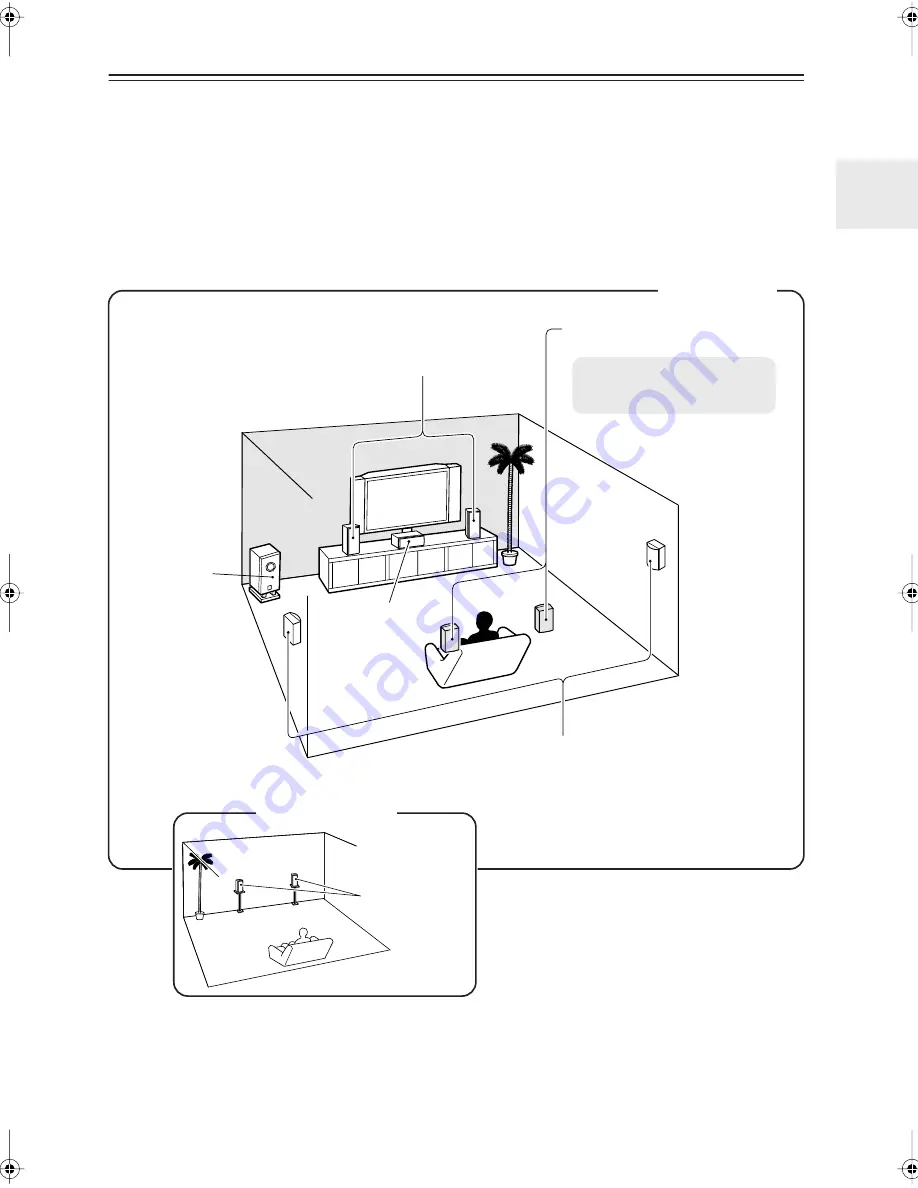
You can use two speaker systems with this AV receiver


—a surround-sound speaker system (up to 7.1 channels) in 

your main listening room, a stereo speaker system in a second room, or Zone 2, as we call it. And, you can select a dif-
ferent audio source for each room.


Main Room: 


In your main listening room, you can enjoy up to 7.1-channel playback (see page 14).

You can enjoy the various listening modes such as Dolby and DTS (pages 57–65).
*While Powered Zone 2 is being used, playback is reduced to 5.1-channels (see page 83).


Zone 2: 


In your Zone 2 room, you can enjoy 2-channel stereo playback (see page 83).

*The listening modes cannot be used with Zone 2.

Surround back left and right 
speakers

* While Powered Zone 2 is being 

used, nothing is output by these 
speakers (page 84).

Main Room

Front left and right speakers

Center speaker

Surround left and right speakers

Subwoofer

Zone 2 Room

Left and right 
stereo speakers

TX-SR606_En.book Page 7 Wednesday, March 5, 2008 10:30 AM

Summary of Contents for TXSR606S

Page 1: ...the instructions in this manual will enable you to obtain optimum performance and listening enjoyment from your new AV Receiver Please retain this manual for future reference Contents Introduction 2 C...

Page 2: ...aratus does not operate normally by following the operating instructions Adjust only those controls that are covered by the operating instructions as an improper adjustment of other controls may resul...

Page 3: ...ime you turn it on so be sure to use it occasionally For U S models FCC Information for User CAUTION The user changes or modifications not expressly approved by the party responsible for compliance co...

Page 4: ...oduct name indicates the color Specifications and operation are the same regardless of color Declaration of Conformity We ONKYO EUROPE ELECTRONICS GmbH LIEGNITZERSTRASSE 6 82194 GROEBENZELL GERMANY GR...

Page 5: ...t Display 45 Automatic Audio Input Selection Setup 46 Playing Your AV Components 47 Basic AV Receiver Operation 47 Common Functions 48 Setting the Display Brightness 48 Muting the AV Receiver 48 Using...

Page 6: ...Laboratories Dolby Pro Logic and the double D symbol are trademarks of Dolby Laboratories 2 Manufactured under license under U S Patent s 5 451 942 5 956 674 5 974 380 5 978 762 6 226 616 6 487 535 o...

Page 7: ...k see page 14 You can enjoy the various listening modes such as Dolby and DTS pages 57 65 While Powered Zone 2 is being used playback is reduced to 5 1 channels see page 83 Zone 2 In your Zone 2 room...

Page 8: ...enus H TUNING PRESET Arrow and ENTER buttons When AM or FM is selected the TUNING buttons are used for radio tuning and the PRE SET buttons are used to select radio pre sets see page 54 With the setup...

Page 9: ...age 55 U MEMORY button 54 Used when storing or deleting radio presets V TUNING MODE button 52 Selects the Auto or Manual tuning mode for AM and FM radio W SETUP MIC 38 The automatic speaker setup micr...

Page 10: ...necting a TV or pro jector with an HDMI input F MONITOR OUT The S Video or composite video jack should be connected to a video input on your TV or projector G SIRIUS antenna on North American model Th...

Page 11: ...R and SURR BACK L R This analog multichannel input is for connecting a component with a 5 1 7 1 channel analog audio out put such as a DVD player DVD Audio or SACD capable player or an MPEG decoder R...

Page 12: ...ging set tings L AUDIO button 69 Used to change audio settings M SLEEP button 48 Used with the Sleep function SP A B is not used in this AV receiver Controlling the tuner To control the AV receiver s...

Page 13: ...f the same type is used in the same room or the AV receiver is installed close to equipment that uses infrared rays the remote control ler may not work reliably Don t put anything on top of the remote...

Page 14: ...nhances the front left and right speakers making sound movements distinct and providing a full sound image For movies it s used mainly for dialog Position it close to your TV preferably on top facing...

Page 15: ...OUT SUB WOOFER to the amp s input Attaching the Speaker Labels The AV receiver s positive speaker terminals are all red The negative speaker terminals are all black The supplied speaker labels are col...

Page 16: ...eaker wiring polarity Connect positive terminals to only positive terminals and negative terminals to only negative termi nals If you get them the wrong way around the sound will be out of phase and w...

Page 17: ...ative tweeter high terminal 2 Connect the AV receiver s SURR BACK R posi tive terminal to the right speaker s positive woofer low terminal And connect the AV receiver s SURR BACK R negative terminal t...

Page 18: ...station and adjust the position of the FM antenna to achieve the best possible reception 2 Use thumbtacks or something similar to fix the FM antenna into position Caution Be careful that you don t in...

Page 19: ...regulations to prevent electrical shock haz ards Using a TV FM Antenna Splitter It s best not to use the same antenna for both FM and TV reception as this can cause interference problems If cir cumsta...

Page 20: ...able Jack Description HDMI HDMI connections can carry uncompressed stan dard or high definition digital video and audio and offer the best picture and sound quality Component video cable Component vid...

Page 21: ...to an HDMI OPTICAL or COAXIAL input you must assign that input to an input selector see pages 44 When choosing a connection format bear in mind that the AV receiver does not convert dig ital input si...

Page 22: ...the following order of priority HDMI component video S Video composite video However for component video only regardless of whether a component video signal is actually present if a component video i...

Page 23: ...L IN OPTICAL 1 Digital optical output Step 1 Video Connection Choose a video connection that matches your TV or and then make the connection A B C Step 2 Audio Connection Choose an audio connection th...

Page 24: ...nection You must connect the AV receiver to your TV with the same type of connection A B C Step 2 Audio Connection Choose an audio connection that matches your DVD player or and then make the connecti...

Page 25: ...input see BasicAV Receiver Operation on page 47 To adjust the subwoofer sensitivity for the multichannel input see Hardware Setup on page 79 ZONE 2 SPEAKERS R L PRE OUT ZONE 2 LINE OUT ANTENNA FM AM 7...

Page 26: ...connection that matches your VCR or DVR or and then make the connection You must connect the AV receiver to your TV with the same type of connection A B C Step 2 Audio Connection Choose an audio conn...

Page 27: ...ted to the VCR DVR OUT S jack Connecting a VCR or DVR for Recording Connection AV receiver Signal flow VCR or DVD recorder Picture quality VCR DVR OUT S S Video input Better VCR DVR OUT V Composite vi...

Page 28: ...nection Choose a video connection that matches the video source or and then make the connection You must connect the AV receiver to your TV with the same type of connection A B C Step 2 Audio Connecti...

Page 29: ...on If you use connection you must connect the AV receiver to your TV with the same type of connection A B C A Step 2 Audio Connection Choose an audio connection that matches your DVD player or and the...

Page 30: ...dio Dolby TrueHD DSD Your DVD player must be able to output these formats from its HDMI OUT About Copyright Protection The AV receiver supports HDCP High bandwidth Digital Content Protection 2 a copy...

Page 31: ...receiver set the HDMI component so that its video can be seen on the TV screen on the TV select the input of the HDMI component connected to the AV receiver If the TV power is off or the TV is set to...

Page 32: ...T VIDEO Composite video output AUX INPUT L AUDIO R Analog audio L R output TUNING MODE SETUP SETUP MIC VIDEO L AUDIO R AUX INPUT ENTER RETURN TUNING PRESET MASTER VOLUME AV RECEIVER TX SR606 VIDEO OUT...

Page 33: ...L 2 CD 2 CBL SAT COAXIAL IN L R L R CD AUDIO OUTPUT OPTICAL OUT AUDIO OUT L R COAXIAL OUT L R IN CD b c a a Step 1 Choose a connection that matches your CD player or Use connection for a turntable wit...

Page 34: ...COAXIAL OPTICAL 1 DVD 2 CBL SAT 1 GAME TV 2 CD DIGITAL IN ASSIGNABLE IN 1 DVD IN 2 COMPONENT VIDEO Y CB PB CR PR ASSIGNABLE HDMI IN 1 IN 2 IN 3 IN 4 ASSIGNABLE R L R L IN IN IN IN IN IN IN IN IN SUB W...

Page 35: ...IN 2 COMPONENT VIDEO Y CB PB CR PR ASSIGNABLE HDMI IN 1 IN 2 IN 3 IN 4 ASSIGNABLE R L IN IN IN IN IN IN CBL SAT GAME TV GAME TV CBL SAT VCR DV VCR DV TAPE CD S V DVD GAME TV CBL SAT VCR DVR OUT OUT OU...

Page 36: ...component Notes Use only cables for connections cables are supplied with Onkyo players DVD CD etc Some components have two jacks You can con nect either one to the AV receiver The other jack is for co...

Page 37: ...on The AV receiver comes on the display lights up and the STANDBY indicator goes off To turn the AV receiver off press the ON STANDBY button or press the remote controller s ON STANDBY button The AV r...

Page 38: ...rement point The left side of the listening area The distances between points 1 and 2 and points 1 and 3 must be at least 1 meter From the examples below choose the listening area that best matches yo...

Page 39: ...ckground noise can disrupt the room measurements Close win dows silence cell phones televi sions radios air conditioners fluorescent lights home appliances light dimmers or other devices and refrain f...

Page 40: ...following screen appears Use the Up and Down buttons to select an option and then press ENTER The options are Save Save the calculated settings and exit the automatic speaker setup Cancel Cancel the a...

Page 41: ...tup follow the directions on pages 72 76 Using a Powered Subwoofer If you re using a powered subwoofer as it outputs very low frequency sound and its position is usually low down it may not be detecte...

Page 42: ...oesn t appear make sure the appropriate external input is selected on your TV SETUP RECEIVER ENTER If you change these settings you must run the auto matic speaker setup again see page 38 2 Use the Up...

Page 43: ...elector Audio input DVD HDMI1 VCR DVR HDMI2 CBL SAT HDMI3 GAME TV HDMI4 AUX TAPE CD 1 Press the RECEIVER button followed by the SETUP button The main menu appears onscreen If the main menu doesn t app...

Page 44: ...RECEIVER button followed by the SETUP button The main menu appears onscreen If the main menu doesn t appear make sure the appropriate external input is selected on your TV 2 Use the Up and Down button...

Page 45: ...3 Use the Up and Down buttons to select 3 Digital Audio Input and then press ENTER 4 Use the Up and Down buttons to select an input selec tor and then use the Left and Right buttons to select COAX1 S...

Page 46: ...STANDBY ZONE 2 PURE AUDIO DVD VCR DVR CBL SAT GAME TV AUX TAPE TUNER CD DIGITAL INPUT 3 Press the DIGITAL INPUT but ton repeatedly to select an option HDMIx Auto This option can be selected when an HD...

Page 47: ...te While the multichannel DVD input is selected the Speaker Configuration settings on page 72 are ignored and signals from the multichannel input are fed to the speakers as they are 2 Start playback o...

Page 48: ...dim dimmer or normal brightness You can also use the AV receiver s DIMMER button not European mod els MUTING DISPLAY SLEEP DIMMER ON STANDBY ZONE 2 ZONE 2 LEVEL TONE MOVIE TV MUSIC GAME DISPLAY DIMME...

Page 49: ...source as follows Note This procedure can also be performed on the AV receiver by using its DISPLAY button The following information can typically be displayed 1 WhenAM or FM radio is used the band p...

Page 50: ...ut 3 seconds press the DIGITAL INPUT button repeatedly to select PCM DTS or Auto PCM Only 2 channel PCM format input signals will be heard If the input signal is not PCM the PCM indicator will flash a...

Page 51: ...EIVER button followed by the SETUP button The main menu appears onscreen If the main menu doesn t appear make sure the appropriate external input is selected on your TV 2 Use the Up and Down buttons t...

Page 52: ...Down buttons to tune the radio Listening to AM FM Stations Use the TUNER input selector button to select AM or FM In this example FM has been selected Actual display depends on country 1 Press the TU...

Page 53: ...uttons to enter the fre quency of the radio station For example to tune to 87 5 FM press 8 7 5 TUNER D TUN Number buttons Press the DISPLAY button to display the available information ON STANDBY ZONE...

Page 54: ...ING PRESET MASTER VOLUME AV RECEIVER TX SR606 STANDBY ZONE 2 PURE AUDIO 2 4 3 MEMORY PRESET MEMORY ON STANDBY ZONE 2 ZONE 2 LEVEL TONE MOVIE TV MUSIC GAME DISPLAY RT PTY TP MEMORY CLEAR DIGITAL INPUT...

Page 55: ...s allows you to search RDS radio stations by type see page 56 TP Traffic Program This allows you to search for RDS radio stations that broadcast traffic information see page 56 Notes In some cases the...

Page 56: ...UT TUNING MODE OFF PHONES MULTI CH DVD VCR DVR CBL SAT GAME TV AUX TAPE TUNER CD SETUP SETUP MIC VIDEO L AUDIO R AUX INPUT ENTER RETURN TUNING PRESET MASTER VOLUME AV RECEIVER TX SR606 STANDBY ZONE 2...

Page 57: ...ning modes intended for use with music GAME button This button selects the listening modes intended for use with video games STEREO button This button selects the Stereo listening mode and All Channel...

Page 58: ...North American model doesn t have Pure Audio listening mode MOVIE TV Mono Multichannel Neo 6 5 Dolby PLII Movie Dolby PLIIx Movie 4 4 If there are no surround back speakers or Powered Zone 2 is being...

Page 59: ...udio listening mode MOVIE TV Mono DolbyDigital DolbyDigital Plus 2 2 If there are no surround back speakers depending on the input signal Dolby Digital may be used Neo 6 4 4 Dolby PLII Movie Dolby PLI...

Page 60: ...ed DTS is used Neo 6 4 Dolby PLII Movie Dolby PLIIx Movie 3 3 If there are no surround back speakers or Powered Zone 2 is being used Dolby Pro Logic II is used 4 4 Cannot be selected with some source...

Page 61: ...Mono Multiplex Media Listening Mode Blu ray HD DVD Blu ray HD DVD PURE AUDIO Pure Audio 1 1 North American model doesn t have Pure Audio listening mode MOVIE TV Mono TrueHD Neo 6 3 Dolby PLII Movie D...

Page 62: ...g Mode Blu ray HD DVD Blu ray HD DVD PURE AUDIO Pure Audio 2 2 North American model doesn t have Pure Audio listening mode MOVIE TV Mono DTS HD High Resolution DTS HD Master Audio Neo 6 4 4 Dolby PLII...

Page 63: ...URE AUDIO Pure Audio 2 2 North American model doesn t have Pure Audio listening mode MOVIE TV Mono DTS Express DSD Neo 6 4 Dolby PLII Movie Dolby PLIIx Movie 3 3 If there are no surround back speakers...

Page 64: ...al logo and Dolby Digital TV broadcasts This is the most common digital surround sound format and it ll put you right in the middle of the action just like being in a movie theater or concert hall 5 1...

Page 65: ...ormat supports up to 5 1 channels and a lower sam pling rate of 48 kHz Applications include interactive audio and commentary encoding for HD DVD Sub Audio and Blu ray SecondaryAudio Also broadcast and...

Page 66: ...the CD IN and video from the camcorder con nected to the AUX INPUT VIDEO jack are recorded by the VCR connected to the VCR DVR OUT jacks Recording the Input Source 1 Use the input selector buttons to...

Page 67: ...image when using the Dolby Pro Logic IIx Music listening mode On Panorama function on Off Panorama function off default Dimension With this setting you can move the sound field forward or backward wh...

Page 68: ...to 0 the front left and right channel output is attenuated by half 6 dB giving the impression that the sound is located centrally This setting works well when the listening position is considerably o...

Page 69: ...namic range High Large reduction in dynamic range For Dolby TrueHD sources the options are Auto The Late Night function is set to On or Off automatically default Off Late Night function off On Late Ni...

Page 70: ...mizer on Note The Music Optimizer function only works with PCM digital audio input signals with a sampling rate below 48kHz and analog audio input signals The Music Optimizer is disabled when the Pure...

Page 71: ...n buttons to select an audio for mat and use the Left and Right buttons to select a lis tening mode Only listening modes compatible with the audio format can be selected see pages 58 63 Analog PCM Spe...

Page 72: ...mine the optimum crossover frequencies Speaker Setup 1 Press the RECEIVER button fol lowed by the SETUP button The main menu appears onscreen If the main menu doesn t appear make sure the appropriate...

Page 73: ...n nected select None Notes If the Surround setting in step 7 is set to None or Powered Zone 2 is being used this setting does not appear Cannot select Full Band if Surround step 7 is set to anything o...

Page 74: ...o the subwoofer default Off Double Bass function off 12 Press the SETUP button Setup closes This setting is not set automatically by theAutomatic Speaker Setup function see page 38 1 Measure and make...

Page 75: ...eakers Note Speakers that you set to No or None in the Speaker Configuration page 72 cannot be selected 8 Press the SETUP button Setup closes 1 Press the RECEIVER REMOTE MODE button followed by the SE...

Page 76: ...e for each speaker is set automatically by the Automatic Speaker Setup function Be sure to select this setting after having performed the Automatic Speaker Setup Manual You can adjust the equal izer f...

Page 77: ...om 0 to 100 milliseconds msec in 10 millisecond steps Use the Left and Right buttons to set the delay To view the TV picture while setting the delay press ENTER If HDMI Lip Sync is enabled see page 81...

Page 78: ...s selected operation details are not output if the input source is connected to a COMPONENT VIDEO IN or HDMI IN Monitor Type With this setting you can specify the aspect ratio of your TV so that menus...

Page 79: ...e Remote Controller s ID Hardware Setup 1 Press the RECEIVER REMOTE MODE button followed by the SETUP button The main menu appears onscreen If the main menu doesn t appear make sure the appropriate ex...

Page 80: ...connected to the AV receiver s MULTI CH SUBWOOFER jack You can select 0dB 5dB 10dB or 15dB If you find that your subwoofer is too loud try the 10 dB or 15 dB setting HDMI Output Resolution You can sp...

Page 81: ...en see page 77 x v Color If your HDMI source and HDMI compatible TV both support the x v Color you can enable x v Color on the AV receiver with this setting Disable x v Color disabled Enable x v Color...

Page 82: ...akers producing sound change the set tings change your TV s settings or turn down the AV receiver s volume With this setting you can protect your settings by lock ing the setup menus Note After changi...

Page 83: ...V receiver s ZONE 2 SPEAKERS L R speaker terminals Notes With this setup the Zone 2 volume is controlled by the AV receiver Powered Zone 2 cannot be used if Speaker Type is set to Bi Amp page 42 Conne...

Page 84: ...is set to Bi Amp This procedure can also be performed on the AV receiver by using its SETUP ENTER and arrow buttons Powered Zone 2 Setting 1 Press the RECEIVER REMOTE MODE button followed by the SETU...

Page 85: ...TUNER input selector button repeatedly On the North American model you can also select SIRIUS Note You cannot select different AM or FM radio stations for your main room Zone 2 The same AM FM radio s...

Page 86: ...en use the VOL button On the AV receiver use the ZONE 2 LEVEL buttons If your Zone 2 speakers are connected to an amp in Zone 2 use its volume control to adjust the volume On the remote controller pre...

Page 87: ...buttons Remote indicator 1 Look up the component s remote control code in the separate Remote Control Codes list The codes are organized by category 2 While holding down the REMOTE MODE button to whi...

Page 88: ...nected with an cable and an analog audio cable RCA See page 36 for details 2 Enter the appropriate remote control code to the REMOTE MODE button DVD REMOTE MODE button 31612 Onkyo DVD player with CD R...

Page 89: ...E Arrow and ENTER buttons Used to navigate menus and select items F SETUP button Displays a menu G Playback buttons From left to right Previous Rewind Pause Play Stop Fast Forward and Next These butt...

Page 90: ...back function J SEARCH buttons Used to search title chapter and track numbers and to search times for locating specific points K Number buttons Used to enter title chapter and track numbers and to ent...

Page 91: ...on Selects the TV s external inputs D TV VOL Adjust the TV s volume E GUIDE button Displays the program guide or navigation list F Arrow and ENTER buttons Used to navigate menus and select items G SET...

Page 92: ...er numbers The 10 button works as a 10 button or button H DISPLAY button Displays information I MUTING button 48 Mutes or unmutes the AV receiver J CH button Selects satellite cable channels K VOL but...

Page 93: ...on Used with the repeat playback function G SEARCH button Used to locate specific points H Number buttons Used to enter track numbers and times for locating specific points The 10 button works as a 10...

Page 94: ...ill remain off when the remote controller trans mits an Off command B TOP MENU button Works as a Mode button when used with a DS A2 RI Dock C Arrow and ENTER buttons Used to navigate menus and select...

Page 95: ...page 87 On twin cassette decks only Deck B can be controlled A ON STANDBY button Turns the cassette recorder on or off B Previous and Next buttons The Previous button selects the previous track During...

Page 96: ...AUDIO button on your DVD player s remote controller If your turntable doesn t have a phono preamp built in you must connect one between it and the AV receiver If your turntable uses an MC cartridge y...

Page 97: ...sure that the multichannel input is selected page 47 Check the audio output settings on your DVD player About DTS signals When playing DTS program material using the pause fast forward or fast reverse...

Page 98: ...ay to MD CDR or DOCK respectively see page 45 The entered remote control code may not be correct If more than one code is listed try each one With some AV components certain buttons may not work as ex...

Page 99: ...e picture isn t very clear you can attenuate the gain Video ATT 0 default Video ATT 2 Gain is reduced by 2 dB The AV receiver contains a microcomputer for signal pro cessing and control functions In v...

Page 100: ...Video input connect your TV to an S Video output If the video source is connected to a composite video input connect your TV to a composite video output 2 On the main menu select 1 Input Assign and th...

Page 101: ...e 1 Vp p 75 Component and S VideoY 0 7 Vp p 75 Component Pb Cb Pr Cr 0 28 Vp p 75 S Video C 1 Vp p 75 Composite Component Video Frequency Response 5Hz 50MHz 3 dB Tuning Frequency Range North American...

Page 102: ...480P 480i 1080P 1080i 720P 480P 480i 480i 480i 480i 480i HDMI 1080P 1080i 720P 480P 480i COMPONENT 1080P 1080i 720P 480P 480i S VIDEO 480i COMPOSITE 480i Input Output HDMI COMPONENT S VIDEO COMPOSITE...

Page 103: ...ock Setup Lock Unlocked 7 Hardware Setup 1 Remote Control 2 Zone2 3 Tuner 4 Analog Multich 5 HDMI 4 Source Setup DVD 1 Input Assign 1 HDMI Input 2 Component Video Input 3 Digital Audio Input 2 Speaker...

Page 104: ...00 Fax 201 785 2650 http www us onkyo com ONKYO EUROPE ELECTRONICS GmbH Liegnitzerstrasse 6 82194 Groebenzell GERMANY Tel 49 8142 4401 0 Fax 49 8142 4401 555 http www eu onkyo com ONKYO EUROPE UK Offi...

Reviews: