Onkyo TX-SE550 Instruction Manual Download Page 16


16


Selecting a sound source

SL

EE

P

D

V

D

D

IS

C

T

A

P

E

C

 D

T

U

N

E

R

M

U

T

IN

G

REMOTE CONTROLLER 


                              RC-386M

CH SEL

SE

N

D

IN

G

/

LEVEL

D

IM

M

ER

P

R

E

S

E

T

G

R

O

U

P

LE

AR

N

ED

M


TI-C

H

U

L

IN

P

U

T

D

V

D

V

ID

E

O

-1

V

ID

E

O

-2

T

A

P

E

T

U

N

E

R

P

H

O

N

O

C

 D

IN

P

U

T

 S

E

LE

C

T

O

R

P

O

W

E

R

P

O

W

E

R

T

V

/ V

C

R

V

O

LU

M

E

C

 H

P

R

O

G

R

A

M

M

A

B

LE

 A

R

E

A

  T

V

  V

ID

E

O

/

M

O

D

E

S

U

R

PO

W

ER

LE

AR

N

KAR

A

O

KE

K

E

Y

 C

O

N

T

R

O

L

V

O

C

A

L

C

A

N

C

E

L

VOLUME

T

O

N

E

T

E

S

T

ECHO LEVEL

MIC LEVEL

KARAOKE

MIC

3-D BASS

1

2

1

MAX

MIN

2

KEY CONTROL

VOCAL

CANCEL


TX-SE550

TREBLE

BASS

PHONES

MASTER  VOLUME

OFF

ON

POWER

STANDBY/ON

C D

AM

PHONO

FM

DVD

1

VIDEO

2

VIDEO

TI  CH INPUT

MUL

TAPE(                 )

MONITOR

Re-EQ

STANDBY

DIRECT TUNING

CLEAR

MEMORY FM MUTE / MODE

SPEAKERS

A

B

MIDNIGHT THEATER

SURROUND MODE

MAX

MIN

MAX

MIN

PARAMETER CONTROLLER

TUNING

PARAMETER SELECTOR

SCAN GROUP

0 /10

9

8

7

6

5

4

3

2

1

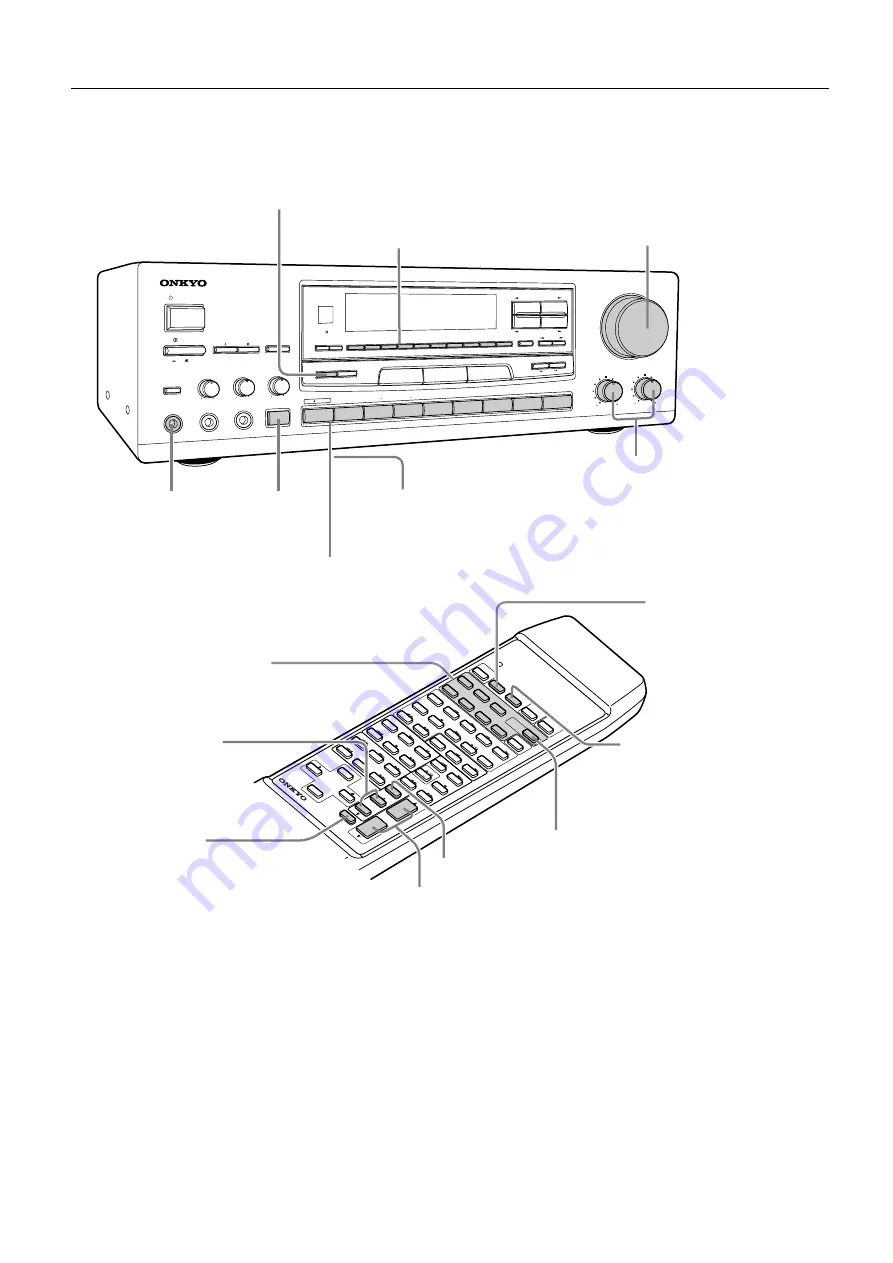
1. Press the desired input selector button or MULTI-CH INPUT button.

The selected source name appears on the display. Refer to page 17 for 
more information on MULTI CH INPUT.

2. Make sure that the SPEAKERS A 

indicator is lit on the display. If it is not lit, 
press the SPEAKERS A button.
(Refer to the “Speakers selector” section on 
the page 18 for more details.)

3. Start playing the selected input source.

Follow the operating instructions for the 
source device.

4. Adjust the volume to an appropriate level.

These controls allow you to adjust the volume of the 
Front, Center, Surround speakers and subwoofer 
simultaneously. Turning the control clockwise 
increases the volume level. Turning the control 
counter-clockwise decreases the volume level.

Number buttons
(Refer to page 24~25 
for more details.)

LEVEL

π

/

 button

4. VOLUME button (

π

up/

down)

Use this button to adjust the volume level.

1. INPUT SELECTOR button

Use this button to select a desired sound source.

DIMMER button
Use this button to change the 
brightness of the display (normal 
or dim).

SLEEP button
This button allows you to set 
the sleep timer.
(Refer to page 19 for more 
details.)

MUTING button
This button mutes the sound temporarily.
(Refer to page 19 for more details.)

5. Use the bass, treble 

controls to adjust the tone.
(Refer to page 18 for more 
details.)

3-D BASS
(Refer to page 18 
for more details.)

PHONE jack
(Refer to page 18 
for more details.)

MULTI-CH INPUT button

CH SEL button

Follow the steps below to select a device to play the sound source.

Note:
If you hear no sound from the speakers, check the following items:

Make sure that all devices and speakers are connected correctly and securely.

Make sure that the TAPE MONITOR indicator is not lit on the display when you select an input source other than TAPE. If the indicator is
lit, no sound will be produced. Press the TAPE (MONITOR) button to turn it off and press the desired input selector button.

The sound is muted when the MUTING indicator is lit. Press the MUTING button on the remote controller to cancel the mute function.

Refer to page 26 for more information on how to use TAPE MONITOR for recording.

When you select a source that is connected to the DIGITAL INPUT jacks on the rear panel, you must select digital input (refer to page 17.). 

If you have selected MULTI CH INPUT, you need to adjust the level of each speaker (refer to page 17).

You can use the MASTER VOLUME control to adjust the overall speaker level in the range of –

 to –61 to +18dB. The level value will

appear on the display. However, if you have set the level of any individual speaker to +1dB or higher, setting the MASTER VOLUME
control to its maximum will not raise the overall volume level to +18dB (maximum). Refer to the following sections for more informa-
tion on adjusting the speaker level:
“Test Tone (Remote control only)” on page 15.
“When Multi channel input is selected as a source” on page 17.

Summary of Contents for TX-SE550

Page 1: ...eset radio stations 25 Recording a source 26 Programming remote controller codes 28 Appendix Troubleshooting guide 30 Specifications 31 Control guide Control positions and names 32 Remote controller R...

Page 2: ...uld be cleaned only as recom mended by the manufacturer 14 Power Lines An outdoor antenna should be located away from power lines 15 Nonuse Periods The power cord of the appliance should be unplugged...

Page 3: ...ied electrician For U S model Note to CATV system installer This reminder is provided to call the CATV system installer s attention to Article 820 40 of the NEC ANSI NFPA 70 which pro vides guidelines...

Page 4: ...SION VOLUME CONTROL to eliminate the noise and distortion inherent in electronic switching and give you more precise minute volume level adjustment by remote KARAOKE CAPABILITY with 2 microphone input...

Page 5: ...n usage Point the remote controller toward the remote control sensor The STANDBY indicator lights up when the unit receives a signal from the remote controller Notes Place the unit away from strong li...

Page 6: ...SUB WOOFER L R R L R L R CENTER SPEAKER R L L SURROUND SPEAKERS DIGITAL INPUT REMOTE CONTROL MODEL NO TX SE550 FRONT SPEAKERS A FRONT SPEAKERS B DIGITAL 1 OPTICAL DIGITAL 2 COAXIAL AC OUTLETS SWITCHED...

Page 7: ...n making any con nections Notes When using a playback only VCR you need to make only the output connections This receiver can be used with only a monitor TV equipped with a video input jack Interferen...

Page 8: ...OUT CENTER OUT SUBWOOFER OUT AUDIO OUT VIDEO OUT SURROUND OUT L Left R Right L R V Video V Audio connection cable Video connection cable On each pair of input jacks a red connector marked R correspond...

Page 9: ...s ON CD AM FM 75 ANTENNA GND PHONO R L R L PLAY REC R L V OUT IN MONI TOR OUT SUB WOOFER PRE OUT SURROUND FRONT R L R L DVD TAPE IN IN VIDEO 1 VIDEO 2 IN OUT CENTER SUB WOOFER L R R L R L R CENTER SPE...

Page 10: ...e the lever to replace it 2 Unscrew 3 Insert wire 4 Screw CD AM FM 75 ANTENNA GND PHONO R L R L PLAY REC R L V OUT IN MONI TOR OUT SUB WOOFER PRE OUT SURROUND FRONT R L R L DVD TAPE IN IN VIDEO 1 VIDE...

Page 11: ...ofer speaker Front speaker Left Front speaker Right Connecting the power Before you plug in the receiver confirm that all connections have been made properly Turning on this receiver s power may cause...

Page 12: ...e same antenna for both FM and TV or VCR recep tion since the FM and TV or VCR signals can interfere with each other If you must use a common FM TV or VCR antenna use a directional linkage type splitt...

Page 13: ...of an outdoor antenna is recommended Please make sure that you follow the considerations below regard ing the location Keep the antenna away from noise sources neon signs busy roads etc It is dangerou...

Page 14: ...e this button to adjust the level of each speaker CH SEL button Use this button to select a speaker Before operating your stereo system you need to set the type and position of the connected speakers...

Page 15: ...t 0 or 10dB In general leave this parameter set to 0dB When Dolby digital sound is played and if the bass range is too loud set this parameter to 10dB to decrease the Low Fre quency Effect in the low...

Page 16: ...he volume level 1 INPUT SELECTOR button Use this button to select a desired sound source DIMMER button Use this button to change the brightness of the display normal or dim SLEEP button This button al...

Page 17: ...PTICAL DIG2 Digital input DIGITAL 2 COAXIAL If an analog device is connected press the Input Selector button to select ANLG You can switch between digital and analog for the DVD VIDEO 1 2 and CD input...

Page 18: ...nd headphones BASS Boosts or cuts the bass response TREBLE Boosts or cuts the treble response 3 D BASS This button is used to clearly reproduce ultra low fre quencies When this button is pressed the 3...

Page 19: ...me reduces the time value in 10 minute incre ments When the specified time comes the power will be switched off automatically Disabling the Sleep function Press the SLEEP button until it returns to th...

Page 20: ...his mode reproduces the acoustics of a live performance ARENA Surround This mode recreates the atmosphere of a concert in a domed sta dium STEREO Select this mode when you do not wish to use the surro...

Page 21: ...material that contains necessary Dolby Digital information Press the MIDNIGHT THEATER button during Dolby Digital playback The MIDNIGHT THEATER indicator appears on the display To cancel the MIDNIGHT...

Page 22: ...MIDNIGHT THEATER SURROUND MODE MAX MIN MAX MIN PARAMETER CONTROLLER TUNING PARAMETER SELECTOR SCAN GROUP 0 10 9 8 7 6 5 4 3 2 1 MIC 1 and MIC 2 jacks Connect one or two dynamic type microphones to th...

Page 23: ...Dolby Digital for the Karaoke function You cannot use the Karaoke function while Dolby Digital signal is being input from a digital source 8 To adjust the pitch of the music in semitone steps 6 6 pre...

Page 24: ...lashing Example 88 10 MHz 50 kHz step area 8 8 1 0 10 100 kHz step area 8 8 1 Use the 0 10 number button to enter a 0 Out of range frequencies will be ignored When receiving AM broadcasts with a 10 kH...

Page 25: ...tored in the memory 1 Select the tuner as the source by pressing the AM or FM input selector button on the main unit 2 Press the GROUP button until the desired group is dis played 3 Enter the desired...

Page 26: ...onitored Press the TAPE MONITOR button The TAPE MONITOR indi cator appears on the display To stop monitoring press the TAPE MONITOR button again The TAPE MONITOR indicator turns off You cannot use the...

Page 27: ...from a video disc player or a video camcorder to VCR Adding new sound to a video tape during video editing 2 VCR VIDEO 2 VDP DVD player VIDEO 1 1 3 1 3 BASS TREBLE C D PHONES Re EQ A V KARAOKE CONTRO...

Page 28: ...ns when memorization is not possible Device commands Symbol VDP VCR TV POWER POWER POWER CHANNEL UP DOWN VOLUME UP DOWN STOP STOP PLAY PLAY Rec Pause TV VCR TV VCR switching FAST REWIND FAST FORWARD 1...

Page 29: ...be necessary to memo rize them once again using the old remote controller Reprogramming the buttons Follow the steps 1 4 described above The previous codes will be lost and new codes will be stored P...

Page 30: ...ed Connect the included AM loop antenna to the AM antenna terminals 13 Buzzing noise on AM particu larly conspicuous at night or with weak stations Noise from electrical apparatus such as fluores cent...

Page 31: ...e 100 dB IHF A Signal sensitivity and impedance 1 Vp p 75 ohms DVD VIDEO 1 VIDEO 2 input out put Tuning Range 87 5 108 0 MHz Usable Sensitivity Mono 11 2 dBf 1 0 V 75 ohms Stereo 18 2 dBf 2 2 V 75 ohm...

Page 32: ...button 25 GROUP button 25 Number buttons 16 24 25 DIRECT TUNING button 24 TUNING UP DOWN buttons 24 FM MUTE MODE button 24 25 MEMORY button 25 9 Display Refer to the Display illustration 10 PARAMETER...

Page 33: ...ton 17 15 LEARN button 28 29 16 Tuner operation buttons TUNER 25 34 GROUP Group selector button PRESET Preset memory up down buttons 17 Tape operation buttons 34 18 Channel selector button CH SEL 14 1...

Page 34: ...IDEO 2 TAPE PHONO C D LEARN INPUT SELECTOR DVD KARAOKE VOCAL CANCEL KEY CONTROL DISC GROUP VOLUME TAPE DIMMER TUNER POWER POWER VOLUME C H TV VCR MUTING LEVEL REMOTE CONTROLLER CH SEL TEST TONE SENDIN...

Page 35: ...g an Onkyo DVD player Using the Karaoke function 2 3 1 POWER SLEEP DVD VIDEO 1 VIDEO 2 TAPE PHONO C D LEARN INPUT SELECTOR DVD KARAOKE VOCAL CANCEL KEY CONTROL DISC GROUP VOLUME TAPE DIMMER TUNER POWE...

Page 36: ...ROPE ELECTRONICS GmbH Industriestrasse 20 82110 Germering GERMANY Tel 089 84 93 20 Fax 089 84 93 226 E mail info onkyo de ONKYO EUROPE FRANCE BRANCH Domaine Technologique de Saclay 4 Rue Ren Razel SAC...

Reviews: