background image

Step 1:

   Connections

En-6

'

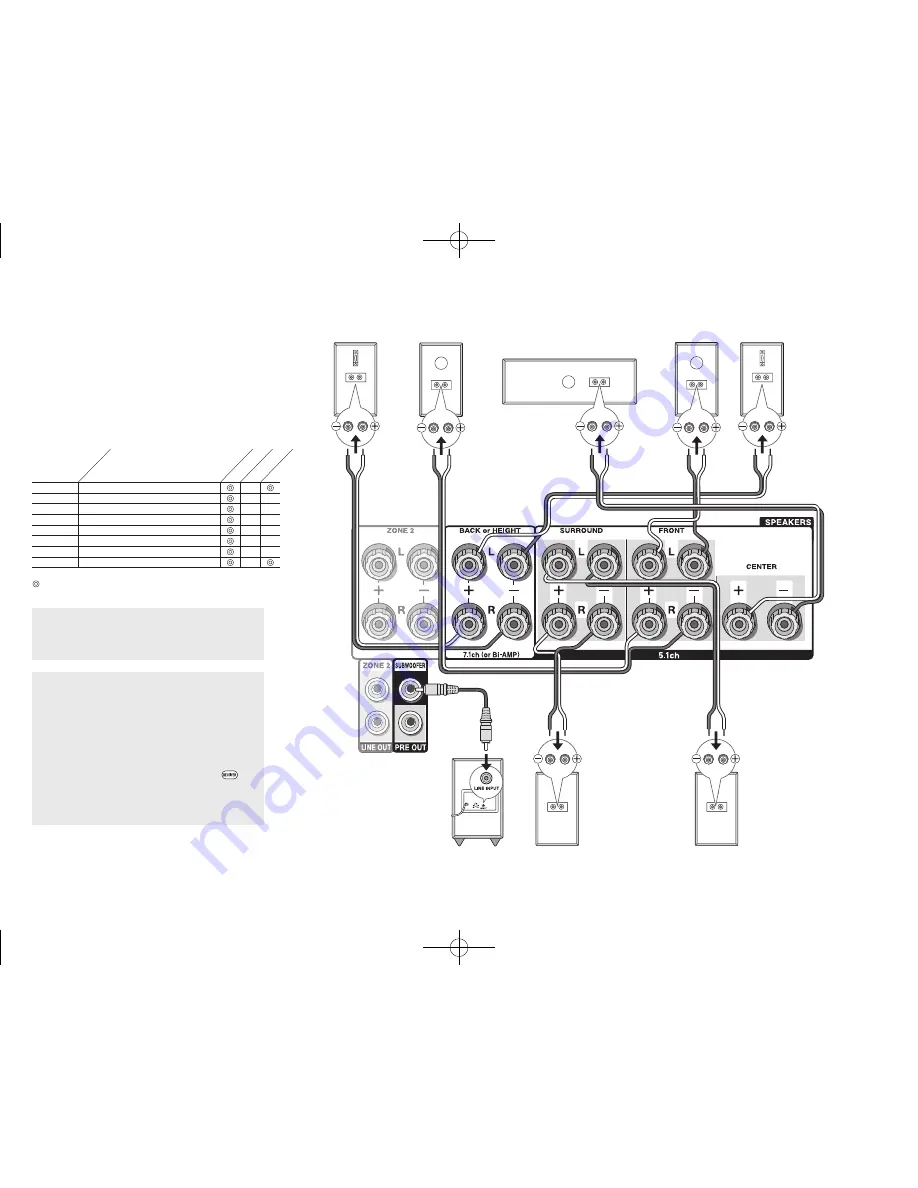
Subwoofer with built-in 

power amplifier

&

Surround R

8FH

Right back

Or right height

79G

Left back

Or left height

%

Surround L

Center

#

Front R

Front L

A speaker configuration 

where only one back 

speaker is connected is 

not supported.

and the other type is designed to be integrated with normal 

speakers. Dolby Enabled Speakers placed with their 

diaphragms facing toward the ceiling create higher effect 

in the Dolby Atmos and Dolby Surround listening modes 

by providing sounds echoing off the ceiling. You can select 

(

g

)(

h

) or (

i

)(

j

) on the unit. For connection with the unit, 

use the SPEAKERS BACK or HEIGHT terminals.
When playing Dolby Atmos, the speakers required depend 

on how you have setup your back speakers or height 

speakers.


The following shows combinations of speakers 

for reproducing Dolby Atmos.

1

Back

2

Front High

3

Rear High

4

Top Front

5

Top Middle

6

Top Rear

7

Dolby Enabled Speaker (Front)

8

Dolby Enabled Speaker (Surround)

Connection 

pattern

Front CenterSurround

Back or Height

: Required, 

: Optional

 Connection of a subwoofer is optional.

Important

: (North American and Taiwanese models)

Connect speakers with 6 Ω to 16 Ω impedance. Using a 

speaker with less impedance than the supported value 

may result in failure. 

Important

: (European, Australian and Asian models)

Connect speakers with 4 Ω to 16 Ω impedance. You 

have to change the setting if any of the speakers 

have 4 Ω or more to less than 6 Ω impedance. Using 

a speaker with less impedance than the setting 

may result in failure. You can set up by viewing the 

guidance displayed on the TV screen. Select the item 

with the cursor buttons of the remote controller and 

press ENTER to confirm your selection. To return 

to the previous screen, press RETURN. Press 

RECEIVER and then SETUP on the remote controller. 

Select "2. Speaker" - "Configuration" - "Speaker 

Impedance" and change the default value from "6ohms" 

to "4ohms".

TX-NR646_BAS_En_SN29401979_20150226.indd   6

2015/02/26   14:59:55

Summary of Contents for TX-NR646

Page 1: ...instructions for frequently used operations The Advanced Manual is published on the web for ecological reasons and has more detailed information and advanced settings http www onkyo com manual txnr646...

Page 2: ...s USB storage playback Supports variety of network functions such as Internet Radio DLNA AirPlay etc Supports Wi Fi and Bluetooth Equipped with a PHONO jack enabling connection with a turntable Bi Amp...

Page 3: ...R button Move the cursor and confirms the selection When listening to AM FM broadcasting tune in to the station with lTUNINGj or select the registered station with dPRESETc K RETURN button Returns the...

Page 4: ...eparate room K PRE OUT SUBWOOFER jack A subwoofer with built in amplifier is connected 1 4 6 23 7 5 9 8 Display 1 Lights in the following conditions Z2 Zone 2 output is on HDMI HDMI signals are input...

Page 5: ...ects on a height plane This unit can perform optimal sound field processing for the type of height speakers actually installed and registered in Initial Setup Height speaker types Installing speakers...

Page 6: ...dle 6 Top Rear 7 Dolby Enabled Speaker Front 8 Dolby Enabled Speaker Surround Connection pattern F r o n t C e n t e r S u r r o u n d Back or Height Required Optional Connection of a subwoofer is opt...

Page 7: ...usting dial turn it to the maximum frequency If your subwoofer does not have built in power amplifier you can connect a power amplifier between the unit and the subwoofer The speaker setting is 7 1 ch...

Page 8: ...tor buttons For how to make settings see the Advanced Manual To connect the TV and the unit connect the HDMI OUT MAIN jack of the unit and the HDMI IN jack of the TV using a HDMI cable With this conne...

Page 9: ...ple when video input connection is to the 2 BD DVD jack the audio input connection should also be to the 4 BD DVD jacks It is possible to change assignment of the input jacks and input selector button...

Page 10: ...t See 4 Network Connection of Step 2 Initial Setup for Wi Fi settings Internet radio Router NAS Headphones connection Connect stereo headphones with a standard plug 1 4 inch or 6 3 mm to the PHONES ja...

Reviews: