background image

En-

22

Listening to the Radio

—Continued

Displaying Radio Text (RT)

When tuned to an RDS station that’s broadcasting text 

information, the text can be displayed.

1

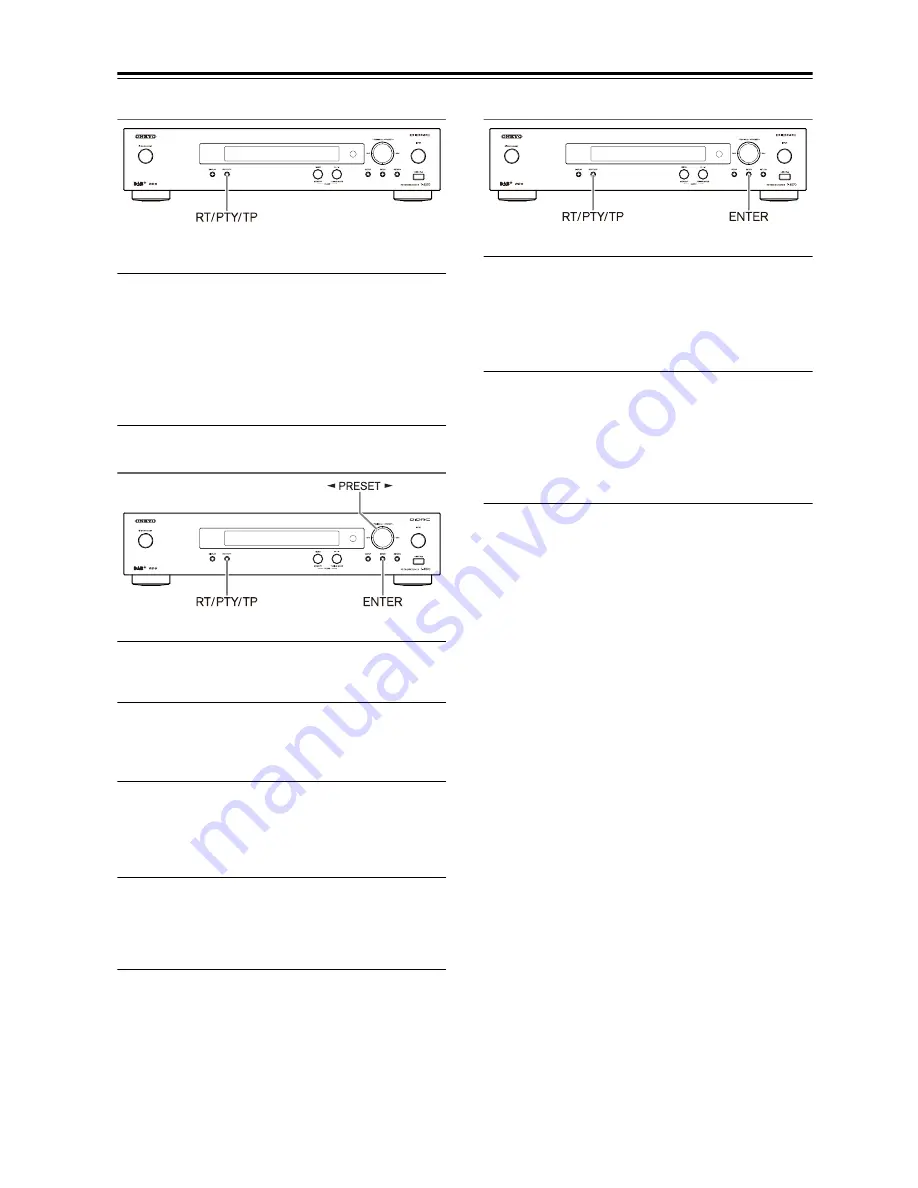
Press the [RT/PTY/TP] button once.

The RT information scrolls across the display.

Notes:

• The message “Waiting” may appear while the 

tuner waits for the RT information.

• If the message “No Text Data” appears on the dis-

play, no RT information is available.

Finding Stations by Type (PTY)

You can search for radio stations by type.

1

Press the [RT/PTY/TP] button twice.

The current program type appears on the display.

2

Use the PRESET [

]/[

] buttons to select 

the type of program you want.

See the table on page 21.

3

To start the search, press [ENTER].

The tuner searches until it finds a station of the 
type you specified, at which point it stops briefly 
before continuing with the search.

4

When a station you want to listen to is 
found, press [ENTER].

If no stations are found, the message “Not Found” 
appears.

Listening to Traffic News (TP)

You can search for stations that broadcast traffic news.

1

Press the [RT/PTY/TP] button three times.

If the current radio station is broadcasting TP 
(Traffic Program), “[TP]” will appear on the 
display. If “TP” without square brackets appears, 
this means that the station is not broadcasting TP.

2

To locate a station that is broadcasting TP, 
press [ENTER].

The tuner searches until it finds a station that’s 
broadcasting TP.
If no stations are found, the message “Not Found” 
appears.

Summary of Contents for T-4070

Page 1: ...connections and plugging in the unit Following the instructions in this manual will enable you to obtain optimum performance and listening enjoyment from your new Tuner Please retain this manual for future reference Contents Introduction En 2 Connections En 10 Enjoying Audio Sources En 16 Appendix Troubleshooting En 37 Specifications En 39 ...

Page 2: ...paratus does not operate normally by following the operating instructions Adjust only those controls that are covered by the operating instructions as an improper adjustment of other controls may result in damage and will often require extensive work by a qualified technician to restore the apparatus to its normal operation E If the apparatus has been dropped or damaged in any way and F When the a...

Page 3: ...ds Never handle this unit or its power cord while your hands are wet or damp If water or any other liquid gets inside this unit have it checked by your Onkyo dealer 8 Handling Notes If you need to transport this unit use the original packaging to pack it how it was when you originally bought it Do not leave rubber or plastic items on this unit for a long time because they may leave marks on the ca...

Page 4: ...immer Normal Dim Dimmer Auto Standby Function 1 AirPlay the AirPlay logo iPad iPhone iPod iPod classic iPod nano iPod shuffle and iPod touch are trademarks of Apple Inc registered in the U S and other countries Made for iPod and Made for iPhone mean that an electronic accessory has been designed to connect specifically to iPod or iPhone respectively and has been certified by the developer to meet ...

Page 5: ... AM FM Stations 16 Listening to DAB Digital Radio 19 Using RDS 21 Using the USB Network Device 23 Connecting the iPod iPhone Directly to the USB Port 23 Using the AirPlay 24 Playing the USB Device 25 Listening to the Internet Radio 26 Playing Music Files on a Server 27 Remote Playback 28 Network USB Features 29 Connecting to the Network 29 Network Requirements 29 Server Requirements 29 USB Device ...

Page 6: ...s of color Notes If the remote controller doesn t work reliably try replacing the batteries Don t mix new and old batteries or different types of batteries If you intend not to use the remote controller for a long time remove the batteries to prevent damage from leakage or corrosion Expired batteries should be removed as soon as possible to prevent damage from leakage or corrosion When using the r...

Page 7: ...6 37 b TUNING PRESET buttons 16 19 22 24 28 31 c INPUT button 16 19 23 d DISPLAY button 19 23 25 e RT PTY TP button 22 f MEMORY MENU button 17 25 28 g TUNING MODE button 16 17 20 37 h SETUP button 18 19 20 24 31 34 i ENTER button 17 19 20 24 j RETURN button 23 27 k USB port 23 25 Front Panel a 9 3 4 5 8 7 2 6 j k ...

Page 8: ...CAL and AES EBU jacks 12 13 e ETHERNET port 29 f AC INLET terminal 15 See Connecting Antennas Connecting Your Components for connection pages 10 to 15 For detailed information see the pages in parentheses a M Opt indicator b indicators c Message area d Tuning indicators RDS indicator 21 AUTO indicator 16 TUNED indicator 16 FM STEREO indicator 16 e NET indicator 26 f USB indicator 23 g SLEEP indica...

Page 9: ...23 25 d INPUT SELECTOR buttons 16 19 23 e SHUFFL button 23 24 25 f Control buttons 17 23 25 28 g Arrow and ENTER buttons 16 19 23 31 34 h SETUP button 18 19 20 24 31 34 i Number buttons 17 j D TUN button 17 18 k MODE button 16 23 l MENU button 25 26 m REPEAT button 23 24 25 n RETURN button 19 20 23 27 Remote Controller 1 2 3 4 5 6 7 8 9 j k l m n ...

Page 10: ...antenna is for indoor use only 1 Assemble the AM loop antenna inserting the tabs into the base as shown 2 Connect both wires of the AM loop antenna to the AM push terminals as shown The antenna s wires are not polarity sensitive so they can be connected either way around Make sure that the wires are attached securely and that the push terminals are gripping the bare wires not the insulation Once t...

Page 11: ...to the DAB ANTENNA jack Once your tuner is ready for use you ll need to tune into a DAB station and adjust the position of the DAB antenna to achieve the best possible reception 2 Use thumbtacks or something similar to fix the DAB antenna into position Connecting the DAB Antenna ...

Page 12: ... is a professional digital audio interface Balanced AES EBU cables are used for better noise immunity and longer cable runs The maximum sampling rate for PCM output is 96kHz 24bit 2ch Optical digital audio Optical digital connections allow you to enjoy digital sound such as PCM The maximum sampling rate for PCM output is 96kHz 24bit 2ch Coaxial digital audio Coaxial digital connections allow you t...

Page 13: ...ect the T 4070 s AUDIO OUTPUT L R jacks to the LINE IN jacks on your amplifier as shown Digital Optical or Coaxial Connection Use the digital audio cable to connect the T 4070 s DIGITAL COAXIAL OPTICAL jacks to the DIGITAL IN jacks on your amplifier as shown Digital AES EBU Connection Use the balanced AES EBU cable to connect the T 4070 s DIGITAL AES EBU jacks to the AES EBU IN jacks on your ampli...

Page 14: ... the T 4070 as the input source Remote Control Operation You can control the T 4070 by using your Onkyo amplifier s remote controller See the amplifier s instruction manual for details With Remote Interactive you can control your capable Onkyo CD player T 4070 and so on with your amp s remote controller Notes Push each plug in all the way to make a good connection Use only dedicated cables for con...

Page 15: ... outlet 1 Press the ON STANDBY button Alternatively press the remote controller s button The tuner comes on and the display lights up To turn the tuner off press the ON STANDBY button or press the remote controller s button The tuner will enter Standby mode Connecting the Power Cord Turning On and Standby AC INLET To an AC wall outlet Plug type varies from country to country Supplied power cord ...

Page 16: ...tor In this mode you will receive the broadcast in monaural sound 3 Press the TUNING or button You can also use the remote controller s arrow buttons to tune the radio Auto Tuning Searching stops when a station is found Manual Tuning The frequency stops changing when you release the button Press the buttons repeatedly to change the frequency one step at a time The frequency changes in 0 05 MHz ste...

Page 17: ...he MEMORY button The preset number flashes Actual display depends on the country 3 While the preset number flashes about 8 seconds use the PRESET buttons to select a preset from 1 through 40 4 Press the MEMORY button again to store the station or channel The station or channel is stored and the preset number stops flashing Repeat this procedure for all of your favorite AM FM radio stations Selecti...

Page 18: ...y for upper case letters You can select characters in each character set by pressing the buttons Press the buttons to select a character to input and then press the ENTER button to confirm If you do not find a character that you want to select in the currently displayed character set press the buttons to display string Shift BS OK use the buttons to select Shift and then press the ENTER button to ...

Page 19: ... Using the Scan Function Manually 1 Press the SETUP button 2 Use the arrow button to select 1 Hardware Setup and then press ENTER 3 Use the arrow button to select 1 DAB Scan and then press ENTER 4 Use the arrow button to select WW or UK see DAB Scan on page 20 and then press ENTER to stat Auto Tuning function To cancel Auto Tuning press the ENTER button If no station is detected after scanning No ...

Page 20: ... LW DAB DRC With the DRC Dynamic Range Control setting you can reduce the dynamic range of DAB digital radio so that you can still hear quiet parts even when listening at low volume levels ideal for listening to the radio late at night when you don t want to disturb anyone Use the arrow buttons to select the following options and then press ENTER 0 default DRC off 1 Large reduction in dynamic rang...

Page 21: ...ns that broadcast traffic information page 22 Notes In some cases the text characters displayed on the tuner may not be identical to those broadcast by the radio station Also unexpected characters may be displayed when unsupported characters are received This is not a malfunction If the signal from an RDS station is weak RDS data may be displayed intermittently or not at all Switching the Display ...

Page 22: ...m you want See the table on page 21 3 To start the search press ENTER The tuner searches until it finds a station of the type you specified at which point it stops briefly before continuing with the search 4 When a station you want to listen to is found press ENTER If no stations are found the message Not Found appears Listening to Traffic News TP You can search for stations that broadcast traffic...

Page 23: ... select the next song press To select the beginning of the current song press To select the previous song press twice To fast forward the current song hold down To fast reverse the current song hold down To switch the repeat mode press REPEAT To switch the shuffle mode press SHUFFL If you reconnect the iPod iPhone it returns to the iPod iPhone setting You cannot use repeat mode and random mode at ...

Page 24: ...ess To select the previous song press twice To switch the repeat mode press REPEAT To switch the shuffle mode press SHUFFL To switch displays press the DISPLAY button Press the button repeatedly to display in turn strings of information for the currently playing song such as artist name album title playback elapsed time song duration etc Tips When iTunes or your iPad iPhone iPod touch device is no...

Page 25: ...turn to the first menu Notes If the media you connect is not supported the message No Storage will appear on the display If you connect a USB hard disk drive to the tuner s USB port we recommend that you use its AC adapter to power it The tuner supports USB MP3 players that support the USB Mass Storage Class standard which allows USB devices to be connected to computers without the need for specia...

Page 26: ...ET appears on the display and the NET indicator lights If it flashes verify that the Ethernet cable is firmly connected to the tuner 2 Use to select vTuner Internet Radio and then press ENTER 3 Use to select a folder and then press ENTER 4 Use to select a program and then press ENTER Playback starts Press MENU button to enable selection from the following menu items Stations like this Stations lik...

Page 27: ...dialog box This completes the Windows Media Player 11 configuration You can now play the music files in your Windows Media Player 11 library through the tuner Windows Media Player 11 can be downloaded for free from the Microsoft web site Windows Media Player 12 Setup 1 Start Windows Media Player 12 2 On the Stream menu select Turn on media streaming A dialog box appears 3 Move your cursor and clic...

Page 28: ... appears 3 Move your cursor and click on Turn on media streaming A list of media server appears Wording may vary slightly depending on the network location 4 Select the product in the list and then click Allowed 5 Click OK to close the dialog box This completes the Windows Media Player 12 configuration You can now play the music files in your Windows Media Player 12 library Using Remote Playback 1...

Page 29: ... the tuner your broadband Internet connection must be working and able to access the Web Consult your ISP if you have any problems with your Internet connection The tuner uses DHCP to configure its network settings automatically If you want to configure these settings manually see Network Setup page 32 The tuner does not support PPPoE settings so if you have a PPPoE type Internet connection you mu...

Page 30: ...and 96 kHz are supported Quantization bit 8 bit 16 bit 24 bit AAC aac m4a mp4 3gp 3g2 AAC M4A MP4 3GP or 3G2 AAC stands for MPEG 2 MPEG 4 Audio Sampling rates of 8 kHz 11 025 kHz 12 kHz 16 kHz 22 05 kHz 24 kHz 32 kHz 44 1 kHz 48 kHz 64 kHz 88 2 kHz 96 kHz and bitrates of between 8 kbps and 320 kbps are supported FLAC flac or FLAC FLAC is a file format for lossless audio data compression Sampling r...

Page 31: ...e where the sampling rate is 96 kHz or more 1 Turn on the power 2 Press the SETUP button on the remote controller The setup menu appears in the display 3 Use the arrow buttons to select 1 Hardware Setup and then press ENTER The Hardware setup menu appears in the display 4 Use the arrow buttons to select Music Optimizer Off 5 Change the Music Optimizer to On using the arrow buttons 6 Press the SETU...

Page 32: ...into IP addresses For example when you enter a domain name such as www onkyousa com in your Web browser before accessing the site your browser uses DNS to translate this into an IP address in this case 63 148 251 142 MAC Address This is the tuner s MAC Media Access Control address This address cannot be changed DHCP This setting determines whether or not the tuner uses DHCP to automatically config...

Page 33: ...ys the approximate time duration required for the update Version Displays the current version of the firmware Tuner via NET Performs the firmware update via Internet Check the network connection before updating via USB Performs the firmware update from a USB device These settings allow you to update the tuner s firmware Do not shutdown the power of the tuner while updating If you ve made a change ...

Page 34: ... the tuner while it is being updated Never plug or unplug an Ethernet cable during the update process Do not attempt to access the tuner from your PC while it is being updated Never unplug the power cord during the update process It takes about 5 to 30 minutes to complete the firmware update The unit displays the approximate time duration required for the update The tuner will retain all your sett...

Page 35: ... from Internet Radio iPod iPhone USB or servers etc If there is any data in the USB device remove it first Update procedure 1 Connect a USB device to your PC If there is any data in the USB device remove it first 2 Download the firmware file from the Onkyo web site The file name is as follows ONKTUN _ zip Unzip the downloaded file The following some any files are created ONKTUN _ of1 ONKTUN _ of2 ...

Page 36: ... an update via USB Case 3 If an error occurs during the update disconnect then reconnect the AC power cord and try again Case 4 If an error occurs due to a wrong selection of input sources turn off and on the tuner Then retry the update ONKYO SOUND VISION CORPORATION 2 1 Nisshin cho Neyagawa shi OSAKA 572 8540 JAPAN http www onkyo com The Americas ONKYO U S A CORPORATION 18 Park Way Upper Saddle R...

Page 37: ... receiver is not subjected to direct sunshine or inverter type florescent lights Relocate if necessary Can t access the server or Internet radio Check the network connection between the tuner and your router or switch Make sure that your modem and router are properly connected and make sure they are both turned on Make sure the server is up and running and compatible with the tuner Check the Netwo...

Page 38: ...s set to On 2 Network Control is set to Enable in the Network Setup setting USB Device Playback Others The tuner contains a microcomputer for signal processing and control functions In very rare situations severe interference noise from an external source or static electricity may cause it to lockup In the unlikely event that this happens unplug the power cord from the wall outlet wait at least fi...

Page 39: ... Frequency Range 522 530 kHz 1611 1710 kHz Preset Channel 40 Tuning Frequency Range Band III 174 928 MHz 239 200 MHz L Band 1452 960 MHz 1490 624 MHz Power Supply AC 230 V 50 Hz Power Consumption 28 W Stand by Power Consumption 0 3 W Dimensions W H D 435 101 5 307 mm 17 1 8 4 12 1 16 Weight 5 8 kg 12 8 lbs Digital Outputs AES EBU 1 OPTICAL 1 COAXIAL 1 Analog Outputs L R Ethernet 1 USB Front 1 2 ...

Page 40: ...ww us onkyo com Liegnitzerstrasse 6 82194 Groebenzell GERMANY Tel 49 8142 4401 0 Fax 49 8142 4401 555 http www eu onkyo com The Coach House 81A High Street Marlow Buckinghamshire SL7 1AB UK Tel 44 0 1628 473 350 Fax 44 0 1628 401 700 Unit 1033 10 F Star House No 3 Salisbury Road Tsim Sha Tsui Kowloon Hong Kong Tel 852 2429 3118 Fax 852 2428 9039 http www onkyochina com 1301 555 Tower No 555 West N...

Reviews: