background image

31

Control positions and names

Specifications

System:

MiniDisc digital audio system

Recording system:

Magnetic field modulation overwrite
system

Signal read out system:

Optical non-contact

Recording time:

Max. 74 min. (STEREO) (when using
MDW-74)
Max. 148 min. (MONAURAL) 

Number of revolutions:

About 400-900 rpm 
(constant linear velocity)

Error 

correction 

system:

Advanced Cross Interleave Reed-
solomon code

Sampling frequency:

44.1 kHz

Number of channels:

2 (stereo)

Frequency response:

10 Hz - 20 kHz

Signal to noise ratio:

98 dB or more when playing

Output level:

2.0 V r.m.s.

Power supply rating:

AC 230 V, 50 Hz
AC 120 V, 60 Hz

Power consumption:

14W

Dimensions (W

×

 H 

×

D):

435 

×

 91 

×

 307 mm

(17-1/8" 

×

 3-9/16"

 ×

 12-1/16")

Weight:

4.2 kg (9.3 lbs.)

Specifications and features are subject to change without notice.

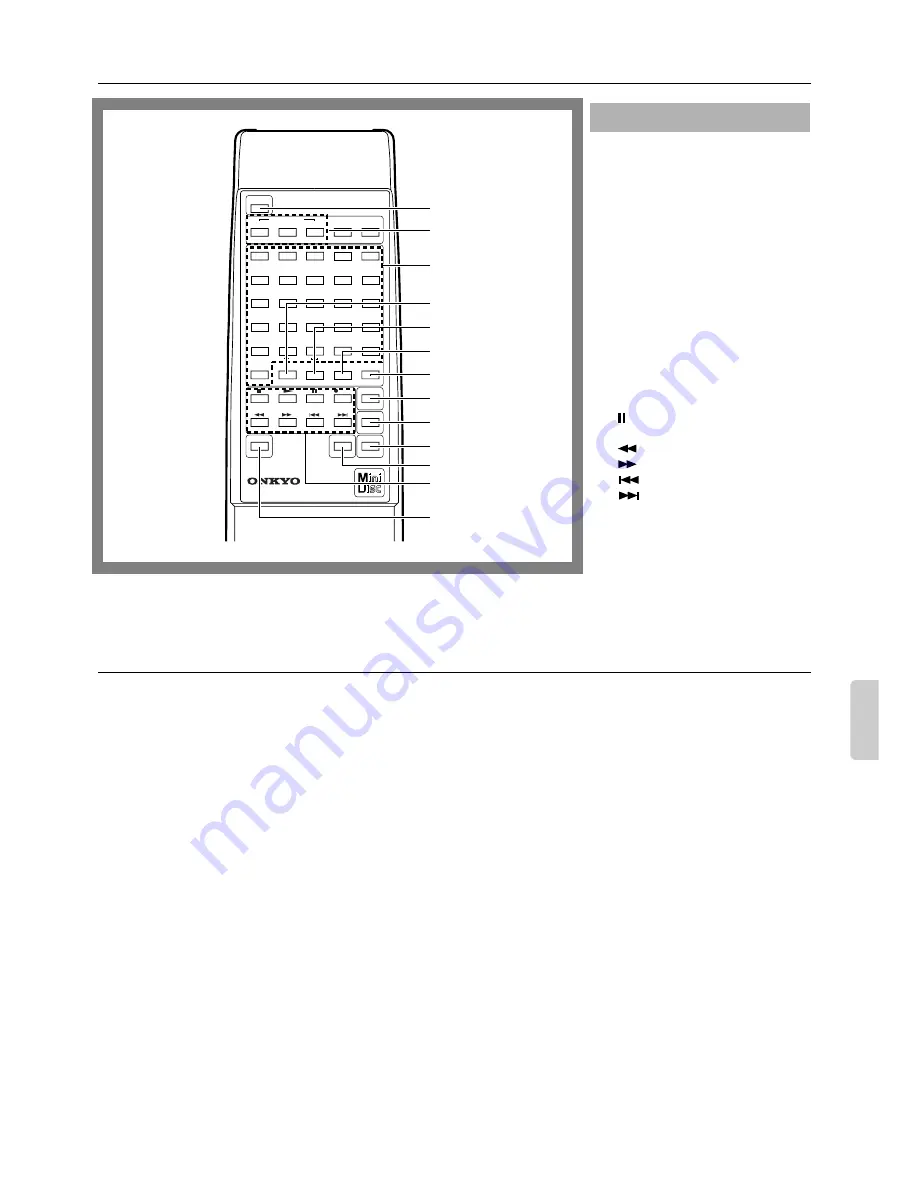
You can use the following buttons to con-
trol your MD recorder.

1. POWER button [7]
2. PLAY MODE buttons [10, 19]
3. Number buttons [9, 19, 25]
4. REPEAT button [11]
5. A-B REPEAT button [11]
6. A.SPACE button [17]
7. M.SCAN button [10]
8. CLEAR button [19, 25]
9. ENTER button [25]

10. NAME button [24, 25]
11. DISPLAY button [8, 24]
12. Operation buttons

:Stop button [7]

®

:Play button [7]
:Pause button [7, 13, 21]

REC

:Rec button [13, 15, 16]
:Fast Reverse button [10, 25]
:Fast Forward button [10, 25]
:Down button [9]
:Up button [9]

13. SCROLL button [8]

Remote controller

POWER

REMOTE CONTROL    RC-339MD

CONTINUE

PLAY MODE

RANDOM MEMORY

REPEAT

>25

M.SCAN

CLEAR

ENTER

NAME

SCROLL

DISPLAY

1

A

2

3

4

5

6

7

8

9

10

11

12

13

14

15

16

17

18

19

20

21

22

23

24

25

B

C

D

E

F

G

H

I

J

K

L

M

N

O

P

Q

R

S

T

U

V

W

X

Y

Z

.

,

/

?

!

(

)

REC

A-B

A-SPACE

1
2

3

4

5

6

7

8

9

10
11
12

13

Summary of Contents for MD-2321

Page 1: ...iDisc MD 26 Message list 26 Troubleshooting guide 27 Rules for digital recording 28 System limitations 29 Other informations Control positions and names 30 Specifications 31 MiniDisc Recorder MD 2321 Instruction Manual Thank you for purchasing the Onkyo MD 2321 Mini Disc Recorder Please read this manual thoroughly before making connections and plugging in the unit Following the instructions in thi...

Page 2: ...d by items placed upon or against them paying particular attention to the cords at plugs convenience receptacles and the point where they exit from the appli ance 13 Cleaning The appliance should be cleaned only as recommended by the manufacturer 14 Nonuse Periods The power cord of the appliance should be unplugged from the outlet when left unused for a long period of time 15 Object and Liquid Ent...

Page 3: ...semiconductor laser system and is classified as a CLASS 1 LASER PRODUCT So to use this model properly read this Owner s Manual carefully In case of any trouble please contact the store where you purchased the unit To prevent being exposed to the laser beam do not try to open the enclosure DANGER INVISIBLE LASER RADIATION WHEN OPEN AND INTER LOCK FAILED OR DEFEATED AVOID DIRECT EXPOSURE TO BEAM CAU...

Page 4: ...SION FROM DIG ITAL APPARATUS SET OUT IN THE RADIO INTERFERENCE REGULATIONS OF THE CANADIAN DEPARTMENT OF COMMUNICATIONS Sur les modèles dont la fiche est polarisée ATTENTION POUR ÉVITER LES CHOCS ÉLEC TRIQUES INTRODUIRE LA LAME LA PLUS LARGE DE LA FICHE DANS LA BORNE CORRESPONDANTE DE LA PRISE ET POUSSER JUSQU AU FOND L INTERFÉRENCE RADIO ÉLECTRIQUE GÉNÉRÉE PAR CET APPAREIL NUMÉRIQUE DE TYPE B NE ...

Page 5: ... service life of approxi mately six months depending on fre quency of usage This unit comes equipped with R6 UM 3 AA manganese batteries but we recommend that you use long life alkaline batteries LR6 AM 3 AA when replacing the batteries The following information will be helpful for the optimum operation of the RC 339MD Place the MD 2321 away from direct bright light which can prevent proper operat...

Page 6: ... DIGITAL INPUT 2 These terminals can also be used for connecting an amplifier which is equipped with a digital output terminal Note If you attempt to perform digital recording using a digital input terminal that is not connected properly D In Unlock will appear Terminal protection caps are attached to the DIGITAL IN terminals Remove the cap for the terminal you wish to use when connecting the MD 2...

Page 7: ...troller to scroll the display 3 Press the PLAY button or the button on the remote controller The first track of the disc starts playing Press the STOP button or the button on the remote controller Press the PAUSE button or the button on the remote controller To resume playback press the or but ton or the or button on the remote controller Normal playback Stopping playback Pausing playback TRACK 1 ...

Page 8: ...ime remaining for recording on the MD Not displayed if it is a premastered MD Disc name No Name appears if the disc is not named If the track or disc name is too long to display You can scroll the name by pressing the SCROLL button on the remote controller Press the SCROLL button again to stop scrolling the name To exit display scroll mode press the CLEAR button on the remote controller Plug the h...

Page 9: ...he MD recorder is stopped turn the AMCS knob to select the track number you wish to play and press the knob On the remote controller use the or button to select the track then press the button To play the next track or a later track Turn the AMCS knob clockwise or press the button on the remote controller several times until the desired track is located To start playback again from the beginning o...

Page 10: ...ng time of the part you want to hear is displayed Press the PLAY button or the button on the remote controller to start playing from that position Note Over indicates that the end of the last track has been reached 1 When the MD recorder is stopped press the PLAY MODE button several times until RANDOM appears on the display The display changes as shown below each time you press the PLAY MODE butto...

Page 11: ...n once or twice until the REPEAT indicator disappears To repeat the desired section of a track 1 While the track is playing press the A B button on the remote controller to specify the beginning of the sec tion you wish to repeat playing Point A 2 While the track is still playing press the A B button again to specify the end of the repeat section Point B The section between A and B of the track wi...

Page 12: ...IAL Note Make sure which of the digital input terminals the sup plied optical cable is connected to If you attempt to per form digital recording using a digital input terminal that is not connected D In Unlock will appear 4 Select the position track number on the disc at which you wish to start recording To record while erasing the existing tracks on the disc Turn the AMCS knob to select the track...

Page 13: ...ton then the EJECT button Caution The indicator flashes If you press the button or the STANDBY ON button while the MD recorder is still writing the recorded contents onto the disc During this period do not disconnect the power cord or allow the MD recorder to vibrate Doing so may prevent normal record ing onto the MD If the MD recorder s power cord is connected to the SWITCHED service power outlet...

Page 14: ...nge the INPUT selector setting during recording 4 Select the position track number on the disc at which you wish to start recording To record while erasing the existing tracks on the disc Turn the AMCS knob to select the track number from which you wish to start recording The selected track number will flash The MD recorder will record new data while erasing that track and subsequent tracks To rec...

Page 15: ...ording Press the STOP button To eject the MD Press the STOP button then the EJECT button Caution The indicator flashes If you press the button or the STAND BY ON button while the MD recorder is still writing the recorded contents onto the disc During this period do not disconnect the power cord or allow the MD recorder to vibrate Doing so may prevent normal record ing onto the MD If the MD recorde...

Page 16: ... you can still perform syn chronized recording Signal synchronized recording records data from the end of the recorded area The Auto Cut and Smart Space functions page 13 are enabled only when analog input is recorded 1 Use the INPUT selector to select MO ST D1 or D2 according to the connected device Analog connection Select MO monaural or ST stereo DIGITAL INPUT 1 OPTICAL connection Select D1 DIG...

Page 17: ...p MD Synchro recording Press the STOP button on the MD recorder The cassette tape deck enters recording standby mode The Auto Space function automatically inserts three seconds of silence between tracks when you are recording data on another MD recorder or a connected cassette tape recorder This function is useful for example when you want the auto track locate function of a cassette player to wor...

Page 18: ...erasure You can prevent your MDs from being recorded Slide the record protect tab on an MD to open the slot To make the MDs recordable again slide back the record protect tab to close the slot You can use a commercially available audio timer for record ing and playing 1 Load an MD If the disc contains recorded material new data will be recorded following the existing tracks 2 Set the TIMER switch ...

Page 19: ...on to enter 0 E x To select the 30th track 25 3 10 To select the 100th track 25 25 1 10 10 3 Press the PLAY button or the button on the remote controller to start Memory playback When the playback of all programmed tracks concludes the MD recorder stops The programmed tracks are retained in memory To exit Memory playback mode When the MD recorder is stopped press the PLAY MODE button several times...

Page 20: ...mple if you erase track 2 track 3 is renumbered as track 2 track 4 is renumbered as track 3 and so on Note While the TOC indicator is lit or flashing do not move or unplug the MD recorder To erase all tracks on an MD 1 Press the STOP button 2 Press the EDIT NO button several times until All Erase appears on the display To cancel the operation press the EDIT NO button or the STOP button 3 Press the...

Page 21: ...is represented by 0 5 seconds of silence You can move the dividing point in the range of 128 to 127 One step corre sponds to approximately 0 06 seconds 5 Press the YES button or AMCS knob to execute the operation After the track is divided Complete appears on the display When a track is divided the subsequent tracks are renumbered accordingly For example if you divide track 2 into two parts the la...

Page 22: ...times until Combine appears on the display To cancel the operation Press the EDIT NO button again or press the STOP button 3 Press the YES button again The part at which the two tracks are to be combined plays for 8 seconds repeatedly with Rehearsal and Track OK alternately showing on the dis play 4 Press the YES button to combine the tracks you have selected When the tracks are combined Com plete...

Page 23: ...ack number 5 Press the YES button or AMCS knob to execute the operation When the track is moved Complete appears on the display and the tracks are renumbered accordingly For exam ple if you move track 3 to track 1 the original track 1 is renumbered as track 2 track 2 is renumbered as track 3 and so on Note While the TOC indicator is lit or flashing do not move or unplug the MD recorder Moving a tr...

Page 24: ...n the remote con troller In this case the Name In display will be skipped When you name a track the TRACK indicator will turn on To cancel the operation Press the STOP or press theYES button while pressing and holding down the EDIT NO button 3 Press the YES button A blinking cursor appears 4 Press the DISPLAY button repeatedly to select a char acter input mode You can enter upper case letters lowe...

Page 25: ...aracter that you want to erase using the and buttons the character blinks and press the EDIT NO button on the front panel or CLEAR button on the remote controller To insert a space Turn AMCS knob to display and press the knob to set 6 Press the YES button Alternatively press the NAME button on the remote con troller Complete appears on the display Note While the TOC indicator is lit or flashing do...

Page 26: ...c A new recordable MD or a recordable MD without disc or track names is inserted Cannot Copy An attempt was made to make a second copy from a digitally dubbed MD see Rules for Digital Recording on page 28 29 Cannot Edit An attempt was made to edit the disc during MEM ORY or RANDOM play Cannot Rec An attempt was made to record onto a premastered read only disc D In Unlock The digital equipment CD p...

Page 27: ...rotected appears Remedy Close the record protect slot See page 18 Cause The unit is not connected properly to the sound source Remedy Make connections properly to the sound source Cause The analog recording level is too low Remedy Turn the REC LEVEL control knob to adjust the recording level properly Cause A premastered disc is inserted Remedy Replace it with a recordable disc Cause There is not e...

Page 28: ...D via the digital input terminals on the MD recorder to create a second gen eration digital copy Note however that with some BS tuners second generation digital copying may not be possible CD player DAT deck MD recorder MD recorder MD recorder MD recorder Digital output terminal Digital input terminal Recording Playing Recording MD A recordable MD recorded through the digital input terminal Line a...

Page 29: ...counted and so erasing them may not lead to an increase in the recording time Some tracks cannot be combined with others Track combination may become impossible when tracks are edited The total recorded time and the remaining time on the disc may not total the maximum recording time 60 or 74 min utes Recording is done in minimum units of two seconds each no mat ter how short the material The conte...

Page 30: ...te sensor 5 6 Stop button STOP 7 7 Play button PLAY 7 10 13 15 17 19 8 AMCS knob AMCS 9 12 14 19 25 9 Phones level control knob PHONES LEVEL 8 10 Headphone jack PHONES 8 11 Yes button YES 15 16 20 25 12 Edit No button EDIT NO 15 16 20 25 13 Rec level control knob REC LEVEL 15 14 Pause button PAUSE 7 13 15 21 15 REC button REC 13 15 16 16 FF FR buttons 10 25 17 Repeat button REPEAT 11 18 Play mode ...

Page 31: ...2 1 16 Weight 4 2 kg 9 3 lbs Specifications and features are subject to change without notice You can use the following buttons to con trol your MD recorder 1 POWER button 7 2 PLAY MODE buttons 10 19 3 Number buttons 9 19 25 4 REPEAT button 11 5 A B REPEAT button 11 6 A SPACE button 17 7 M SCAN button 10 8 CLEAR button 19 25 9 ENTER button 25 10 NAME button 24 25 11 DISPLAY button 8 24 12 Operatio...

Page 32: ...RONICS GmbH Industriestrasse 20 82110 Germering GERMANY Tel 089 84 93 20 Fax 089 84 93 226 E mail info onkyo de ONKYO EUROPE FRANCE BRANCH Domaine Technologique de Saclay 4 Rue René Razel SACLAY 91892 ORSAY CEDEX FRANCE Tel 1 69 33 14 00 Fax 1 69 41 35 84 ONKYO CHINA LIMITED Units 2102 7 Metroplaza Tower I 223 Hing Fong Road Kwai Chung N T HONG KONG Tel 852 2429 3118 Fax 852 2428 9039 E http www o...

Reviews: