background image

11

FUNCTION OVERVIEW

EN

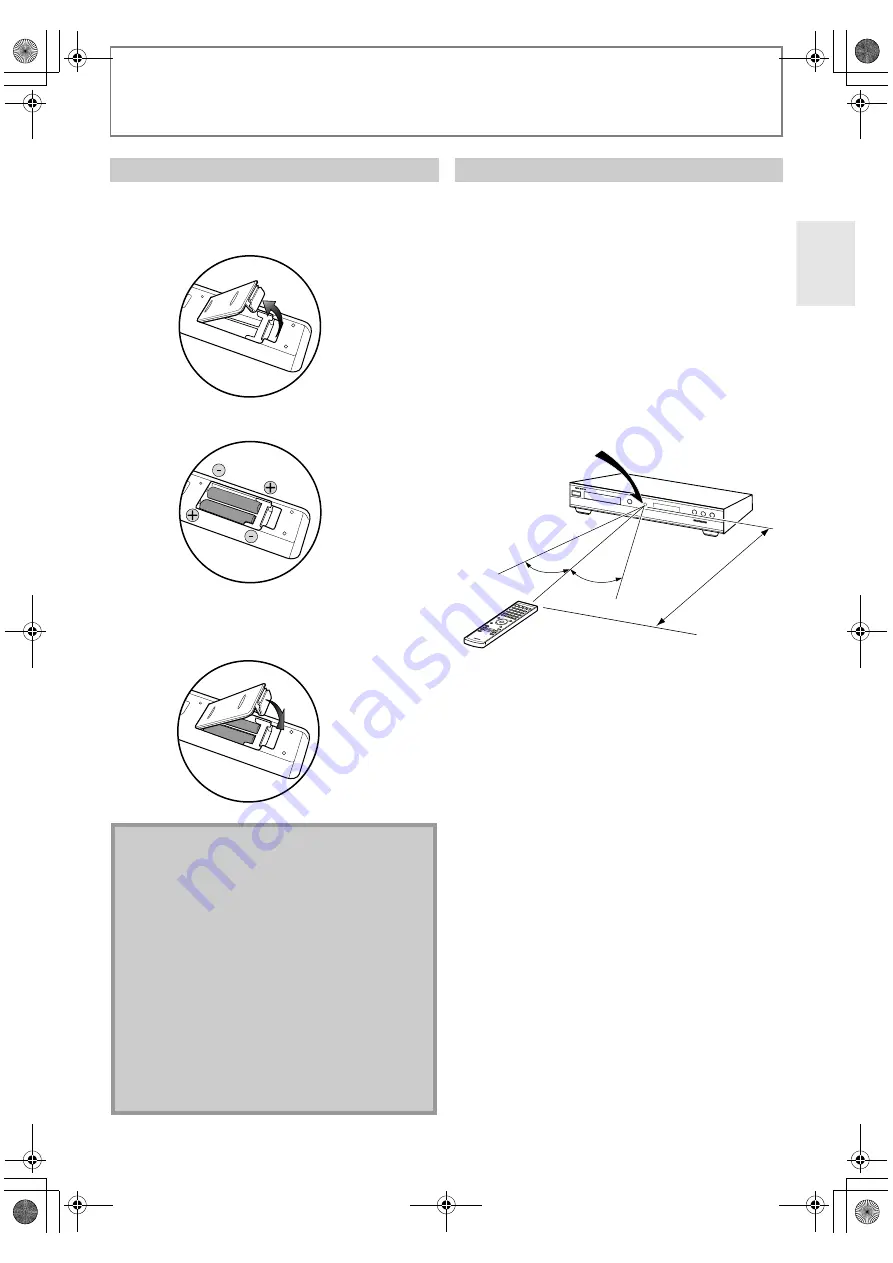
Install the batteries (R6x2) matching the polarity indicated 
inside battery compartment of the remote control.

Keep in mind the following when using the remote 
control:
• Make sure that there are no obstacles between the 

remote control and the infrared sensor window on the 
unit.

• Remote operation may become unreliable if strong 

sunlight or fluorescent light is shining on the infrared 
sensor window of the unit.

• Remote control for different devices can interfere with 

each other. Avoid using remote control for other device 
located close to the unit.

• Replace the batteries when you notice a fall off in the 

operating range of the remote control.

• The maximum operable ranges from the unit are as 

follows.

Installing the Batteries in the Remote Control

1) Open the cover.

2) Insert batteries.

Make sure to match + and - on the batteries to the 
marks indicated in the battery compartment.

3) Close the cover.

Note

Incorrect use of batteries can result in hazards such 
as leakage and bursting. Please observe the 
following:

• Do not mix new and old batteries together.
• Do not use different kinds of batteries together. 

Although they may look similar, different batteries 
may have different voltages.

• Make sure that the + and - ends of each battery 

match the indications in the battery compartment.

• Remove batteries from battery compartment that is 

not going to be used for a month or more.

• When disposing of used batteries, please comply 

with governmental regulations or environmental 
public instruction’s rules that apply in your country 
or area.

• Do not recharge, short-circuit, heat, burn or 

disassemble batteries.

Using a Remote Control

30˚

30˚

Approx

. 5 m

Infrared sensor window

DV-BD507

E5L50ED_EN.book  Page 11  Wednesday, June 10, 2009  1:02 PM

Summary of Contents for DV-BD507 - Blu-Ray Disc Player

Page 1: ...ructions in this manual will enable you to obtain optimum performance and listening enjoyment from your new BLU RAY DISC PLAYER Please retain this manual for future reference BLU RAY DISC PLAYER DV BD...

Page 2: ...ot place any combustible objects on the device candles etc 10 Before moving the unit be sure to remove any discs and unplug the mains cable from the AC outlet 11 Disconnect the mains plug to shut off...

Page 3: ...may not work properly the next time you turn it on so be sure to use it occasionally When you ve finished using this unit remove all discs and turn off the power 9 Installing this Unit Install this u...

Page 4: ...S 1 LASER PRODUCT So to use this model properly read this Instruction Manual carefully In case of any trouble please contact the store where you purchased the unit To prevent being exposed to the lase...

Page 5: ...l camera including a cellular phone with built in camera to see if it is sending out an infrared signal With an AM radio Tune the AM radio station to a non broadcasting frequency Point the remote cont...

Page 6: ...sential are trademarks of DTS Inc 1996 2008 DTS Inc All Rights Reserved x v Color and x v Color logo are trademarks of Sony Corporation Blu ray Disc and are trademarks is a trademark of DVD Format Log...

Page 7: ...e 24 Reading the SD Memory Card 26 Inserting the SD Memory Card and Playback 27 Removing the SD Memory Card 27 SPECIAL PLAYBACK 28 Fast Forward Fast Reverse 28 Slow Forward Playback 28 Step by Step Pl...

Page 8: ...g POP UP MENU MENU Contents in the pop up menu vary depending on the disc Rapid playback Playback in slightly faster speed while keeping the sound output Rapid playback is available only on discs reco...

Page 9: ...h the AC cord Unplug the AC cord from the AC outlet to completely shut down the unit 2 AUDIO OUTPUT DIGITAL OPTICAL COAXIAL jacks Use to connect an AV receiver amplifier Dolby Digital DTS decoder or o...

Page 10: ...licable to BD video which supports the PIP function 17 ANGLE button Press to access various camera angles on the disc Press to rotate the JPEG files clockwise by 90 degrees 18 REPEAT button Press to t...

Page 11: ...ol 1 Open the cover 2 Insert batteries Make sure to match and on the batteries to the marks indicated in the battery compartment 3 Close the cover Note Incorrect use of batteries can result in hazards...

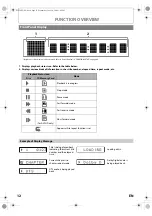
Page 12: ...layback Status Icon Mode Disc SD Memory Card Playback is in progress Stop mode Pause mode Fast forward mode Fast reverse mode for AVCHD only Slow forward mode Appears while repeat function is set Exam...

Page 13: ...ue Red AUDIO CONNECTION VIDEO CONNECTION AUDIO VIDEO CONNECTION Method 1 Method 2 1 Method 3 1 2 Supplied cables used in this connection are as follows RCA audio cable L R x 1 RCA video cable x 1 Plea...

Page 14: ...resolution during Blu ray Disc playback To change the resolution stop playback You can also change the HDMI output mode from HDMI Video Resolution setting in Video menu In this menu you can confirm wh...

Page 15: ...lti PCM Downmix 2ch PCM Downmix 2ch PCM Dolby Digital Plus Dolby Digital Plus Dolby Digital Multi PCM 1 Multi PCM 2 Downmix 2ch PCM 1 Downmix 2ch PCM 2 Dolby TrueHD Dolby TrueHD Dolby Digital Multi PC...

Page 16: ...optical cable AV receiver amplifier this unit digital audio coaxial cable digital audio coaxial input jack Supplied cables used in these connections are as follows RCA audio cable L R x 1 Please purc...

Page 17: ...Bitstream LPCM BD Audio Mode setting A HD Audio Output Mix Audio Output HD Audio Output Mix Audio Output Media Audio Source Which audio format can be output depends on the compatibility of the connec...

Page 18: ...minal to avoid damaging the unit If your telecommunications equipment modem etc does not have broadband router functions connect a broadband router If your telecommunications equipment modem etc has b...

Page 19: ...n Demand VOD content To generate the registration code locate the DivX VOD section in the device setup menu Go to vod divx com with this code to complete the registration process and learn more about...

Page 20: ...mation remaining time A Disc information elapsed time A Disc information remaining time A off Track information elapsed time not available during programme random playback off File information elapsed...

Page 21: ...MI output image HDMI audio format Maximum numbers of audio channels that can be accepted by the connected device S Track File information Current track file number Total number of track file Elapsed t...

Page 22: ...D video a menu screen may appear In this case use K L s B to select the desired item then press ENTER 7 Press STOP C once to stop playback temporarily Refer to Resume Playback on page 23 To eject the...

Page 23: ...P C Resume message will appear on the TV screen 2 Press PLAY B In a few seconds playback will resume from the point at which it stopped last To cancel the resume playback and start playback the disc f...

Page 24: ...Memory Card name will be displayed for the top of the hierarchies audio CD List of the track number and time MP3 JPEG DivX List of the file folder names in the current folder disc Operation Guide Pres...

Page 25: ...ation codes on this unit Press ENTER and select other files that can be played back Note If DivX files written on a DVD or CD RW R cannot be played back rewrite them on a BD RE R and try to play back...

Page 26: ...as the screen resolution which this unit does not support the playback will be stopped and error message will appear Some DivX files cannot be played back on this unit due to the configuration and cha...

Page 27: ...Memory Card 1 In stop mode push the SD Memory Card and then slowly remove your finger 2 Grasp the card and pull it out from the SD CARD slot This will set the unit to Disc mode Compatible Cards SD Mem...

Page 28: ...n 3 different levels Only slow forward is available Set Still Mode setting to Field in Video menu if pictures in the slow forward playback mode are blurred refer to page 39 BD V DVD V AVCHD MP3 DivX C...

Page 29: ...tle or track as point A A B repeat is not available with some scenes To cancel the A point which was set press CLEAR A B repeat does not function during chapter title track group or all repeat playbac...

Page 30: ...mixed MP3 and JPEG files programme function allows 99 files in combination of MP3 and JPEG files Playback from a desired track file and random playback are not available during programme playback Pre...

Page 31: ...ed Plays back approximately at 1 3 times of normal playback Note Picture adjustment and audio language setting cannot be changed during this function This function may not work at some points on a dis...

Page 32: ...TV screen 4 Press SEARCH or RETURN to exit 5 To return to the marker later call the marker setting by pressing SEARCH repeatedly during playback or in stop mode and use s B to select a desired marker...

Page 33: ...ayed on the TV screen During playback of the secondary video the primary subtitle setting is not available except when there is no subtitle for the secondary video Secondary subtitle setting is only a...

Page 34: ...de if there is no secondary and interactive audio the audio will be output as HD Audio Output mode In Mix Audio Output mode even if you set HDMI Multi Normal in HDMI Audio Out setting multi LPCM will...

Page 35: ...to select your desired setting items 4 Follow the procedure below depending on the setting items A If B does not appear on the right side of the setting items when you highlight the items Press ENTER...

Page 36: ...not available with current situation of this unit will be displayed in gray and you cannot select them 5 Follow the procedure below depending on the setting items A If B does not appear on the right s...

Page 37: ...garian Romanian Turkish Greek Irish Czech Slovak Bulgarian Other Subtitle Sets the language for subtitle Off English French German Spanish Italian Dutch Swedish Portuguese Norwegian Polish Russian Chi...

Page 38: ...elected automatically depending on the connected HDMI device 480p 576p 720p 1080i 1080p 1080p24 Gives a natural and high quality film reproduction of 24 frame film material The connected TV has to be...

Page 39: ...MI OUT jack or 480i 576i If the video resolution for the component output and HDMI video resolution do not match the video resolution for the component output will be switched to 480i 576i VIDEO OUTPU...

Page 40: ...DIGITAL OPTICAL COAXIAL jacks HDMI Multi Normal The multi channel audio signals are output from HDMI OUT jack with bitstream or LPCM HDMI Multi LPCM The multi channel audio signals are output from HDM...

Page 41: ...tions Speaker setting for the audio signal output from HDMI OUT jack Available when you have HDMI cable connected to HDMI OUT jack Quick A HDMI Audio Out A HDMI Multi LPCM Custom A Audio A HDMI Audio...

Page 42: ...setting of Subwoofer If connected device is not compatible with subwoofer Subwoofer will be displayed in gray Small Center Large Small Subwoofer On Surround Large Small Surround Back Large Small Defau...

Page 43: ...ons Delay Time This is a parameter for optimising the timing at which the sound is output from the speakers according to their distance from the listening position Distance Feet Set the desired measur...

Page 44: ...cting Age Setting use the Number buttons to enter the age from 0 254 e g for age 15 press 0 1 5 3 Press SETUP to exit B DVD Rating Level 1 Use K L to select DVD Rating Level then press ENTER 2 Use K L...

Page 45: ...stration code is required when downloading the DivX VOD files from the Internet To learn more about DivX VOD visit www divx com vod Deactivation Code Your deactivation code is cccccccc To learn more v...

Page 46: ...perform this test Enable Easy If you select Enable Easy Connection test will automatically start Enable Custom IP Address Setting Auto DHCP Set the IP address In most cases you can connect to the Int...

Page 47: ...tomatically Press SETUP to exit In following cases select Enable Custom to set each setting as necessary IP Address Setting DNS Setting 1 Follow steps 1 to 4 in Connection Test on this page 2 Use K L...

Page 48: ...fault settings select Do Not Use If you need to change the proxy setting as instructed by your Internet service provider to set the designated proxy address and port select Use If you select Use follo...

Page 49: ...ect Enable Custom then press ENTER 3 Use K L to select BD Live Setting then press ENTER 4 Use K L to select the desired setting then press ENTER Allow Internet access is permitted from all BD Live con...

Page 50: ...ect Software Upgrade then press ENTER 3 Use K L to select Network Upgrade then press ENTER 4 Use K L to select Yes then press ENTER This unit will then start checking for the latest firmware version 5...

Page 51: ...uch as BD ROM game scores from this player Erase Saved BD ROM Data SD Card Available only when an SD Memory Card is inserted Clears the supplemental data for the BD ROM playback such as subtitle data...

Page 52: ...tive by trying another disc Cancel the ratings control or change the control level Insert a correct disc that can be played back on this unit SD Memory Card cannot be read The format of the card does...

Page 53: ...t remove the card during playback as some BD videos require an SD Card during playback HDCP NOK appears on the front panel display HDCP NOK appears under the following conditions When the connected de...

Page 54: ...very small amount of data The software can compress video data from almost any devices to the size that can be sent on the Internet without compromising visual quality of the pictures DNS Server A ser...

Page 55: ...assigned to each device and routing and forwarding information in the computer network Sampling Frequency The rate which sound is measured by a specified interval to turn into digital audio data The n...

Page 56: ...ian 5866 Language Code Macedonian 5957 Malagasy 5953 Malay 5965 Malayalam 5958 Maltese 5966 Maori 5955 Marathi 5964 Moldavian 5961 Mongolian 5960 Nauru 6047 Nepali 6051 Norwegian NOR 6061 O R Occitan...

Page 57: ...Analogue RCA jack x 2 L R 2Vrms output impedance more than 1k Video output RCA jack x 1 1Vp p 75 Component video output RCA jack x 3 Y 1Vp p 75 PB 700mVp p 75 PR 700mVp p 75 Audio output Digital RCA j...

Page 58: ...58 EN MEMO E5L50ED_EN book Page 58 Wednesday June 10 2009 1 02 PM...

Page 59: ...59 MEMO EN E5L50ED_EN book Page 59 Wednesday June 10 2009 1 02 PM...

Page 60: ...9 8142 4401 555 http www eu onkyo com ONKYO EUROPE UK Office Suite 1 Gregories Court Gregories Road Beaconsfield Buckinghamshire HP9 1HQ UNITED KINGDOM Tel 44 0 1494 681515 Fax 44 0 1494 680452 ONKYO...

Reviews: