23
Connecting the DVD receiver
—Continued
• Read the manuals supplied with your AV components.
• Don’t connect the power cord until you’ve completed
all audio and video connections.
RCA AV Connection Color Coding
RCA AV connections are usually color coded: red,
white, and yellow. Use red plugs to connect right-chan-
nel audio inputs and outputs (typically labeled “R”). Use
white plugs to connect left-channel audio inputs and out-
puts (typically labeled “L”). And use yellow plugs to
connect composite video inputs and outputs.
• Push each plug in all the way to
make a good connection (loose
connections can cause noise or
malfunctions).
• To prevent interference, keep
audio and video cables away from
power cords and speaker cables.
Optical Digital Jacks
The DVD receiver’s optical digital connectors have a
shutter-type cover that opens when an optical plug is
inserted, and closes when it’s removed. Push the plug in
all the way.
Caution:
To prevent shutter damage, hold the optical
plug straight when inserting and removing.
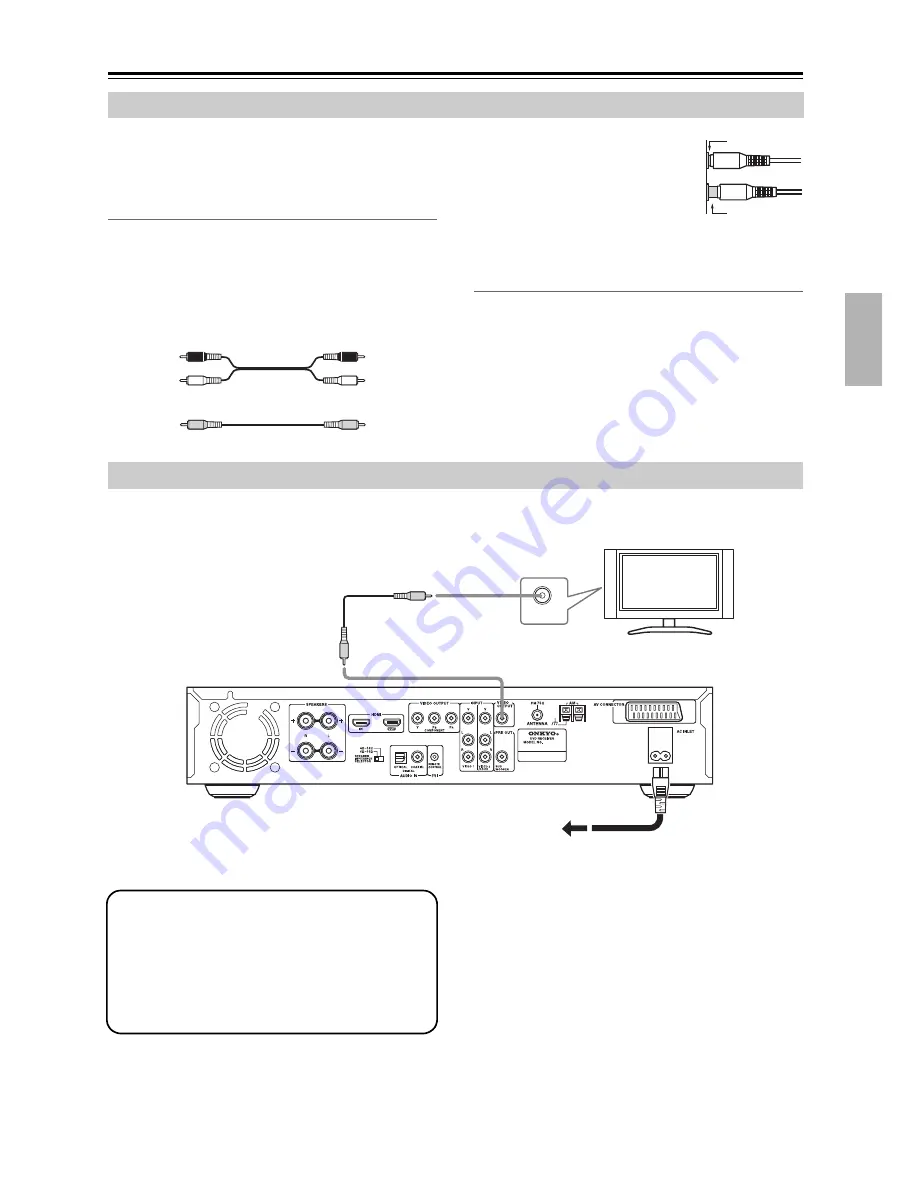
The setup described here is a basic setup that allows you to play discs using just the cables supplied with the receiver.
1. Connect the VIDEO OUTPUT jack to the com-
posite video input on your TV.
Use the supplied Video cable (RCA), connecting the
yellow plug to the video output.
See the following page if you want to use other cable
for the video connection.
2. Connect the supplied AC power cord to the AC
INLET, then plug into a power outlet.
Before Making Any Connections
Analog audio
Composite video (Supplied)
Right (red)
Left (white)
(Yellow)
Right (red)
Left (white)
(Yellow)
Right!
Wrong!
Basic Setup
VIDEO IN
To power outlet
TV
Video cable
(Supplied)
Power cord
(Supplied)
This receiver is equipped with copy protection tech-
nology. Do not connect this receiver to your TV via a
VCR using Video cable, as the picture from this
receiver will not appear properly on your TV. (This
receiver may also not be compatible with some com-
bination TV/VCRs for the same reason; refer to the
manufacturer for more information.)
Summary of Contents for DR-S501
Page 82: ...82 Memo...
Page 83: ...83 Memo...


