Onkyo CR-545 Instruction Manual Download Page 27

iPod / iPhone Playback 

27


Make sure the slot 
is at the rear.

When you select iPod as the input source, the headphones output no sound. If use headphones, connect it directly 
to iPod. 
Before using your iPod with the CD receiver, be sure to update your iPod with the latest software, available from 
the Apple Web site. 
If you leave your iPod paused when using it on its own, eventually it will go into hibernation. If you insert it into 
the CD receiver dock in this state, you’ll need to wait a few moments before your iPod is ready for use. 
Always remove your iPod before moving CD receiver. 
Depending on your iPod, or the type of content being played, some functions may not work as expected. 


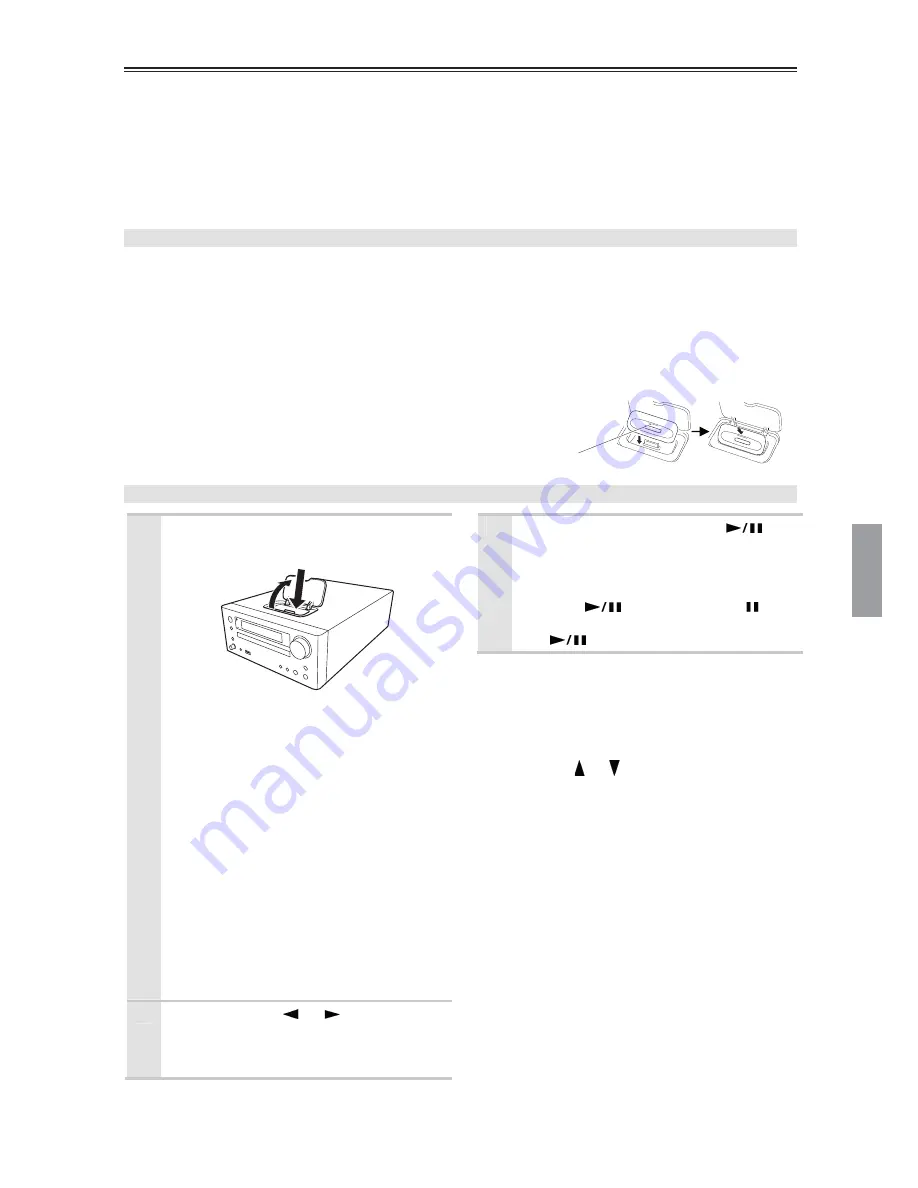
Installing the iPod / iPhone Universal Dock Adapter 

First, with the adapter slot facing the back, fit in the front of the adapter and then press in the back until a click is 
heard. To remove the adapter, lift the back side up. If the adapter is difficult to remove, insert a thin object into 
the slot and lift the adapter up. 
Always use the Universal Dock Adapter enclosed with the iPod model to correctly set the iPod in the CD 
receiver.  
 

Note: 

The slot’s connection terminal could be damaged if the iPod is set in the CD receiver dock without using the 
Universal Dock Adapter. 
Please purchase a commercially available dock adapter when using an iPhone 
or when the Universal Dock Adapter has been lost or damaged. 


Playing iPod / iPhone 

Inserting your iPod into the CD 
receiver’s dock for iPod. 


Raise the dock cover, insert your iPod 
ensuring that it is seated correctly. 

 
Notes: 

•    The appropriate iPod universal dock 

adapter must be installed prior to inserting 
an iPod. 

•    To prevent damage to the dock connector, 

do not twist or force your iPod into the 
dock, and be careful not to wiggle your 
iPod while inserting it. 

•    Do not use with any iPod accessories, 

such as FM transmitters and microphones, 
as they may cause a malfunction. 

•    If you use a case with your iPod, always 

remove it before you insert it. 


Otherwise, it will not connect properly 
and a malfunction may occur. 

Use the INPUT [

] / [

] buttons to 

select “iPod”. 

When no iPod is connected, “iPod No 
Device” will be displayed.

To start playback, press the [

button. 

Playback will begin. 

To pause playback: 

Press the [

] button. The Pause 


indicator appears. To resume playback, press 
the [

] button again.


Notes: 

•    You can see the contents of “videos” and 

“photos” in your iPod on TV (see page 17). 


Confirm your iPod, if video output is available. 

•    The volume level is adjusted by using the 

VOLUME [ ] / [ ] knob or the buttons on the 
remote controller. 
Adjusting the volume on your iPod has no effect. 
In case you inadvertently move your iPod 
volume control, make sure the volume level is 
not set too high before you reconnect your 
headphones. 


Summary of Contents for CR-545

Page 1: ...lowing the instructions in this manual will enable you to obtain optimum performance and listening enjoyment from your new CD receiver Please retain this manual for future reference Contents Getting S...

Page 2: ...njury from tip over 13 Unplug this apparatus during lightning storms or when unused for long periods of time 14 Refer all servicing to qualified service personnel Servicing is required when the appara...

Page 3: ...was when you originally bought it Do not leave rubber or plastic items on this unit for a long time because they may leave marks on the case This unit s top and rear panels may get warm after prolong...

Page 4: ...red in accordance with the following code Blue Neutral Brown Live As the colours of the wires in the mains lead of this apparatus may not correspond with the coloured markings identifying the terminal...

Page 5: ...have the following accessories Remote controller and two batteries R6 AA Indoor FM antenna CR 545 Indoor FM DAB antenna CR 545UKD AM loop antenna CR 545 Note In catalogs and on packaging the letter a...

Page 6: ...te Controller When you operate the remote controller point it at the CD receiver s remote control sensor Notes The remote controller may not work reliably if the CD receiver is subjected to bright lig...

Page 7: ...tion 23 One Folder Playback 23 Random Playback 24 Repeat Playback 24 Memory Playback 24 Setting DISC Preferences 25 iPod iPhone Playback Installing the iPod iPhone Universal Dock Adapter 27 Playing iP...

Page 8: ...y 6 VOLUME control knob 7 TONE BALANCE button knob 8 PHONES jack Rear Panel 1 LINE IN 2 VIDEO OUT 3 AM ANTENNA CR 545 4 SPEAKERS 5 SUBWOOFER PRE OUT 6 Power cord 7 FM ANTENNA CR 545 8 DAB FM ANTENNA C...

Page 9: ...ndicator 4 FOLD indicator 5 Playback mode indicators 1FOLD MEM RDM REPEAT REPEAT 1 6 Tuning indicators AUTO FM ST RDS 7 iPod menu mode indicator 8 MUTING indicator 9 TITLE ARTIST and ALBUM indicators...

Page 10: ...button 8 Fast Reverse Fast Forward buttons 9 USB Play Pause button 10 iPod Play Pause button 11 PLAYLIST FOLDER buttons 12 ALBUM buttons 13 TIMER button 14 CLOCK CALL button 15 DISPLAY button 16 MODE...

Page 11: ...player s lens dew condensation etc A disc recorded on a personal computer may not play because of the application settings or environment Record the disc with the proper format Contact the application...

Page 12: ...r Remove the disc from the CD receiver when not being played and store it in a case A freshly printed disc will stick easily and should not be played immediately Caring for Discs If the disc is dirty...

Page 13: ...hing similar to fix the FM antenna into position Caution Be careful that you don t injure yourself when using thumbtacks If you cannot achieve good reception with the supplied indoor FM antenna try a...

Page 14: ...ed when installed in an attic or loft For best results install the outdoor FM antenna well away from tall buildings preferably with a clear line of sight to your local FM transmitter Outdoor antenna s...

Page 15: ...ly speakers with an impedance of between 4 and 16 ohms Connecting a speaker with a lower impedance may damage the CD receiver Be careful not to short the positive and negative wires Doing so may damag...

Page 16: ...tputs typically labeled R Use white plugs to connect left channel audio inputs and outputs typically labeled L Note Do not put anything on top of the CD receiver as it may interfere with proper ventil...

Page 17: ...e CD receiver must be able to receive RDS radio stations which means an FM antenna must be connected Be sure to connect an FM antenna before plugging in the power cord see pages 13 and 14 The very fir...

Page 18: ...repeatedly The input sources are selected in the following order CR 545 CR 545UKD Using Headphones Turn down the volume then connect your stereo headphones to the PHONES minijack The speakers output...

Page 19: ...just the balance The default setting is 0 You can adjust the balance from L 5 to 0 then 0 to R 5 Tip To adjust the bass treble and balance you can also use TONE BALANCE button and knob Note If you pre...

Page 20: ...button The Pause indicator appears To resume playback press the button again To remove the CD Press the button to open the disc tray Display during Stop Audio CD Display MP3 WMA DISC Display Selecting...

Page 21: ...other folders see page 22 Press to stop playback Press to fast reverse or fast forward During playback or while playback is paused press and hold the fast forward button to fast forward or the fast re...

Page 22: ...files inside the folder press the FOLDER button The name of the first MP3 WMA file inside the folder is displayed Use the buttons to select the MP3 WMA files within the folder To select another folde...

Page 23: ...en playing default display Title name Title of the current file if tag present Artist name Name of the album if tag present Album name Name of the album if tag present Notes If there is no data Unknow...

Page 24: ...til the RANDOM indicator disappears Random playback is cancelled when you press the button to open the disc tray Repeat Playback With repeat playback you can play an entire CD repeatedly or play one t...

Page 25: ...Removing Tracks from the Playlist While memory playback is stopped press the MENU CLEAR button Each press removes the last track from the playlist The playlist will be deleted when you cancel memory p...

Page 26: ...ession will be default played MP3 WMA MP3 WMA files will be played Prefix Num This preference determines whether or not the numbers at the beginning of file and folder names are displayed When you cre...

Page 27: ...ase purchase a commercially available dock adapter when using an iPhone or when the Universal Dock Adapter has been lost or damaged Playing iPod iPhone 1 Inserting your iPod into the CD receiver s doc...

Page 28: ...ton When operating iPod menu via the CD receiver do not operate iPod directly This may be the cause of the trouble of CD receiver s operation The volume level is adjusted by using the VOLUME knob or t...

Page 29: ...ly when iPod is fully charged To start the charging again remove and set iPod or restart the CD receiver Select Ever if keep standby state for a long time with inserting iPhone in the CD receiver s do...

Page 30: ...itrates VBR for WMA files are from 64 to 192 kbps and they must have a WMA or wma filename extension Note MPEG 2 Audio LAYER 3 MPEG 2 5 Audio LAYER 3 MP1 and MP2 files are not supported USB Flash Driv...

Page 31: ...is stopped pressing the button will select the previous file Press the button repeatedly to select next file Selecting Folders 1 Press the FOLDER button to display the current folder name 2 To select...

Page 32: ...Press the SHUFFLE RANDOM button The RANDOM indicator appears 2 To start random playback press the button Cancelling Random Playback To cancel random playback press the SHUFFLE RANDOM button The RANDO...

Page 33: ...rrent MP3 or WMA file has been playing default display Title name Title of the current file if tag present Artist name Name of the artist if tag present Album name Name of the album if tag present Not...

Page 34: ...elease Once a station is found tuning stops automatically Radio frequency can be changed in 0 05 MHz steps for FM and 9 kHz step for AM Adjusting the Antennas Adjusting and installing the DAB FM anten...

Page 35: ...S Notes If the signal from an RDS station is weak RDS data may be displayed intermittently or not at all The message Waiting may appear while the RT data is being received 2 If the selected preset has...

Page 36: ...ent When tuned to a station that s broadcasting DLS text data the text will scroll across the display Scroll 2 Program Type Displays the type of program 3 Multiplex Name Displays the name of the curre...

Page 37: ...you can still hear quiet parts even when listening at low volume levels ideal for listening to the radio late at night when you don t want to disturb anyone Use the buttons to select the following opt...

Page 38: ...ed station press the MENU CLEAR button If the message Memory Full appears all the presets 40 presets for CR 545 30 DAB presets and 30 FM presets for CR 545UKD have been stored and you ll need to erase...

Page 39: ...tons to select a preset Naming Presets FM AM only You can name presets for easy identification The preset name may contain of up to twelve characters 1 Select the preset you want to name see page 39 2...

Page 40: ...10 10 0 0 0 0 FOLDER space space space See below See below See below The next symbol can be selected with the buttons _ a D P 23 space Copying Presets FM AM only With the Preset Copy function you can...

Page 41: ...ay Erasing Presets FM AM only 1 Select the preset you want to erase see page 39 2 Press the MENU CLEAR button and then use the buttons to select PresetErase 3 Press ENTER A message requesting confirma...

Page 42: ...button to select A M or P M 8 Press ENTER The clock is set and the second dot starts flashing Displaying the Day and Time To display the day and time press the remote controller s CLOCK CALL button Pr...

Page 43: ...d in which case you should return to step 5 and specify another frequency Notes Once the AccuClock function is working it will automatically update the clock daily at 2 00 3 00 and 14 00 but only when...

Page 44: ...imer 1 07 00 13 00 This timer has priority Timer 2 07 00 12 30 If two or more timers overlap the timer with the earliest start time has priority For example Timer 1 9 00 10 00 Timer 2 8 00 10 00 This...

Page 45: ...only consecutive days 8 Use the buttons to specify the On time and then press ENTER You can also use the remote controller s number buttons to enter the time For example to enter 7 29 press 7 2 and 9...

Page 46: ...eturn to the previous display at any point in this procedure press the MENU CLEAR button Using the Sleep Timer With the sleep timer you can set the CD receiver so that it automatically turns off after...

Page 47: ...page 16 to 17 The sound quality can be affected by strong magnetic fields such as that from a TV Try moving any such devices away from the CD receiver If you have any devices that emit high intensity...

Page 48: ...hat the format is FAT16 or FAT32 and the cluster size is 32K bytes or less USB Flash Drives with an internal USB hub are not supported Can t play MP3 WMA files Check whether the file format is support...

Page 49: ...an be moved by buttons during the iPod menu mode indicator is lit If the tracks are skipped by pressing buttons press the remote controller s MENU CLEAR button and confirm the indicator on the display...

Page 50: ...turns on when the power cord is connected to a power outlet If the power cord is disconnected while the power is ON the power will turn ON the next time the power cord is connected If there is a power...

Page 51: ...t 1 kHz 4 Frequency Response 20 Hz 20 kHz 0 3 dB LINE IN Tone Control 10 dB 80 Hz BASS 10 dB 10 kHz TREBLE 7 5 dB 80 Hz S BASS Signal to Noise Ratio 70 dB LINE IHF A Speaker Impedance 4 16 Tuner Secti...

Page 52: ...785 2650 http www us onkyo com ONKYO EUROPE ELECTRONICS GmbH Liegnitzerstrasse 6 82194 Groebenzell GERMANY Tel 49 8142 4401 0 Fax 49 8142 4401 555 http www eu onkyo com ONKYO EUROPE ELECTRONICS GmbH...

Reviews: