background image

9

1300 886 649

Model: ASET-048T Product Code: 44062  12/2014

www.tempo.org

AUS

Instructions

Playing a record

• 

Connect the AC power cord to an electrical outlet and raise the dust cover

• 

Turn ON (with the

 POWER/VOLUME KNOB) and adjust the volume to an 

appropriate level.

• 

Slide the function switch to PHONO position.

• 

Place a record on the turntable platter and select the correct player speed: 
33 1/3, 45, 78 RPM according to the vinyl played.

• 

Set the auto /manual stop control: Set the auto stop switch to ON if you 
are playing a 33 RPM record and you want the turntable to stop turning 
when it has reached the end of the record. If the switch is set to OFF, the 
turntable will continue turning at the end of the record.

• 

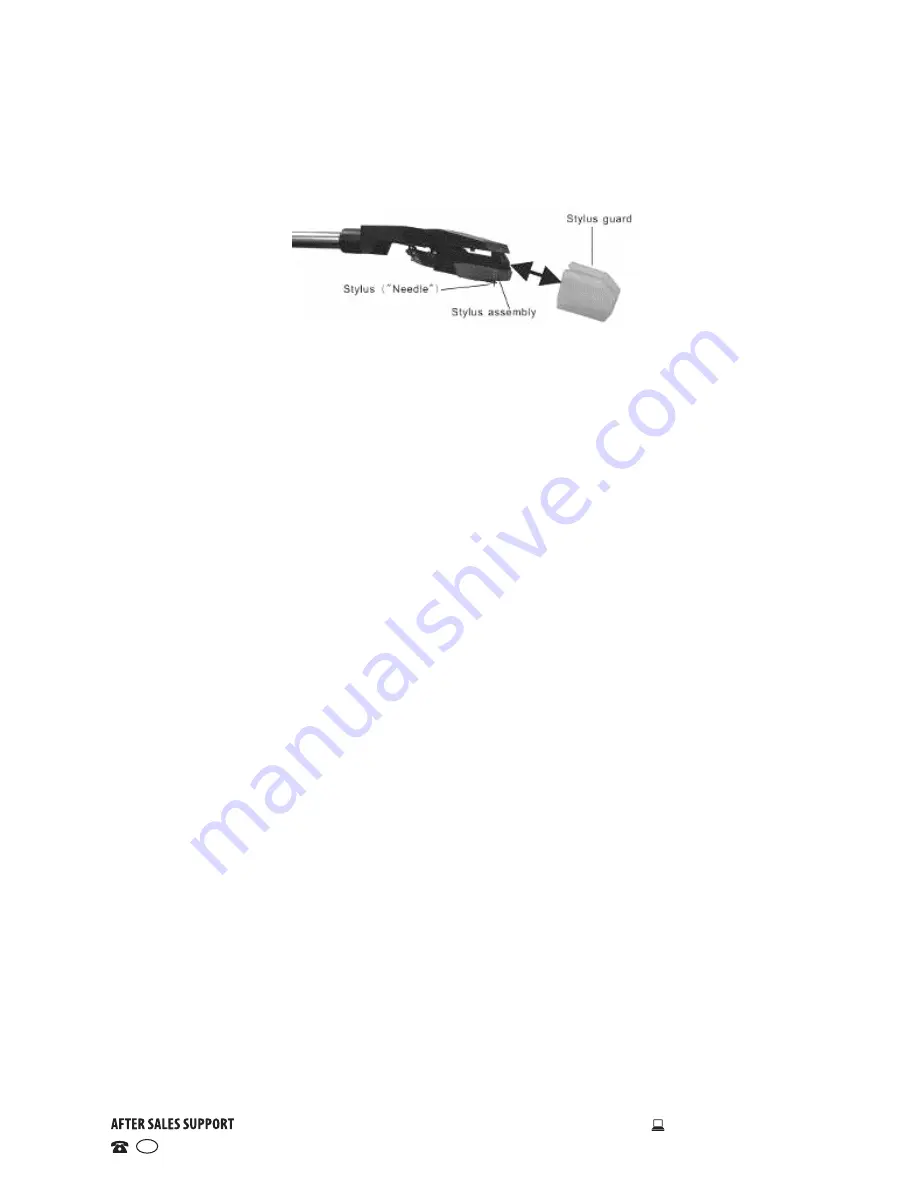
Remove the stylus guard and unlock the tone arm lock. Push the Lift lever 
upward to raise the tone arm and then gently move tone arm to the desired 
position over the record. The platter will begin to spin when the tone arm is 
moved toward the record.  

• 

Push the lift lever forward to lower the tone arm slowly onto the desired 
position on the record and begin to playing the record. 

• 

If the auto stop switch is set to ON, the record will stop automatically. If it is 
set to OFF, the record will not stop automatically. 

• 

At the end of playing the record, push the lift lever backward to raise the 
tone arm and gently move it back to its rest. 

• 

When you have finished playing records, engage the tone arm lock to 
protect it from accidental movement. Turn the power knob to switch the 
unit off. Unplug it from the power supply if you are not going to use it for a 
while.

NOTE:


Should your record stop before the last track finishes, set the auto 
stop switch to OFF. Your record will now play to the end, but you will 
have to stop the turntable rotation manually.

IMPORTANT:

 To avoid stylus damage, make certain the included stylus guard 

is in place whenever the turntable is being installed, moved or cleaned.

Summary of Contents for ASET-048T

Page 1: ...Instruction Manual 1300 886 649 Model ASET 048T Customer Helpline Turntable WITH CASSETTE DECK ...

Page 2: ...e 44062 12 2014 www tempo org AUS Warranty Details 3 Welcome 4 General Safety Instructions 5 Parts List 8 Getting Started 9 Instructions 10 Features 15 FAQs 16 Other Useful Information 17 Repair and Refurbished Goods or Parts Notice 18 Contents ...

Page 3: ... peace of mind that comes with purchasing a product made by one of the leading manufacturers All products brought to you by Onix are manufactured to the highest standards of performance and safety and as part of our philosophy of customer service and satisfaction are backed by our comprehensive 1 Year Warranty We hope you will enjoy using your purchase for many years to come ...

Page 4: ...ppliance rating label When connecting the equipment align the plug properly and insert it fully to prevent electric shock Only use this equipment with the cord and plug supplied and do not overload the power outlet If the power cord is damaged do not use the equipment The cord must be replaced by the manufacturer or similarly qualified personnel in order to avoid a hazard Contact the after sales s...

Page 5: ...t Make sure there is free circulation of air around the unit Do not place it on a thick carpet bed or any place where ventilation holes are obstructed Leave at least 10cm clearance around the unit Make sure the mains socket is readily accessible at all times Usage conditions and restrictions Openings on the cabinet are provided for ventilation and to protect the unit from overheating To ensure pro...

Page 6: ...a warm place and vice versa When you use the unit in a room where you just turned on a heater or where cold air from an air conditioner is directed on to the unit When you use the unit in hot and humid surrounds just after having moved it from an air conditioned room When the room is steamy or damp If condensation exists the unit will not operate properly Remove the disc plug the power cord into t...

Page 7: ...rtridge with stylus 9 Dynamic stereo speakers 10 Platter 11 Power volume control knob 12 Function switch 13 3 5mm earphone socket 14 AUX IN 15 USB port 16 SD MMC Card slot 17 Cassette PLAY EJECT FFWD button 18 Cassette slot 19 NEXT button 20 STOP button 21 PREV button 22 PLAY PAUSE button 23 EQ button 24 FOLDER button 25 REC button 26 DELETE button 6 10 9 26 25 24 23 23 23 23 23 11 12 13 14 15 16 ...

Page 8: ...he equipment Pay particular attention to the safety instructions on the previous pages Do not connect the unit to the mains before checking the mains voltage and before all other connections have been made Do not cover any vents and make sure that there is a space of several centimetres around the unit for ventilation Connections Connect the power cord to a properly earthed AC outlet Move the func...

Page 9: ...e desired position over the record The platter will begin to spin when the tone arm is moved toward the record Push the lift lever forward to lower the tone arm slowly onto the desired position on the record and begin to playing the record If the auto stop switch is set to ON the record will stop automatically If it is set to OFF the record will not stop automatically At the end of playing the rec...

Page 10: ...tte tape will be ejected Playing music from an auxiliary input Connect an external device to the auxiliary input at the front of the equipment Connect the AC power cord to an electrical outlet Using a 3 5mm Stereo cable connect the External audio device to the AUX IN Turn ON with the POWER VOLUME KNOB and adjust the volume to an appropriate level Set the function to AUX IN Use the POWER VOLUME KNO...

Page 11: ...n once to halt playing Press it again to continue playback To play the previous track press PREV once or hold down continuously to rapidly progress through previous tracks To play the next track press NEXT once or hold down continuously to rapidly advance through tracks To choose different sound effects press EQ Function a E1 Normal Sound b E2 POP c E3 ROCK d E4 JAZZ e E5 CLASSIC To delete a file ...

Page 12: ... a storage device USB stick SD MMC card into the relevant slot Get your traditional music media ready for playback either start playing a record on the turntable or insert a cassette tape into the cassette slot or insert a CD into a CD player connected to the AUX IN socket Press the REC button to start recording the music track s will be recorded automatically onto the storage medium as MP3 file s...

Page 13: ...edge Clean the stylus tip frequently using a soft brush with a back to front motion only If you use a stylus cleaning fluid use it very sparingly Wipe the dust cover and turntable housing gently with a soft cloth Use only a small amount of mild detergent solution to clean the turntable and dust cover Never apply harsh chemicals or solvents to any part of the turntable system Prior to moving the tu...

Page 14: ...uxillary input Auxillary input for connection of other device e g MP3 or CD player 3 5mm earphone socket for earphones or external amplifier Built in stereo speakers with 2 x 3W output LED display with blue backlight Rotary power volume control with blue backlight Transparent dust cover CAUTION Usage of controls or adjustments or performance of procedures other than those specified herein may resu...

Page 15: ...selected the correct speed 33 1 1 45 or 78 RPM Nothing will play via the AUX IN connection Make sure the cable is firmly connected and check your external device is clean and undamaged Check the FUNCTION Switch is in the AUX IN position Nothing will play via the USB device or SD Card Make sure the memory device is properly inserted in the USB port or SD Card slot and the correct function is select...

Page 16: ...FAT32 only SD MMC Card 1 x slot Speaker 2 x 4 ohms 3 Watt max Input AUX IN 1 x 3 5mm Output Headphones 1 x 3 5mm Responsible disposal At the end of its working life do not throw this product out with your house hold rubbish Electrical and electronic products contain substances that can have a detrimental effect on the environment and human health if disposed of inappropriately Observe any local re...

Page 17: ...17 1300 886 649 Model ASET 048T Product Code 44062 12 2014 www tempo org AUS This page has been left blank intentionally ...

Page 18: ...18 1300 886 649 Model ASET 048T Product Code 44062 12 2014 www tempo org AUS This page has been left blank intentionally ...

Page 19: ...19 1300 886 649 Model ASET 048T Product Code 44062 12 2014 www tempo org AUS This page has been left blank intentionally ...

Page 20: ...to return this product for a warranty claim make sure to include all accessories with the product Product does not work If you encounter problems with this product or if it fails to perform to your expectations make sure to contact our After Sales Support Centre on 1300 886 649 before returning it to the store for a refund ...

Reviews: