background image

57

Your OneTouch® Verio™ Pro Meter allows you to attach a 
before-meal, after-meal, fasting, or a bedtime tag to any 
BG result. 

•  A before-meal BG test is taken just before the start of 

your meal.

•  An after-meal BG test is typically taken one to two hours 

after the start of your meal.

•  A fasting BG test is taken after you have not eaten for at 

least 8 hours. Typically, this is the first test of the day.

•  A bedtime BG test is taken right before you go to bed.

You can also add, change or remove a tag when reviewing 
your Last Result in the meter memory.

We suggest you talk to your healthcare professional to see 
how meal, fasting and bedtime tags may help you manage 
your diabetes.

3

Attaching tags to your 

BG results

Summary of Contents for Verio Pro

Page 1: ...Owner s Booklet Instructions for use Blood Glucose Monitoring System ...

Page 2: ......

Page 3: ...1 Owner s Booklet Blood Glucose Monitoring System ...

Page 4: ...ner s Booklet offers a complete explanation of how to use your new meter and testing supplies and reviews the do s and don ts of testing your BG level Clear instructions and visuals will help you get comfortable using the OneTouch Verio Pro Meter so you can expect to get reliable results every time you test Please keep your Owner s Booklet in a safe place you may want to refer to it in the future ...

Page 5: ...related information Consult instructions for use Contains sufficient for n tests Direct current 2 Do not re use Expiry Date IVD In Vitro Diagnostic Medical Device LOT Lot Number Low Battery Manufacturer On Off Separate collection of batteries SN Serial Number Sterilised by irradiation Storage temperature limits ...

Page 6: ... Setting up your system 10 2 Testing your blood glucose BG 27 3 Attaching tags to your BG results 57 4 Reviewing past results averages and high low pattern messages 62 5 Control solution testing 79 6 Care and maintenance 90 ...

Page 7: ...5 7 Batteries 92 8 Troubleshooting 96 9 Detailed information about your system 111 10 Index 122 ...

Page 8: ...capillary whole blood drawn from the fingertips forearm or palm Venous whole blood samples may be used by healthcare professionals The OneTouch Verio Pro System is intended for self testing outside the body in vitro diagnostic use by people with diabetes at home and by healthcare professionals in a clinical setting as an aid to monitor the effectiveness of diabetes control It should not be used fo...

Page 9: ...sorption test as it may cause inaccurately high results Test principle Glucose in the blood sample mixes with special chemicals in the test strip and a small electric current is produced The strength of this current changes with the amount of glucose in the blood sample Your meter measures the current calculates your BG level displays the result and stores it in its memory ...

Page 10: ...8 The OneTouch Verio Pro Blood Glucose Monitoring System A B D E C Included with your kit Available separately G F ...

Page 11: ...evice OneTouch Verio Control Solution is available separately Ask for control solution where you obtain your test strips For availability of Clear Cap contact Customer Care on 0800 121 200 UK or 1800 535 676 Ireland mWARNING Keep the meter and testing supplies away from young children Small items such as the battery door batteries test strips lancets protective covers on the lancets and control so...

Page 12: ... Insert test strip here to turn meter on Data port Connect to download to computer mmol L is the pre set unit of measure and cannot be changed Up and down buttons Select or change information OK button Turns the meter on off Confirms menu selections Turns backlight on Meter 1 Setting up your system ...

Page 13: ...prongs Insert into test strip port Turning your meter on Press and hold until the start up screen appears Once the start up screen is displayed release After the start up screen the Main Menu is displayed 9 Oct 12 45 Last Result 7 8 mmol L My History Pattern Log Settings ...

Page 14: ... of no activity the backlight will dim Pressing any button or inserting a test strip will turn the backlight back on NOTE The backlight also lights the test port When testing in the dark press before you insert the test strip to turn on the display backlight and test strip port light This may help you insert the test strip and complete the test ...

Page 15: ...eter for the first time you will automatically start at the Set Language screen 1 Choose a language In the Set Language screen press or to highlight the language you want and press Pressing after making your selection confirms each setting and takes you to the next screen NOTE The time and date formats are pre set You cannot change these settings Set Language English Welcome ...

Page 16: ...r to set the hour and press Repeat this step to set the minutes 3 Set the date In the Set Date screen press or to change the first value and press Repeat these steps to set the second value then the year Set Time 12 45 Please set with care Set Date Please set with care 09 Oct 2010 ...

Page 17: ... L is the pre set unit of measure and cannot be changed m WARNING The unit of measure mmol L should be displayed here If your display shows mg dL rather than mmol L contact Customer Care on 0800 121 200 UK or 1800 535 676 Ireland Use of the wrong unit of measure may cause you to misinterpret your BG level and may lead to incorrect treatment Confirm Settings Language English Time 12 45 Date 09 Oct ...

Page 18: ...g the date this screen will appear on the meter display To customise other meter features highlight OK and press To go to the Main Menu highlight Not Now and press Your meter is now ready for testing Set up tools and other features OK Not Now ...

Page 19: ...s that provide information to help you manage your diabetes Tagging BG results can be tagged to indicate tests taken around mealtimes High Low Patterns Lets you know if your BG levels are developing a high or low pattern Tool Settings Tagging On High Low Patterns Off Menu ...

Page 20: ...ng you can add tags to your BG results See pages 57 61 for more information Highlight Tagging on the Tool Settings screen and press To turn this feature on or off press or to highlight your selection and press Tool Settings Tagging On High Low Patterns Off Back Tagging On Off ...

Page 21: ... you set in your meter See pages 69 76 for more information NOTE Before Meal and Fasting tags are used to determine if a BG result should trigger a high pattern message Be sure to tag your results carefully see page 57 Use care when adding tags to your BG results Incorrect tagging can cause the information displayed in high pattern messages to be inaccurate and or misinterpreted ...

Page 22: ...k m CAUTION Be sure to talk to your healthcare professional about the High and Low pattern limits that are right for you When selecting or changing your pattern limits you should consider factors such as your lifestyle and diabetes therapy Never make significant changes to your diabetes care plan without consulting your healthcare professional ...

Page 23: ...or off press or to highlight your selection and press If the feature is turned on highlight My High Low Limits on the High Low Patterns screen and press High Low Patterns Receive Alerts On My High Low limits Back Receive Alerts On Off High Low Patterns Receive Alerts On My High Low Limits Back ...

Page 24: ...apply to every hour of the day On the My High Low Limits screen highlight Low and press The Low limit is highlighted Press or to select a value for your low limit and press My High Low Limits mmol L Low 3 9 Before Meal High 8 3 Back Low 3 9 mmol L Set to detect Low Patterns ...

Page 25: ...hted Press or to select a value for your high limit and press On the My High Low Limits screen highlight Back and press to return to the High Low Patterns screen Repeat this step to return to the Tool Settings screen My High Low Limits mmol L Low 3 9 Before Meal High 8 3 Back Before Meal High Tag BG result to detect High Patterns 8 3 mmol L ...

Page 26: ...eter Highlight Settings on the Main Menu screen and press Next select Time Date Language or Tool Settings and press Then follow the instructions on pages 13 23 to make changes to your settings 9 Oct 12 45 Last Result 7 8 mmol L My History Pattern Log Settings Settings Time 12 45 Date 09 Oct 2010 Language English Tool Settings Meter Info Back ...

Page 27: ...meter and you can check this information at any time Highlight Meter Info on the Settings screen and press Settings Time 12 45 Date 09 Oct 2010 Language English Tool Settings Meter Info Back NOTE After changing any of your meter settings you will not see the Confirm Settings screen page 15 that appears when you set the meter up for the first time ...

Page 28: ...s mmol L Turning your meter off after set up There are two ways to turn your meter off Press and hold for several seconds until the meter turns off Or Your meter will turn off by itself if left alone for two minutes The information is displayed Press to return to the Settings screen ...

Page 29: ...trips Lancing device Sterile lancets Use only OneTouch Verio Test Strips Unlike some blood glucose meters no separate step to code your OneTouch Verio Pro System is required Make sure your meter and test strips are about the same temperature before you test For the most accurate results test as close to room temperature 20 25 C as you can See page 115 for more information ...

Page 30: ... vial Do Not test if there is condensation water build up on your meter Move your meter and test strips to a cool dry spot and wait for the meter surface to dry before testing Do Not return the used test strip to the vial after performing a test Do Not re use a test strip that had blood or control solution applied to it Test strips are for single use only When you first open a vial of test strips ...

Page 31: ...ies contact your healthcare professional Failure to test could delay treatment decisions and lead to a serious medical condition The meter meets all applicable standards but some mobile phones may interfere with the proper operation of your meter if next to the meter during testing The test strip vial contains drying agents that are harmful if inhaled or swallowed and may cause skin or eye irritat...

Page 32: ...ve site testing see the user instructions for that lancing device or contact Customer Care on 0800 121 200 UK or 1800 535 676 Ireland Lancing Device Protective Cover Sterile Lancet Lancet Point Cocking Control Release Button Depth Indicator Lancing Device Cap For fingertip sampling Clear Cap For forearm and palm sampling See pages 48 56 ...

Page 33: ...se and dry 1 Snap off the lancing device cap m CAUTION To reduce the chance of infection Make sure to wash the sample site with soap and warm water rinse and dry before sampling Never share a lancet or a lancing device with anyone Always use a new sterile lancet each time you test Always keep your meter and lancing device clean see pages 90 91 ...

Page 34: ...32 Testing your blood glucose BG 2 2 Insert a sterile lancet Firmly push the lancet into the holder 3 Twist off the protective cover and save it for later use Replace the lancing device cap ...

Page 35: ...tting Twist the lancing device cap until the desired setting appears Smaller numbers are for shallower punctures which may be less painful Shallower punctures work for children and most adults Deeper punctures work well for people with thick or callused skin ...

Page 36: ...34 Testing your blood glucose BG 2 5 Cock the lancing device Slide the cocking control back until it clicks If it does not click that s okay It may have been cocked when you inserted the lancet ...

Page 37: ... gold side of the test strip and the two silver prongs facing you No separate step to code the meter is required NOTE When testing in the dark press and hold before you insert the test strip to turn on the display backlight and test port light This may help you insert the test strip and complete the test Silver prongs Test strip port ...

Page 38: ...ood glucose BG 2 When the Apply Blood screen appears on the display you can apply your blood sample Apply Blood 7 Lance your finger Hold the lancing device firmly against the side of your finger Press the release button ...

Page 39: ...8 Get a round drop of blood Gently squeeze your finger until you get a round drop of blood If the blood smears or runs Do Not use that sample Wipe the area and gently squeeze another drop of blood or puncture a new site Approximate size ...

Page 40: ...esults 1 Apply the sample to the test strip You can apply blood to either side of the test strip Apply your sample to the opening of the channel Be sure to apply your sample immediately after you get a drop of blood Channel Apply drop of blood here or here Channel ...

Page 41: ...39 Testing your blood glucose BG 2 Holding the meter at a slight angle guide the channel to the blood drop When it touches your sample the test strip wicks blood into the channel Channel ...

Page 42: ... fill completely The blood drop will be drawn into the narrow channel The channel should fill completely The channel turns red and the meter begins a 5 second countdown Blood should not be applied on the top of the test strip or to the top edge of the test strip ...

Page 43: ...against the puncture site or the channel may be blocked from filling properly Do Not apply more blood to the test strip after you have moved the drop of blood away Do Not move the test strip in the meter during a test or the meter may turn off Do Not remove the test strip until the result is displayed or the meter will turn off ...

Page 44: ...time of the test If mmol L does not appear with the BG result contact Customer Care on 0800 121 200 UK or 1800 535 676 Ireland m CAUTION If the words Control Solution appear on the screen when testing your blood glucose repeat the test with a new test strip If the problem persists contact Customer Care on 0800 121 200 UK or 1800 535 676 Ireland Example ...

Page 45: ...have your BG result you may Attach a Tag to this result if the Tagging feature is turned on see pages 57 61 Or Return to the Main Menu Or Press and hold for several seconds until the meter turns off The meter will also automatically turn off if left alone for two minutes ...

Page 46: ...the lancet tip into the cover Remove the lancet and place it in a container for sharp objects Replace the lancing device cap Disposing of the used lancet and test strip Used test strips and lancets may be considered biohazardous waste in your area Be sure to follow your healthcare professional s recommendations or local regulations for proper disposal ...

Page 47: ... result could be due to a test error it is safer to treat first then do another test EXTREME LOW BG is displayed when your BG result is below 1 1 mmol L You may have severe hypoglycaemia very low blood glucose This may require immediate treatment according to your healthcare professional s recommendations Although this result could be due to a test error it is safer to treat first then do another ...

Page 48: ...healthcare professional if you are concerned about hyperglycaemia EXTREME HIGH BG is displayed when your BG result is over 33 3 mmol L You may have severe hyperglycaemia very high blood glucose Re test your BG level If the result is EXTREME HIGH BG again this indicates a severe problem with your blood glucose control Obtain and follow instructions from your healthcare professional immediately ...

Page 49: ... not consistent with your BG results and you have followed all instructions in this Owner s Booklet call your healthcare professional Never ignore symptoms or make significant changes to your diabetes management programme without speaking to your healthcare professional Unusual red blood cell count A haematocrit percentage of your blood that is red blood cells that is either very high above 60 or ...

Page 50: ...m Getting a drop of blood from these alternative sites may be less painful than a fingertip sample m CAUTION Talk to your healthcare professional before using your forearm or palm for testing If you are testing Use blood sample from your Before or more than 2 hours after a meal a fast acting insulin injection or insulin pump bolus exercise Fingertip forearm or palm ...

Page 51: ...lin reaction sooner than testing with a forearm or palm sample It has been less than two hours after a meal a fast acting insulin injection or insulin pump bolus physical exercise or you think your glucose level is changing rapidly You are ill or during times of stress You are concerned about the possibility of hypoglycaemia or an insulin reaction such as when driving a car This is especially impo...

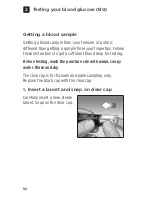
Page 52: ...our fingertips Follow these instructions to get a sufficient blood drop for testing Before testing wash the puncture site with warm soapy water Rinse and dry The clear cap is for forearm and palm sampling only Replace the black cap with the clear cap 1 Insert a lancet and snap on clear cap Carefully insert a new sterile lancet Snap on the clear cap ...

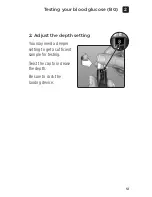
Page 53: ...51 Testing your blood glucose BG 2 2 Adjust the depth setting You may need a deeper setting to get a sufficient sample for testing Twist the cap to increase the depth Be sure to cock the lancing device ...

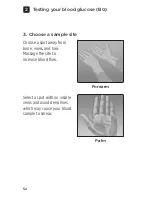
Page 54: ...ose BG 2 3 Choose a sample site Choose a spot away from bone veins and hair Massage the site to increase blood flow Select a spot with no visible veins and avoid deep lines which may cause your blood sample to smear Forearm Palm ...

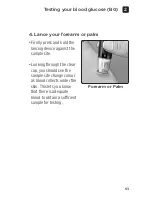
Page 55: ... press and hold the lancing device against the sample site Looking through the clear cap you should see the sample site change colour as blood collects under the skin This lets you know that there is adequate blood to obtain a sufficient sample for testing Forearm or Palm ...

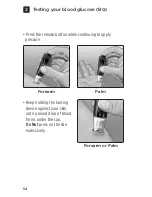
Page 56: ...e BG 2 Press the release button while continuing to apply pressure Keep holding the lancing device against your skin until a round drop of blood forms under the cap Do Not press on the site excessively Forearm Palm Forearm or Palm ...

Page 57: ...e If the drop of blood runs or spreads due to contact with hair or a line in your palm Do Not use the sample Try lancing again in a smoother area If bruising occurs at an alternative site or you have difficulty getting a sample consider sampling from a fingertip instead You may want to review the choice of sites with your healthcare professional ...

Page 58: ...ther hand to bring the side of the test strip channel to the drop of blood See pages 38 42 for more information on applying the blood sample to the test strip See pages 45 47 for more information on interpreting unexpected test results See page 44 for information on disposing the used lancet and test strip Forearm Palm ...

Page 59: ...r the start of your meal A fasting BG test is taken after you have not eaten for at least 8 hours Typically this is the first test of the day A bedtime BG test is taken right before you go to bed You can also add change or remove a tag when reviewing your Last Result in the meter memory We suggest you talk to your healthcare professional to see how meal fasting and bedtime tags may help you manage...

Page 60: ... tags are used to determine if a BG result should trigger a high pattern message see page 69 Use care when adding tags to your BG results Incorrect tagging can cause the information displayed in averages and high pattern messages to be inaccurate and or misinterpreted ...

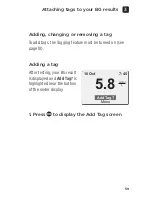
Page 61: ...ing a tag To add tags the Tagging feature must be turned on see page 18 Adding a tag After testing your BG result is displayed and Add Tag is highlighted near the bottom of the meter display 1 Press to display the Add Tag screen 10 Oct 7 45 Add Tag Menu 5 8 mmol L ...

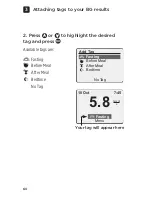
Page 62: ...ts 3 2 Press or to highlight the desired tag and press Available tags are Fasting Before Meal After Meal Bedtime No Tag Add Tag Fasting Before Meal After Meal Bedtime No Tag 10 Oct 7 45 Fasting Menu 5 8 mmol L Your tag will appear here ...

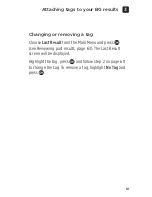
Page 63: ...removing a tag Choose Last Result from the Main Menu and press see Reviewing past results page 63 The Last Result screen will be displayed Highlight the tag press and follow step 2 on page 60 to change the tag To remove a tag highlight No Tag and press ...

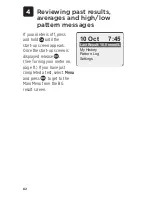
Page 64: ...and hold until the start up screen appears Once the start up screen is displayed release See Turning your meter on page 11 If you have just completed a test select Menu and press to get to the Main Menu from the BG result screen 10 Oct 7 45 Last Result 10 0 mmol L My History Pattern Log Settings ...

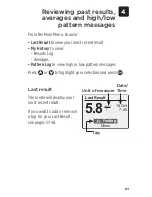
Page 65: ... History to view Results Log Averages Pattern Log to view high or low pattern messages Press or to highlight your selection and press Last result The meter will display your most recent result If you wish to add or remove a tag for your Last Result see pages 57 61 Tag Unit of measure Date Time Last Result 5 8mmol L 10 Oct 7 45 Fasting Menu ...

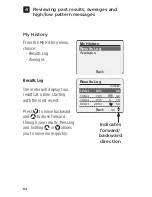
Page 66: ...will display four results at a time starting with the most recent Press to move backward and to move forward through your results Pressing and holding or allows you to move more quickly My History Results Log Averages Back Results Log Back 12 Oct 8 03 3 9 10 Oct 7 45 4 2 10 Oct 7 35 C 7 8 09 Oct 20 03 5 8 mmol L 1 4 Indicates forward backward direction ...

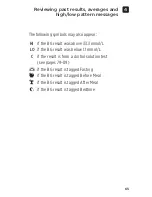
Page 67: ...appear HI if the BG result was above 33 3 mmol L LO if the BG result was below 1 1 mmol L C if the result is from a control solution test see pages 79 89 if the BG result is tagged Fasting if the BG result is tagged Before Meal if the BG result is tagged After Meal if the BG result is tagged Bedtime ...

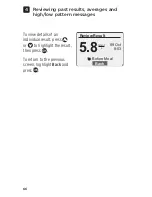
Page 68: ...ages and high low pattern messages 4 To view details of an individual result press or to highlight the result then press To return to the previous screen highlight Back and press Review Result 5 8mmol L 09 Oct 8 03 Before Meal Back ...

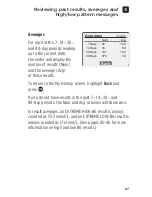
Page 69: ...o the My History screen highlight Back and press If you do not have results in the past 7 14 30 and 90 day periods the Num and Avg columns will show zero In result averages an EXTREME HIGH BG result is always counted as 33 3 mmol L and an EXTREME LOW BG result is always counted as 1 1 mmol L See pages 45 46 for more information on high and low BG results Averages Back Num Avg 7 Days 34 10 3 14 Day...

Page 70: ...e setting If you change your date setting your averages may change too Result averages provide information from past results Do Not use result averages to make immediate treatment decisions Always consult your healthcare professional before making significant changes to your diabetes care plan m CAUTION Allowing other people to use your meter may affect your averages ...

Page 71: ...the Before Meal High limit set in your meter Pattern messages appear based on the following A low pattern message appears whenever you get a low result on any 2 days within the same 3 hour period within the most recent 5 consecutive days A high pattern message appears whenever you get a high result on any 3 days tagged as Before Meal or Fasting within the same 3 hour period within the most recent ...

Page 72: ... high or low pattern messages with your BG results the High Low Patterns feature must be turned on see pages 19 23 Once a result is used in a pattern it will not be used again in future pattern messages NOTE To be sure that High Low pattern messages appear whenever appropriate Test your blood glucose using only this meter Using different meters may cause you to miss patterns Tag your BG results ca...

Page 73: ...9 23 These Messages are different from EXTREME HIGH BG and EXTREME LOW BG Warnings that appear whenever your BG level is above 33 3 mmol L or below 1 1 mmol L Be sure you are performing BG tests correctly to get accurate results see pages 31 42 Inaccurate results cause pattern messages to appear Allowing other people to use your meter may affect your patterns ...

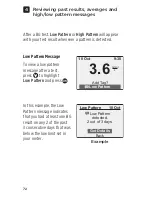
Page 74: ... Message To view a low pattern message after a test press to highlight Low Pattern and press In this example the Low Pattern message indicates that you had at least one BG result on any 2 of the past 3 consecutive days that was below the low limit set in your meter Low Pattern 10 Oct Get Details Back Low Pattern detected 2 out of 3 days Example 10 Oct 9 30 Add Tag Low Pattern 3 6mmol L ...

Page 75: ...highlight Back and press High Pattern Message To view a high pattern message after a test press to highlight High Pattern and press NOTE High pattern messages only include BG results that are above the Before Meal High limit and are tagged as Before Meal or Fasting results Be sure to tag your results carefully Low Pattern Details Back 10 Oct 9 30 3 6 09 Oct 9 10 3 3 mmol L 10 Oct 9 30 Before Meal ...

Page 76: ...t was above the high limit set in your meter To view details about the individual results that resulted in the High Pattern message highlight Get Details and press To return to the previous screen highlight Back and press High Pattern Details Back 10 Oct 9 30 10 0 09 Oct 9 10 9 7 08 Oct 7 35 8 9 mmol L High Pattern 10 Oct Get Details Back Before Meal High Pattern detected 3 out of 4 days Example ...

Page 77: ...that blinks This reminds you to view your messages To view your message s highlight Pattern Log and press On the Pattern Log screen highlight the message s you want to view and press After viewing each message the message icon will be removed 10 Oct 12 45 Last Result 7 8 mmol L My History Pattern Log Settings Pattern Log Back 10 Oct 9 30 09 Oct 12 53 02 Oct 11 00 23 Sep 10 15 1 4 ...

Page 78: ... in your meter Talk to your healthcare professional about High Low limits that are right for you and check your settings to ensure that your High Low limits are set correctly Messages provide information from past results and may help you to identify a need to consider making adjustment in therapy or lifestyle Do Not use messages to make immediate and or significant changes to your diabetes care p...

Page 79: ...s for planning meals exercise insulin dosing and medication To learn more about OneTouch DMS and to order the software and USB cable from LifeScan visit www LifeScan co uk or Customer Care on 0800 121 200 UK or 1800 535 676 Ireland Connect only to a computer certified to UL 60950 1 To transfer meter data follow the instructions provided with the OneTouch DMS to download the results from the meter ...

Page 80: ...sages 4 Do Not insert a test strip while the meter is connected to a computer Once the command to start the download is sent from the computer to the meter the meter display will show PC Connected indicating that the meter is in communication mode PC Connected ...

Page 81: ...hat the meter and test strips are working together properly and that you are performing the test correctly Control Solution is available separately NOTE Use only OneTouch Verio Control Solution with your OneTouch Verio Pro Meter 5 Control solution testing ...

Page 82: ...ely after use to avoid contamination or damage Control solution tests must be done at room temperature 20 25 C Make sure your meter test strips and control solution are at room temperature before testing m CAUTION Do Not swallow or ingest control solution Do Not apply control solution to the skin or eyes as it may cause irritation Do Not use control solution after the expiry date printed on the vi...

Page 83: ...ing 5 Do a control solution test Whenever you open a new vial of test strips If you suspect that the meter or test strips are not working properly If you have had repeated unexpected BG results If you drop or damage the meter ...

Page 84: ... Control solution testing 5 Performing a control solution test 1 Insert a test strip to turn the meter on Wait for the Apply Blood screen to appear on the display Silver prongs Test strip port Apply Blood ...

Page 85: ...ntrol solution Remove the vial cap and place it on a flat surface with the top of the cap pointing up Squeeze the vial to discard the first drop Wipe both the tip of the control solution vial and the top of the cap with a clean damp tissue or cloth ...

Page 86: ...squeeze a drop into the small well on the top of the cap or onto another clean non absorbent surface 3 Apply the control solution Hold the meter so that the side edge of the test strip is at a slight angle to the drop of control solution ...

Page 87: ...ntrol solution Wait for the channel to fill completely 4 Read your result The meter will begin a 5 second countdown Your result is displayed along with the date time unit of measure and the words Control Solution The meter automatically marks the result as a control solution test Example ...

Page 88: ...r on the screen repeat the test with a new test strip If the problem persists contact Customer Care on 0800 121 200 UK or 1800 535 676 Ireland NOTE If the words Control Solution do not appear on the screen the result will be included in your averages and your averages will change too ...

Page 89: ...range Compare the result displayed on the meter to the range printed on your OneTouch Verio Control Solution vial If your control solution result falls outside the expected range repeat the test with a new test strip Example range OneTouch Verio 5 7 7 7 mmol L ...

Page 90: ...on pages 82 87 Control solution is contaminated expired or past its discard date Test strip or test strip vial is damaged expired or past its discard date Meter test strips and or control solution were not all at the same temperature when the control solution test was performed A problem with the meter Dirt or contamination in the small well on the top of the control solution cap see Step 2 ...

Page 91: ...to get control solution results that fall outside the range printed on the control solution vial Do Not use the meter test strips or control solution Contact Customer Care on 0800 121 200 UK or 1800 535 676 Ireland The control solution range printed on the control solution vial is for control solution tests only and is not a recommended range for your BG level ...

Page 92: ...ems away from direct sunlight and heat Cleaning and caring for your meter Wipe the outside with a soft cloth dampened with water and mild detergent Do Not use alcohol or any other solvent Do Not allow liquids dirt dust blood or control solution to enter the test strip port or the data port Refer to meter illustration on page 10 Do Not spray cleaning solution on the meter or immerse it in any liqui...

Page 93: ...and mild detergent Do Not immerse the lancing device in any liquid To disinfect these items prepare a solution of one part household bleach to nine parts water Wipe the lancing device with a soft cloth dampened with this solution Immerse the caps only in this solution for 30 minutes Rinse briefly with water and allow both to air dry 91 ...

Page 94: ...es IMPORTANT Use only AAA alkaline batteries with your meter Do Not use rechargeable batteries Use of an incorrect battery type may result in your meter providing fewer tests than normal from when the battery icon or the Low Battery screen first appears m WARNING Certain batteries may cause leaking which can damage the meter or cause the batteries to lose power sooner than normal Replace leaking b...

Page 95: ...t with the meter turned off Remove the battery cover by lifting the tab located on the cover at the bottom of the meter Pull up on the battery ribbon to lift both batteries out of the compartment Do Not change either battery while the meter is connected to a computer 7 ...

Page 96: ...ry ribbon Plus and minus signs will guide you in placing the batteries If the meter does not power on after you have replaced the meter batteries check that the batteries are correctly installed If the meter still does not power on contact Customer Care on 0800 121 200 UK or 1800 535 676 Ireland ...

Page 97: ...e of batteries according to your local environmental regulations Please recycle or dispose of used batteries using your local battery collection systems and in compliance with your local environmental laws and regulations Batteries contain chemicals that if released may affect the environment and human health The crossed out wheeled bin symbol indicates the need for the separate collection for bat...

Page 98: ...ouch Verio Pro Meter displays messages when there are problems with the test strip with the meter or when your BG levels are above 33 3 mmol L or below 1 1 mmol L Improper use may cause an inaccurate result without producing an error message 8 ...

Page 99: ...1 1 mmol L What to do This may require immediate treatment according to your healthcare professional s recommendations Although this message could be due to a test error it is safer to treat first and then do another test EXTREME LOW BG below 1 1 mmol L Warning 97 Troubleshooting 8 ...

Page 100: ...hat to do You may have severe hyperglycaemia extremely high blood glucose Re test your BG level If the result is EXTREME HIGH BG again this indicates a severe problem with your blood glucose control Obtain and follow instructions from your healthcare professional immediately EXTREME HIGH BG above 33 3 mmol L Warning ...

Page 101: ...ove the meter and test strips to a cooler area Insert a new test strip when the meter and test strips are within the operating range 6 44 C If you do not get another Temperature too high message you can proceed with testing Temperature too high Out of operating range See Owner s Booklet Warning ...

Page 102: ...Move the meter and test strips to a warmer area Insert a new test strip when the meter and test strips are within the operating range 6 44 C If you do not get another Temperature too low message you can proceed with testing Temperature too low Out of operating range See Owner s Booklet Warning ...

Page 103: ...oubleshooting 8 What it means There is a problem with the meter What to do Do Not use the meter Contact Customer Care on 0800 121 200 UK or 1800 535 676 Ireland Meter problem Contact Customer Service ERROR 1 ...

Page 104: ...problem with the meter What to do Repeat the test with a new test strip see blood application pages 38 42 or control solution testing pages 82 87 If this message continues to appear contact Customer Care on 0800 121 200 UK or 1800 535 676 Ireland Meter or strip problem Retest with a new strip ERROR 2 ...

Page 105: ...What to do Repeat the test with a new test strip Apply a blood or control solution sample only after Apply Blood appears on the display If this message continues to appear contact Customer Care on 0800 121 200 UK or 1800 535 676 Ireland Meter was not ready Retest with a new strip ERROR 3 ...

Page 106: ...ter the meter began to count down The test strip may have been damaged or moved during testing The sample was improperly applied There may be a problem with the meter What to do Repeat the test with a new test strip see blood application pages 38 42 or control solution testing pages 82 87 If the error message appears again contact Customer Care on 0800 121 200 UK or 1800 535 676 Ireland ...

Page 107: ...e cause is test strip damage What to do Repeat the test with a new test strip see blood application pages 38 42 or control solution testing pages 82 87 If the error message appears again contact Customer Care on 0800 121 200 UK or 1800 535 676 Ireland Strip problem Retest with a new strip ERROR 5 ...

Page 108: ...gh power to perform a test What to do This message will appear when you turn the meter on and there is enough power for a minimum of 100 more tests Press to continue but replace the battery as soon as possible see pages 93 95 Low Battery OK Replace battery See Owner s Booklet ...

Page 109: ...h power to perform a test What to do Once the Low Battery message is displayed this symbol will continue to appear until you replace the battery Test results will still be accurate but replace the battery as soon as possible see pages 93 95 10 Oct 10 13 Add Tag Menu 5 8 mmol L ...

Page 110: ...roubleshooting 8 What it means Meter battery does not have enough power to perform a test What to do Replace the meter battery see pages 93 95 Very low battery Replace battery now See Owner s Booklet Warning ...

Page 111: ...uter Or Your meter was unable to recall this result This result will not be included in result averages What to do You can still perform a BG test and get an accurate result Contact Customer Care on 0800 121 200 UK or 1800 535 676 Ireland to report this occurrence unless this is your first use of the meter Result not available Warning ...

Page 112: ...sult will not be included in result averages What to do You can still perform a BG test and get an accurate result but contact Customer Care on 0800 121 200 UK or 1800 535 676 Ireland to report this occurrence Results Log Back 10 Oct 7 45 4 2 10 Oct 7 35 C 3 9 09 Oct 20 03 4 2 mmol L 1 4 ...

Page 113: ... results can be affected by factors that do not affect lab results in the same way which may cause a difference of more than 15 Specific factors that may cause your meter result to vary from your lab result by more than 15 include You have eaten recently This can cause a result from fingertip testing to be up to 3 8 mmol L higher than a lab test using blood drawn from a vein 1 1 Sacks D B Carbohyd...

Page 114: ...nformation refer to the OneTouch Verio Test Strip Insert Guidelines for obtaining accurate meter to lab comparisons Before going to the lab Perform a control solution test to make sure your meter is working properly Do Not eat for at least 8 hours before you test your blood Take your meter and testing supplies with you to the lab ...

Page 115: ...r system 9 Testing with your OneTouch Verio Pro Meter at the lab Test within 15 minutes of the lab test Use only a fresh capillary blood sample from your fingertip Follow all instructions in this Owner s Booklet for performing a BG test ...

Page 116: ...tion Plasma equivalent Sample Fresh capillary whole blood Sample volume 0 4 µL Test time 5 seconds Assay method FAD GDH glucose dehydrogenase Power source Two replaceable AAA alkaline batteries Expected meter battery life Minimum six months at average four tests per day Unit of measure mmol L Memory 750 test results ...

Page 117: ...minutes after last action Size 91 x 56 x 20 mm Weight Approximately 85 05 grammes with batteries Operating ranges Temperature 6 44 C Relative humidity non condensing 10 90 Altitude up to 3048 metres Haematocrit 20 60 Battery ratings 2 x 1 5 V d c 60 mA 2 x AAA alkaline batteries direct current ...

Page 118: ...tration is 4 2 mmol L or higher However experts have suggested greater accuracy of Blood Glucose Monitoring Systems is desirable The OneTouch Verio Pro Blood Glucose Monitoring System has demonstrated accuracy within 0 7 mmol L of the laboratory method for glucose concentrations lower than 4 4 mmol L and within 15 of the laboratory method for glucose concentrations 4 4 mmol L or higher Samples fro...

Page 119: ... laboratory test Within 0 3 mmol L Within 0 6 mmol L Within 0 7 mmol L Within 0 8 mmol L 78 3 94 120 99 2 119 120 99 2 119 120 100 120 120 System Accuracy Results for Glucose Concentrations 4 4 mmol L Percent and number of meter results that match the laboratory test Within 5 Within 10 Within 15 Within 20 46 7 224 480 85 4 410 480 99 0 475 480 99 8 479 480 ...

Page 120: ... Verio Pro System compares well with a laboratory method of Subjects of Tests Slope Intercept mmol L 100 600 0 949 0 070 95 CI Slope 95 CI Intercept Std Error Sy x R2 0 941 to 0 957 0 022 to 0 163 0 615 0 990 System Accuracy Results across the entire Glucose Range Percent and number of meter results that match the laboratory test Within 0 67 mmol L or 15 99 0 594 600 ...

Page 121: ... Tests Target Glucose mmol L Mean Glucose mmol L Standard Deviation mmol L Coefficient of Variation 2 2 2 08 0 05 2 17 5 6 5 7 0 11 2 00 7 2 7 06 0 14 1 91 11 0 10 69 0 2 1 88 19 4 18 53 0 34 1 85 Results show that the greatest variability observed between test strips when tested with blood is 2 17 or less ...

Page 122: ...stem 9 Total Precision 600 Control Solution Tests Glucose Level Ranges mmol L Mean Glucose mmol L Standard Deviation mmol L Coefficient of Variation Low 2 11 3 44 2 77 0 07 2 59 Mid 5 67 7 67 6 49 0 13 2 06 High 16 56 22 39 19 53 0 42 2 14 ...

Page 123: ...his meter complies with CISPR 11 2003 Class B Radiated Only Emissions of the energy used are low and not likely to cause interference in nearby electronic equipment The meter has been tested for immunity to Level 3 electrostatic discharge as specified in IEC 61000 4 2 This meter has been tested for immunity to radio frequency interference over the frequency range 80 MHz to 2 5 GHz at 3 V m as spec...

Page 124: ... Comparing meter results to laboratory results 111 Control solution discard and expiry dates 80 Control solution testing 79 Data port 10 Date setting 14 Dehydration 45 Display check 11 62 Disposal lancets and test strips 44 Downloading results to a computer 77 Error messages 96 Fingertip testing procedure 31 Forearm testing procedure 48 Index 10 ...

Page 125: ...Hypoglycaemia 45 97 Infection reduce the chance 31 Intended use 6 Kit components 8 Lancing device 8 30 Language setting 13 LOW BATTERY message 106 LOW GLUCOSE message 45 65 97 Main Menu screen 11 24 62 mmol L 10 15 42 114 Palm testing procedure 48 Plasma calibration 111 114 Results reviewing past 62 Settings 13 ...

Page 126: ...ecifications 114 Temperature 27 80 99 100 115 Test strip applying drop of blood 38 Test strip discard and expiry dates 28 Test strip silver prongs 11 35 82 Time setting 14 Tool settings 17 Turning meter off 26 43 Turning meter on 11 35 62 82 Unexpected test results 47 Unit of measure 10 15 42 114 Unusual red blood cell count haematocrit 47 ...

Page 127: ...125 Notes ...

Page 128: ...126 Notes ...

Page 129: ...127 Notes ...

Page 130: ...128 Notes ...

Page 131: ...Meter Test Strips and Control Solution MDD 93 42 EEC Lancets Blood Sampler LifeScan Europe Division of Cilag GmbH International 6300 Zug Switzerland Distributed by LifeScan UK Ireland A div of Ortho Clinical Diagnostics Johnson Johnson 50 100 Holmers Farm Way High Wycombe Bucks HP12 4DP United Kingdom www LifeScan co uk ...

Page 132: ... 475 372 6 716 577 6 749 887 6 797 150 6 863 801 6 872 298 7 045 046 and 7 498 132 Use of the monitoring device included herein is protected under one or more of the following U S patents 6 413 410 6 890 421 Purchase of this device does not act to grant a use license under these patents Such a license is granted only when the device is used with OneTouch Verio Test Strip No test strip supplier oth...

Reviews: