background image

Page 9

SKU 96622

For technical questions, please call 1-800-444-3353.

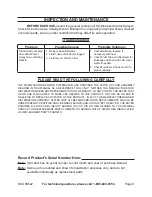
inspection and maintenance

beFore eacH use,

 inspect the general condition of this Motorized Caddy Sprayer.  

Check for loose screws, misalignment or binding of moving parts (including wheels), cracked 

or broken parts, and any other condition that may affect its safe operation.  

troubleshooting

problem

possible causes

probable solutions

Product will not spray 

from either Power 

Spray Gun or Misting 

Nozzle.

Weak or dead Batteries.
Fluid Tube or Nozzle(s) clogged.
Fluid level in Tank too low.

1.
2.
3.

Check Batteries, replace if 

necessary with new.
Check Fluid Tube and Nozzle(s) for 

blockage and flush with cold, clean 

water if needed.

Check fluid level in Tank and fill to 

proper capacity. 

1.

2.

3.

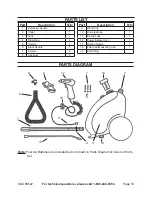
please read tHe Following careFully

THE MANUFACTURER AND/OR DISTRIBUTOR HAS PROVIDED THE PARTS LIST AND ASSEMBLY 

DIAGRAM IN THIS MANUAL AS A REFERENCE TOOL ONLY.  NEITHER THE MANUFACTURER OR 

DISTRIBUTOR MAKES ANY REPRESENTATION OR WARRANTY OF ANY KIND TO THE BUYER THAT 

HE OR SHE IS QUALIFIED TO MAKE ANY REPAIRS TO THE PRODUCT, OR THAT HE OR SHE IS 

QUALIFIED TO REPLACE ANY PARTS OF THE PRODUCT.  IN FACT, THE MANUFACTURER AND/OR 

DISTRIBUTOR ExPRESSLY STATES THAT ALL REPAIRS AND PARTS REPLACEMENTS SHOULD BE 

UNDERTAKEN BY CERTIFIED AND LICENSED TECHNICIANS, AND NOT BY THE BUYER.  THE BUYER 

ASSUMES ALL  RISK AND  LIABILITY ARISING  OUT  OF  HIS  OR  HER  REPAIRS  TO  THE  ORIGINAL 

PRODUCT OR REPLACEMENT PARTS THERETO, OR ARISING OUT OF HIS OR HER INSTALLATION 

OF REPLACEMENT PARTS THERETO.

record


product’s serial number Here: 

note:

  If product has no serial number, record month and year of purchase instead.

note:

  Some parts are listed and shown for illustration purposes only, and are not 

available individually as replacement parts.

Summary of Contents for CADDY SPRAYER 96622

Page 1: ...reight Tools 3491 Mission Oaks Blvd Camarillo CA 93011 Visit our website at http www harborfreight com Read this material before using this product Failure to do so can result in serious injury Save this manual Copyright 2007 by Harbor Freight Tools All rights reserved No portion of this manual or any artwork contained herein may be reproduced in any shape or form without the express written conse...

Page 2: ...se call 1 800 444 3353 Contents Important Safeguards 3 Work Area Safety 3 General and Specific Safety 4 Specifications 5 Unpacking 5 Cleaning 5 Assembly 5 Operation 7 INSPECTION and MAINTENANCE 9 Troubleshooting 9 PARTS LIST 10 Parts diagram 10 ...

Page 3: ...y messages that follow this symbol to avoid possible injury or death DANGER indicates a hazardous situation which if not avoided will result in death or serious injury WARNING indicates a hazardous situation which if not avoided could result in death or serious injury CAUTION used with the safety alert symbol indicates a hazardous situation which if not avoided could result in minor or moderate in...

Page 4: ...n of this manual on page 5 Caution Do not store chemicals in the Tank Dispose of any remaining chemicals according to manufacturers directions Caution Do not mix old and new batteries Do not mix alkaline with standard carbon zinc or rechargeable batteries Always check with local refuse disposal for correct way to dispose of old used batteries Make sure the Fill Cap 14 Drain Plug 15 and Universal C...

Page 5: ... as possible Cleaning Read the entire Important Safeguards section at the beginning of this manual including all text under subheadings therein before set up or use of this product Always rinse the Tank 3 Fluid Pickup 11 Misting Nozzle 13 and Power Sprayer Gun 12 completely with cold clean water at least twice before initial use between different chemicals when finished Dry with a soft cloth Wipe ...

Page 6: ...ighten the Collar 2 with clockwise motion until it is snug and the Stop Ring 4 is located just above it See Figure 1 5 1 5 7 8 Figure 2 Slide Holster 5 onto Extension Handle 1 The Holster 5 must face the front and be on the right side of the Extension Handle 1 viewed from behind the sprayer Fasten Screw 7 and Hex Nuts 8 securely with screwdriver not included See Figure 2 1 2 ...

Page 7: ...Universal Cap 10 holding the Pickup Tube 11 onto the Tank 3 The Motorized Power Sprayer may be used with either the Power Sprayer Gun by itself 12 or by attaching the Misting Tube 13 to the end of the Power Sprayer Gun 12 when only a light mist is needed Operation Read the entire Important Safeguards section at the beginning of this manual including all text under subheadings therein before set up...

Page 8: ... use Grab the handle and move the Caddy Sprayer into position Squeeze the Trigger on the Power Spray Gun 12 and Spray with back and forth or up and down motion keeping the Power Sprayer Gun 12 and or the Misting Nozzle 13 approximately 12 inches from what you intend to cover with the product you are using CAUTION Do not spray against the wind When you are finished or if you intend to switch chemic...

Page 9: ...Y The manufacturer and or distributor has provided the parts list and assembly diagram in this manual as a reference tool only Neither the manufacturer or distributor makes any representation or warranty of any kind to the buyer that he or she is qualified to make any repairs to the product or that he or she is qualified to replace any parts of the product In fact the manufacturer and or distribut...

Page 10: ... 1 5 Holster 1 6 Black Handle 1 7 Screws 3 8 Hex Nuts 3 Part Description Q ty 9 Wand Clip 1 10 Universal Cap 1 11 Pickup Tube 1 12 Power Sprayer Gun 1 13 Misting Nozzle 1 14 Filler Cap Measuring Cup 1 15 Drain Plug Parts diagram 9 5 12 7 14 2 4 3 15 8 6 1 13 11 10 Note Four AA Batteries are included but not shown in Parts Diagram or listed on Parts List ...

Reviews: