•
Set the PLC setting to the same as the Servo Drive
Chapter 4-5-7
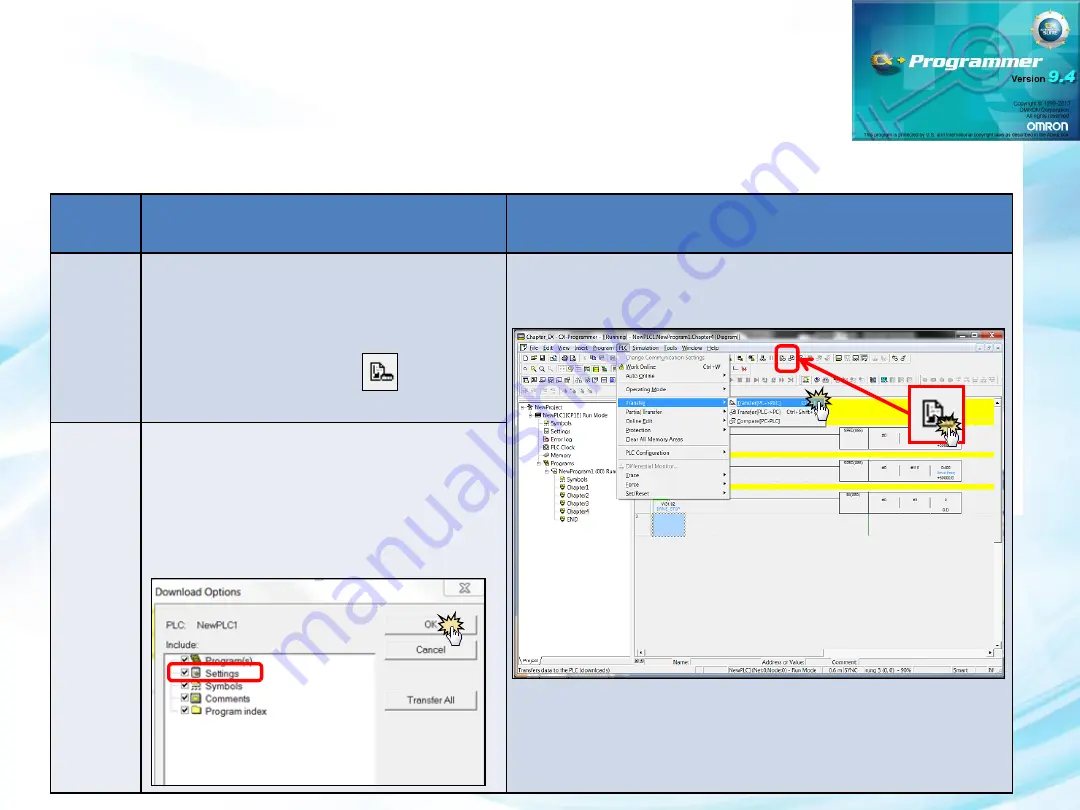
Transfer PLC Program
Step
Description
Transfer Program
1
Download program to PLC
1.
Click PLC tab > Transfer > Transfer
[PC ->PLC]
2.
Ctrl + T
3.
Click on the icon
2
Check the Settings before download,
else there will be no communication
between PLC and Inverter due to setting
wasn’t being transfer.
Summary of Contents for CP1E-N[]S1
Page 1: ...Chapter 4 CP1E N S1 to G5 Lite Servo with NB...
Page 8: ...Chapter 4 1 What Hardware will we be using in this Topic...
Page 10: ...Chapter 4 1 1i The Complete CP1E N S1 Family...
Page 15: ...Chapter 4 1 3i The Complete Power Supply Family...
Page 23: ...RS232C Male to Male USB plug Connector Chapter 4 1 7i Cable Type XW2Z 200T PC HMI PLC PLC HMI...
Page 25: ...Connector Terminal Block Cables Type B mini USB cable Chapter 4 1 7i Cable Type PC Servo Drive...
Page 26: ...Chapter 4 2 How are we going to connect the components Answer Just follow the wiring diagram...
Page 28: ...Wire PLC to Terminal block Chapter 4 2 1 Wiring Diagram...
Page 56: ...Chapter 4 5 How to create program for Servo Drive in CX Programmer Answer Using CX Programmer...
Page 75: ...Chapter 4 6 How do we know the display speed is true Answer Using CX Drive s Real Time Trace...
Page 80: ...Chapter 4 7 How to prevent accidental control Answer Using Interlocking...
Page 109: ...Chapter 4 9 How do we know the display speed is true Answer Using CX Drive s Real Time Trace...
Page 113: ...Chapter 4 10 Create Control Speed of the Servo motor through NB HMI...
Page 121: ...Chapter 4 11 What kind of program function needed for this topic Answer Using PLS2 Function...
Page 134: ...Chapter 4 12 How do we know the display speed is true Answer Using CX Drive s Real Time Trace...
Page 140: ...Chapter 4 13 How to set a certain amount of output pulses Answer Using PULS Function...
Page 157: ...Chapter 4 14 How can we have different control setting to run Servo Motor Answer Create Recipe...
Page 183: ...END of Chapter 4 Thank you...

![Preview for 57 page of Omron CP1E-N[]S1 Manual](http://thumbs.mh-extra.com/thumbs/omron/cp1e-n-s1/cp1e-n-s1_manual_743665-057.webp)
![Preview for 58 page of Omron CP1E-N[]S1 Manual](http://thumbs.mh-extra.com/thumbs/omron/cp1e-n-s1/cp1e-n-s1_manual_743665-058.webp)
![Preview for 59 page of Omron CP1E-N[]S1 Manual](http://thumbs.mh-extra.com/thumbs/omron/cp1e-n-s1/cp1e-n-s1_manual_743665-059.webp)
![Preview for 60 page of Omron CP1E-N[]S1 Manual](http://thumbs.mh-extra.com/thumbs/omron/cp1e-n-s1/cp1e-n-s1_manual_743665-060.webp)
![Preview for 61 page of Omron CP1E-N[]S1 Manual](http://thumbs.mh-extra.com/thumbs/omron/cp1e-n-s1/cp1e-n-s1_manual_743665-061.webp)
![Preview for 62 page of Omron CP1E-N[]S1 Manual](http://thumbs.mh-extra.com/thumbs/omron/cp1e-n-s1/cp1e-n-s1_manual_743665-062.webp)
![Preview for 63 page of Omron CP1E-N[]S1 Manual](http://thumbs.mh-extra.com/thumbs/omron/cp1e-n-s1/cp1e-n-s1_manual_743665-063.webp)
![Preview for 64 page of Omron CP1E-N[]S1 Manual](http://thumbs.mh-extra.com/thumbs/omron/cp1e-n-s1/cp1e-n-s1_manual_743665-064.webp)
![Preview for 65 page of Omron CP1E-N[]S1 Manual](http://thumbs.mh-extra.com/thumbs/omron/cp1e-n-s1/cp1e-n-s1_manual_743665-065.webp)
![Preview for 66 page of Omron CP1E-N[]S1 Manual](http://thumbs.mh-extra.com/thumbs/omron/cp1e-n-s1/cp1e-n-s1_manual_743665-066.webp)
![Preview for 67 page of Omron CP1E-N[]S1 Manual](http://thumbs.mh-extra.com/thumbs/omron/cp1e-n-s1/cp1e-n-s1_manual_743665-067.webp)
![Preview for 68 page of Omron CP1E-N[]S1 Manual](http://thumbs.mh-extra.com/thumbs/omron/cp1e-n-s1/cp1e-n-s1_manual_743665-068.webp)
![Preview for 69 page of Omron CP1E-N[]S1 Manual](http://thumbs.mh-extra.com/thumbs/omron/cp1e-n-s1/cp1e-n-s1_manual_743665-069.webp)
![Preview for 70 page of Omron CP1E-N[]S1 Manual](http://thumbs.mh-extra.com/thumbs/omron/cp1e-n-s1/cp1e-n-s1_manual_743665-070.webp)
![Preview for 71 page of Omron CP1E-N[]S1 Manual](http://thumbs.mh-extra.com/thumbs/omron/cp1e-n-s1/cp1e-n-s1_manual_743665-071.webp)
![Preview for 72 page of Omron CP1E-N[]S1 Manual](http://thumbs.mh-extra.com/thumbs/omron/cp1e-n-s1/cp1e-n-s1_manual_743665-072.webp)
![Preview for 73 page of Omron CP1E-N[]S1 Manual](http://thumbs.mh-extra.com/thumbs/omron/cp1e-n-s1/cp1e-n-s1_manual_743665-073.webp)
![Preview for 74 page of Omron CP1E-N[]S1 Manual](http://thumbs.mh-extra.com/thumbs/omron/cp1e-n-s1/cp1e-n-s1_manual_743665-074.webp)
![Preview for 75 page of Omron CP1E-N[]S1 Manual](http://thumbs.mh-extra.com/thumbs/omron/cp1e-n-s1/cp1e-n-s1_manual_743665-075.webp)
![Preview for 76 page of Omron CP1E-N[]S1 Manual](http://thumbs.mh-extra.com/thumbs/omron/cp1e-n-s1/cp1e-n-s1_manual_743665-076.webp)
![Preview for 77 page of Omron CP1E-N[]S1 Manual](http://thumbs.mh-extra.com/thumbs/omron/cp1e-n-s1/cp1e-n-s1_manual_743665-077.webp)
![Preview for 78 page of Omron CP1E-N[]S1 Manual](http://thumbs.mh-extra.com/thumbs/omron/cp1e-n-s1/cp1e-n-s1_manual_743665-078.webp)
![Preview for 79 page of Omron CP1E-N[]S1 Manual](http://thumbs.mh-extra.com/thumbs/omron/cp1e-n-s1/cp1e-n-s1_manual_743665-079.webp)
![Preview for 80 page of Omron CP1E-N[]S1 Manual](http://thumbs.mh-extra.com/thumbs/omron/cp1e-n-s1/cp1e-n-s1_manual_743665-080.webp)
![Preview for 81 page of Omron CP1E-N[]S1 Manual](http://thumbs.mh-extra.com/thumbs/omron/cp1e-n-s1/cp1e-n-s1_manual_743665-081.webp)
![Preview for 82 page of Omron CP1E-N[]S1 Manual](http://thumbs.mh-extra.com/thumbs/omron/cp1e-n-s1/cp1e-n-s1_manual_743665-082.webp)
![Preview for 83 page of Omron CP1E-N[]S1 Manual](http://thumbs.mh-extra.com/thumbs/omron/cp1e-n-s1/cp1e-n-s1_manual_743665-083.webp)
![Preview for 84 page of Omron CP1E-N[]S1 Manual](http://thumbs.mh-extra.com/thumbs/omron/cp1e-n-s1/cp1e-n-s1_manual_743665-084.webp)
![Preview for 85 page of Omron CP1E-N[]S1 Manual](http://thumbs.mh-extra.com/thumbs/omron/cp1e-n-s1/cp1e-n-s1_manual_743665-085.webp)
![Preview for 86 page of Omron CP1E-N[]S1 Manual](http://thumbs.mh-extra.com/thumbs/omron/cp1e-n-s1/cp1e-n-s1_manual_743665-086.webp)


