background image

4

30

This test performs a failure diagnosis on the unit and performs a test to check for battery deterioration.
Use the procedure below to check whether a circuit failure has occurred inside the unit and whether 

battery replacement is required.
This test is performed if the “Power” switch is ON or performed automatically (You do not have to per-

form any special operations). The test is performed once every 4 weeks after the AC input is connect-

ed to commercial power and power distribution begins. The test is not performed if the “Power” switch 

is OFF.
  If the battery is not fully charged, the self-diagnostic test is not executed immediately.
  After charging is complete, it is automatically executed.

(1)  When the self-diagnostic test is executed, the Battery Mode starts automatically (No beep sounds). 

After the test is complete, the normal operation automatically starts.

(2)  If an error message appears on the LCD: 

Follow the directions for the solutions described earlier in this document.

* This test can also be run from the included UPS monitoring software. 

  For more details, refer to the online help for the UPS monitoring software.

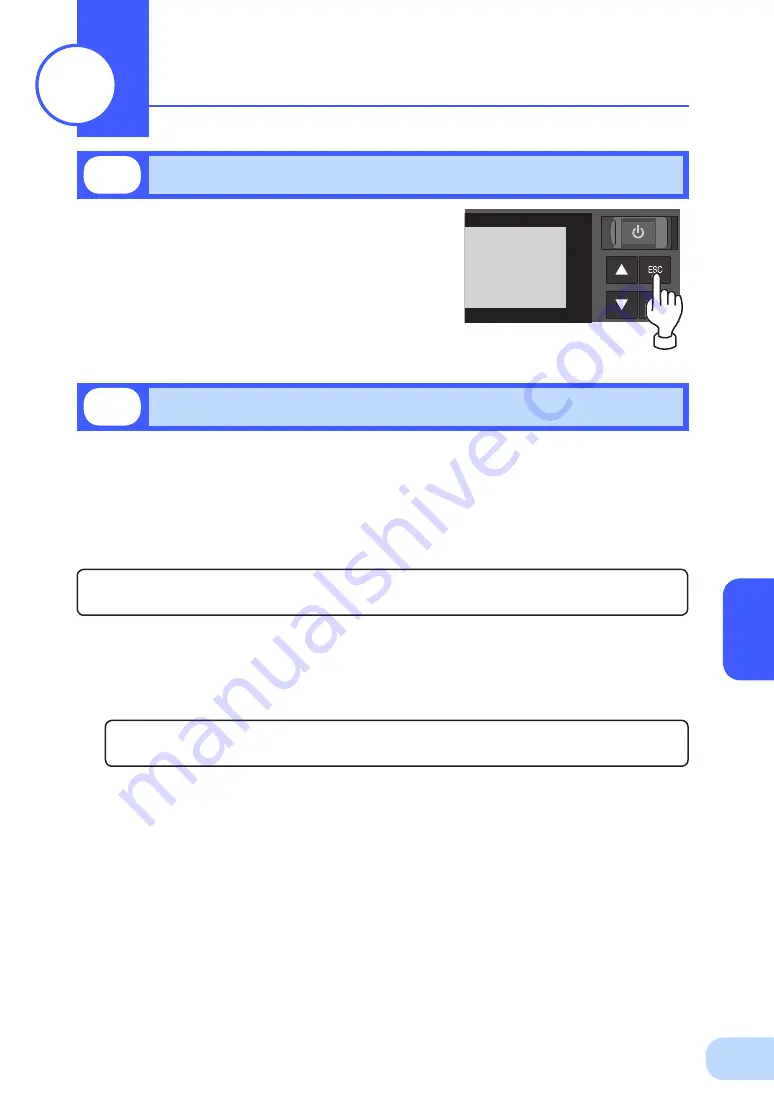
When the beep is sounding, you can suspend it by pressing 

and holding the ESC switch for 0.5 seconds or longer. 

4-1  Suspending a beep

UPS functions

4

4-2  Self-diagnosis test

Summary of Contents for BN150R

Page 1: ...installing and using the product Keep this manual in a convenient location so that you can refer to it whenever necessary The contents of this manual are subject to change without notice Uninterrupti...

Page 2: ...cars and ships Applications in which a failure of this product may cause significant damage or effect to the society and public important computer systems main communication equipment public transpor...

Page 3: ...2 SYMBOL This symbol indicates earth ground This symbol indicates turning on off UPS 3 INTERNAL BATTERY Internal battery voltage is 24VDC for BN75R 48VDC for BN150R and 72VDC for BN300R 4 TEMPERATURE...

Page 4: ...rm installation and connection Page 5 Check the operation and displays Pages 15 Charge the battery Page 25 Measure the backup time Page 34 Read Using the UPS monitoring software and contact signal Pag...

Page 5: ...ons 30 4 1 Suspending a beep 30 4 2 Self diagnosis test 30 4 3 Battery life counter function 31 4 4 LCD menu items 31 5 Measuring the backup time 34 5 1 How to measure backup time 34 5 2 Estimated bac...

Page 6: ...ribed Be sure to read it before installation and start of use Misuse may cause injury or property damage Carry the unit considering its weight and balance and place it on a stable and robust base Drop...

Page 7: ...than specified orientations Dropping or toppling the unit may cause injury If you install the unit in an orientation other than specified the unit cannot be protected from a battery fluid leakage Use...

Page 8: ...r or isolating transformer to the output side Overcurrent may damage the UPS or cause it to malfunction Even when connected to the input side the UPS may fail or malfunction Make sure to check the ope...

Page 9: ...you notice such a condition stop using the unit and contact us at _____ for inspection and repairs Position the unit in such a way that you can immediately disconnect the AC input plug from the wall...

Page 10: ...o that you do not drop it Not doing so could cause injury or burns due to liquid acid leakage Use a specified battery for replacement Not doing so may cause a fire Replacement battery pack for BN75R B...

Page 11: ...not connect a page printer such as a laser printer to the unit The unit repeatedly and frequently switches between Commercial Power Mode and Battery Mode which may shorten the life of the battery The...

Page 12: ...s specify a period of no more than 3 months for the start of the next operation If you specify a period longer than 3 months the internal timer is reset and the scheduled operation does not start Note...

Page 13: ...appearance If you should notice defects or anything wrong contact us OMRON Electronic Systems Equipments Customer Support Center 1 Accessories related to the main unit 2 UPS monitoring software relate...

Page 14: ...Operation on page 24 that provides the details Front view A Power supply output LED B Battery mode LED C Battery replacement LED D Liquid Cell Display E Power switch F Up switch G Down switch H ESC sw...

Page 15: ...ounding terminal M4 screw D RS 232C port E USB port F Remote ON OFF port G Option slot H Power supply output receptacle A I Power supply output receptacle B J Power supply output receptacle C K Coolin...

Page 16: ...on unit Symbol Description Start the UPS Stop the UPS UPS output power enabled supplied by operating on line mode battery mode UPS output power enabled supplied by operating on battery mode Batteries...

Page 17: ...onnected devices follow the above instructions to ensure safety Do not connect devices such as dryers some solenoid valves etc which have a half wave rectifier that allows only half cycle AC power to...

Page 18: ...ity of the unit You can use a plug strip to connect additional devices but do not connect devices that exceed the current capacity of the plug strip The current protection of the unit may operate whic...

Page 19: ...printer to the unit The unit repeatedly and frequently switches between Commercial Power Mode and Battery Mode which may shorten the life of the battery The page printer has a large peak current so a...

Page 20: ...e effect of inrush current may cause this unit to stop operating properly Check system operation beforehand if the unit is used in combination with a device whose power supply voltage and frequency fl...

Page 21: ...nscribed on the bottom left side of the rear panel The product serial number is inscribed on the bottom left side of the rear panel The product serial number label is also included BN150R Correct Posi...

Page 22: ...lower part of the rack Dropping it may result in injury Be sure to use the supplied mounting screws Use of long screws other than those supplied for case mounting may damage inside the unit Screws oth...

Page 23: ...to the left and right sides of the UPS The support angles cannot be attached to special EIA racks 3 Place the UPS on the rack rails and push it completely into the rack and use the 2 included EIA rack...

Page 24: ...ge of the rack rails is 465 to 790 mm 3 For EIA standard compliant installation attach the 8 included EIA rack fixing nuts M5 to the rack aligning them with the hole positions on the front the side di...

Page 25: ...PS 5 Place the UPS on the rack rails and push it completely into the rack and attach the 2 included ear fixing nuts to the rack aligning them with the hole positions on the ears Then use ear fixing sc...

Page 26: ...or stationary horizontal installation make sure that this product does not slide or fall Upright installation Only BN150R and BN300R Use the upright stands 2 included with the product If the upright s...

Page 27: ...e PowerAct Pro UPS monitoring software included software or SNMP Web card sold separately Output ON OFF can be controlled by operating the LCD panel or with the included PowerAct Pro UPS monitoring so...

Page 28: ...t signal Page 43 If you do not use the UPS monitoring software and Contact Signal this step is not required The UPS has been charged prior to shipment However the backup time becomes shorter when usin...

Page 29: ...C input connection method by refer ring to the table above After changing the AC input plug change the Setting In Out Settings Input Plug setting in the menu on the LCD Caution Caution The BN75R AC in...

Page 30: ...f the BN150R Provide a wall outlet commercial power suitable for the shape of the 20A plug NEMA 5 20R Replace the AC input plug with the included NEMA L5 20P plug Plug replacement procedure 1 Disconne...

Page 31: ...the unit s AC input terminal while it is connected to commercial power Failure to do so may result in electric shock or ground fault Not re install power supply cord to the unit after re configured th...

Page 32: ...use You can perform 2 5 Checking the operation on page 21 also before charging the battery 6 After connecting to commercial power turn ON the INPUT PROTECTION switch input overcurrent protection swit...

Page 33: ...onnected to the AC outlet of your PC Operate the connected devices in a way that allows the power supply to be stopped at any time The unit was charged before shipment but it may have self discharged...

Page 34: ...he AC input plug to a wall outlet com mercial power and charging the battery go back to step 4 on page 21 If the problem persists after checking the 2 points above contact us ____ See also Beeper ON O...

Page 35: ...time initial value of the unit in your environment this value can be used as a guide when checking the battery and deciding the UPS monitoring software setting values See also 5 Measuring the backup t...

Page 36: ...unit and contact us at _____ for inspection and repairs Position the unit in such a way that you can immediately disconnect the AC input plug from the wall outlet commercial power in the event a probl...

Page 37: ...wer switch of the connected devices Scheduled operation using the UPS monitoring software When performing scheduled operation in which the UPS is stopped and a device such as a breaker is used to stop...

Page 38: ...xt Load level Battery level Lower text Output receptacle status indicator Backup time UPS setting change menu screen Menu title Menu list Previous next page mark Selected item is highlighted Pop up wi...

Page 39: ...opped Charge the battery During operation the battery is charged automatically When the unit is connected to a commercial power source with the power switch OFF and commercial power is supplied to it...

Page 40: ...f the UPS for 3 seconds or longer The power output from the UPS stops Even if you turn off the power switch if AC is supplied from commercial power the battery is automatically charged Status indicato...

Page 41: ...needed 11 Over load Intermittent 0 5 second intervals There are too many connected devices and the rated capacity is exceeded Reduce the number of connected devices until the display appears as in sta...

Page 42: ...FF If the battery is not fully charged the self diagnostic test is not executed immediately After charging is complete it is automatically executed 1 When the self diagnostic test is executed the Batt...

Page 43: ...tors Displayed only when the menu type is Advanced Not displayed in Standard Displayed only when the UPS is stopped Not displayed during operation Menu Description Measurements Load Meter Display the...

Page 44: ...nge mode Transfer Sensitivity Set the sensitivity at which to switch to Battery Mode Boot Settings Auto Reboot Set auto restart from power failure Cold Start Set whether to enable the cold start funct...

Page 45: ...he logic of the remote signal Identification Type Display the names of the UPS and battery pack Serial Number Display the serial number of the UPS Firmware Ver sion Display the firmware version of the...

Page 46: ...rature is lower The smaller the capacity of connected devices becomes the longer the backup time becomes Indication Value VA power factor W A power factor 100 W 1 Connect the AC input plug to commerci...

Page 47: ...onmental conditions temperature etc Backup time table Time unit Minutes BN75R Connection capacity W 20 50 100 200 300 400 600 680 Backup time Minutes 250 110 55 24 15 5 10 5 5 8 4 BN150R Connection ca...

Page 48: ...ccurately When maintaining the connected equipment turn OFF the unit s power switch to stop the output and stop the supply of commercial power Even if commercial power to the UPS is stopped while it i...

Page 49: ...rt the battery with metal objects Doing so could cause an electric shock fire or burn Some electrical energy still remains inside the spent battery Do not put the battery into fire and do not break it...

Page 50: ...g of batteries should be performed or supervised by personnel knowledgeable of batter ies and the required precautions Keep unauthorized personnel away from batteries Caution for battery replacement P...

Page 51: ...ing down on the center of the connectors pull them apart Remove turn counter clockwise the 2 screws that hold the battery cover in place Slide the battery cover to the left and pull it towards you fro...

Page 52: ...er edge of the battery to gauge how much further you need to pull the battery to remove it Hold the battery se curely with both hands so as not to drop it 4 Insert the new battery upright into the uni...

Page 53: ...rt the front panel from the left side for the BN75R or right side for the BN150R and BN300R and fix it with the 2 screws Battery replacement is complete 6 Securely connect the battery connectors For t...

Page 54: ...use deformation or discoloration 2 Removing dust from the AC input plug power supply output receptacles of the UPS Stop all the connected devices and the UPS and disconnect the AC input plug from a wa...

Page 55: ...owerAct Pro 4 x Note 1 Simple Shutdown Software Note 1 See 7 1 UPS service OS standard UPS service driver included software See 7 2 Contact signal Note 2 Note 3 UPS service OS standard BUC26 See 7 3 L...

Page 56: ...en a problem occurs with the power supply multiple computers connected to the UPS can coordinate to perform auto shutdown 12 Output receptacle control The UPS output receptacles can be individually se...

Page 57: ...edule setting The time between the occurrence of a power failure and the shutdown of your PC must be within the backup time measured in 5 1 How to measure backup time on page 34 For more information r...

Page 58: ...e included PowerAct Pro 4 x or Simple Shutdown Software to the PC you want to shutdown Installation method For PowerAct Pro 4 x refer to the installation guide for Windows in the CD ROM or the sepa ra...

Page 59: ...eduled operation using the UPS monitoring software To manually start up this unit after it has been stopped by a scheduled operation turn OFF the power switch and turn it back ON again To stop the uni...

Page 60: ...iver on the computer Software to install UPS service driver How to install Refer to the separate UPS monitoring software installation guide 7 3 When performing auto save functions using the standard U...

Page 61: ...utput BL Goes ON when the battery becomes weak during backup operation at a power failure Trouble Signal output TR Goes ON when an internal failure of the UPS occurs or when the battery life counter e...

Page 62: ...tor pins 6 7 and the remote ON OFF con nector External contact Operate Open Start Close Stop Jumper setting 9 digits 7 4 3 Items that can be set using the contact signal card Jumper settings By making...

Page 63: ...output BL NC 2 Trouble signal output TR Backup signal output BU 3 Backup stop signal input BS Backup reverse signal output NBU 4 NC COMMON COM 5 COMMON COM Battery Low Signal output BL Front view Scre...

Page 64: ...t Signal ratings Signal output BL TR BU WB NBU UPS Stop Signal input BS Photo coupler ratings Input voltage HIGH ON 5 to 12 VDC Appliable voltage 35 VDC or less LOW OFF 0 7 VDC or less Maximum current...

Page 65: ...eboot in the menu on the LCD 7 4 8 Example of the use of the Contact Signal circuit Example of BU signal output circuit and the connected circuit Example of BS signal input circuit and the connected c...

Page 66: ...it SNMP Web card model number SC20G sold separately 1 Remove the 2 screws and remove the cover 8 1 Adding an SNMP Web card Using an SNMP Web card 8 2 Carefully insert the SNMP Web card model number SC...

Page 67: ...olled for each IP Coordinated shutdown Multiple UPS can coordinate with each other to perform shutdown Log function The UPS power status battery status etc can be stored in the built in flash memory C...

Page 68: ...different wall out let commercial power located some distance away from the device consum ing a large amount of power This problem may occur also when you connect many devices to a plug strip or exte...

Page 69: ...57 Notes of Chinese 10 UPS UPS 1 FA OA Windows UPS...

Page 70: ...BN75R BN150R BN300R 10 58 2 FA OA 2...

Page 71: ...10 Troubleshooting 59 AC 50 60Hz AC AC AC AC 3P 2P AC AC...

Page 72: ...BN75R BN150R BN300R 10 60 5cm UPS UPS AC AC AC200V 240V AC200 240V...

Page 73: ...10 Troubleshooting 61 AC AC AC AC AC ON OFF AC INPUT PROTECTION 25 4 5 30 1mA...

Page 74: ...BN75R BN150R BN300R 10 62 AC UPS AC UPS...

Page 75: ...10 Troubleshooting 63 AC AC 50 60Hz 25 25 6 40 2 AC AC...

Page 76: ...BN75R BN150R BN300R 10 64 DC250V UPS 200V http www fa omron com cn Pb AC AC 50 60Hz...

Page 77: ...10 Troubleshooting 65 3 3 3 UPS 1 OS 1 OS BIOS POWER MANAGEMENT Disable 1 MICRON Millennia Mme BIOS Restore on AC Power Loss Power On BIOS...

Page 78: ...0VA 1350W 1 3000VA 2700W 2 Voltage Commercial operation 90 3 to 114V 3 VAC Sensitivity setting Standard 84 3 to 114V 3 VAC Sensitivity setting Low 90 3 to 110V 3 VAC Sensitivity setting High Backup op...

Page 79: ...References 67 B Dimensions 438 512 43 OMRON BN75R ESC BN75R BN150R OMRON BN150R ESC 438 87 437 Unit mm Tolerance 2mm...

Page 80: ...BN75R BN150R BN300R 68 BN300R 438 87 OMRON BN300R ESC 650...

Page 81: ...References 69 Rubber feet ESC 330 438 512 43 350 60 2 14 5 437 87 438 330 330 ESC 14 5 BN75R BN150R Unit mm Tolerance 2mm...

Page 82: ...BN75R BN150R BN300R 70 BN300R 650 87 603 685 438 330 500 ESC 14 5 Rackmount BN75R ESC 450 465 1 465 1000 480 35 31 75 44 45 Unit mm Tolerance 2mm...

Page 83: ...References 71 BN150R BN300R 465 790 44 5 44 6 6 8 60 2 88 9 ESC 480 465 450 44 5 6 8 60 2 88 9 ESC 480 465 450 465 790 44 6...

Page 84: ...group A Output group B Output group C Charger Battery DC DC converter AVR transforme Noise filter Description BN75R BN150R BN300R Replacement battery pack BNB75R BNB150R BNB300R SNMP Web card SC20G S...

Page 85: ...No part or whole of this manual may be reproduced without permission The contents of this manual are subject to change without notice OMRON Corporation K1L D 12225A...

Reviews: