background image


20

OPERATION 

Switch  on  the  receiver  with  the  power  switch.  The  switch  and  the  display  light  up.  To  switch  on  the 
microphones,  keep  the  power  switch  pressed  for  about  2  seconds.  The  battery  indicator  lights  up 
yellow. If the indicator lights up red, the inserted batteries are going flat and have to be replaced. 

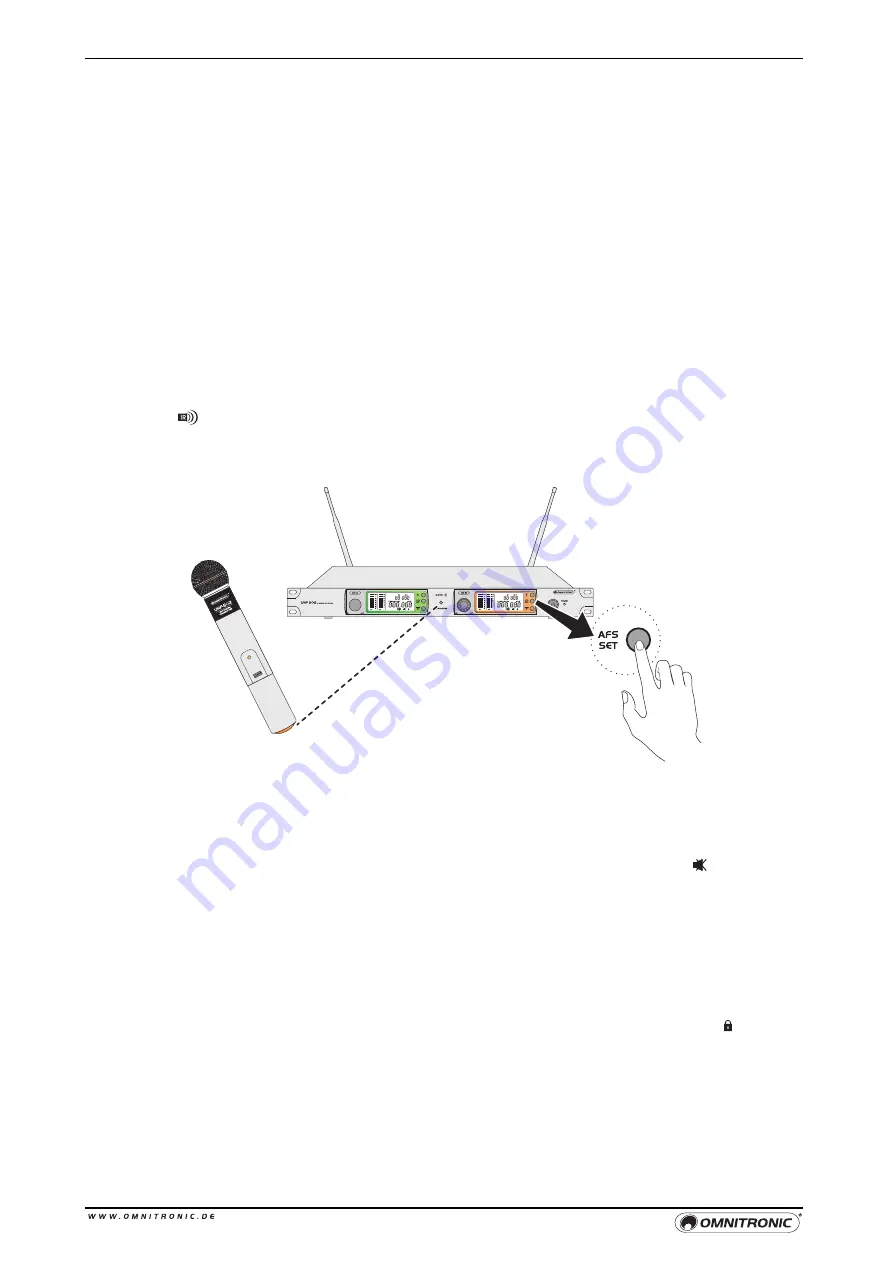
Perform  the  automatic  channel  scan  on  each  receiver  section  to  select  an  interference-free 
transmission channel. Keep the 

AFS  SET

 button pressed until a segment starts moving around in the 

display. When the scan is complete, the display shows the number of the channel found. 

With the ▲ and ▼ button you can manually select the transmission channel. By short actuation, the unit 
jumps to the next channel, long actuation starts fast forward mode.  

Once  each  receiver  unit  is  adjusted  to  a  transmission  channel,  adjust  the  microphones  to  the  same 
channel via infrared signal. The infrared interface of the microphone is located on the housing bottom of 
the device under the screw cap. In order to establish the IR connection, the cap has to be unscrewed 
and the infrared interface must be aimed directly at the interface of the receiver. Shortly press the 

AFS 

SET

  button  on  the  receiver  to  transfer  the  channel  information  to  the  microphone.  The  display  will 

indicate      during the IR transmission. When the receiver section and the microphone have been set to 
the  same  transmission  channel,  the  RF  bargraph  on  the  receiver’s  display  will  indicate  that  a  radio 
signal is being received. The more segments by the bargraph are displayed, the better is the reception. 
The cap can now be screwed onto the microphone again. 


Switch  on  the  following  audio  unit  or  advance  the  respective  fader  on  the  mixer.  Speak  into  the 
microphones and match the output level of the receiver to the input of the following unit with the volume 
controls.  The  AF  bargraphs  in  the  displays  light  up  when  an  audio  signal  from  the  corresponding 
microphone is received. 

To  mute  a  microphone  during  operation,  shortly  press  the  power  switch.  Then  no  sound  will  be 
transmitted. The power indicator blinks green and the receiver’s display indicates the      symbol. Press 
the power button again to turn mute off. 

If  necessary,  adjust  the  threshold  for  the  interference  suppression  with  the 

SQUELCH 

sliding  switch. 

The  interference  suppression  will  mute  the  receiver  when  the  level  of  the  radio  signal  received  falls 
below  the  threshold  value  adjusted.  Thus,  high-frequency  hissing  noise  will  not  cause  noise  at  the 
receiver  when  the  microphone  is  switched  off  or  when  the  transmission  power  is  insufficient.  With  a 
longer  distance  between  microphone  and  receiver,  the  switch  can  be  set  to  10  dB;  with  a  shorter 
distance, it can be set to 20 dB. 

To prevent accidental change of the transmission channel at the receiver, it is possible to activate a lock 
mode. For this, shortly press the buttons ▲ and ▼ simultaneously. The display indicates the      symbol. 
Press the buttons again to deactivate the lock mode. 

After operation, switch off the receiver with the power switch. To switch off the microphones, keep the 
power switch pressed for about 2 seconds. 


Summary of Contents for UHF-502

Page 1: ......

Page 2: ...Rackeinbau 1 HE Anmelde und geb hrenfrei in gro en Teilen der EU bitte l nderspezifisch pr fen Wireless Mic System 2 channel multifrequency receiver unit and 2 hand held microphones with UHF PLL techn...

Page 3: ...9 TECHNISCHE DATEN 12 Zubeh r 12 Steckerbelegung 12 Funkfrequenzen in MHz 13 Table of Contents 1 INTRODUCTION 14 Delivery Includes 14 2 SAFETY INSTRUCTIONS 15 3 OPERATING DETERMINATIONS 16 4 OPERATING...

Page 4: ...achten die Bedienungsanleitung w hrend der Lebensdauer des Produkts behalten die Bedienungsanleitung an jeden nachfolgenden Besitzer oder Benutzer des Produkts weitergeben sich die letzte Version der...

Page 5: ...Netzstecker muss dabei gewaltfrei eingesetzt werden Achten Sie auf einen festen Sitz des Netzsteckers Kondenswasser Das Ger t darf nicht in Betrieb genommen werden nachdem es von einem kalten in einen...

Page 6: ...ackung um Transportsch den zu vermeiden Reinigung Reinigen Sie das Ger t niemals mit L sungsmitteln oder scharfen Reinigungsmitteln sondern verwenden Sie ein weiches und angefeuchtetes Tuch Serienbarc...

Page 7: ...alsuchlauf 6 Hinterleuchteter Netzschalter 7 Antennenanschluss 8 Symmetrische Kanalausg nge 3 pol XLR die das Ausgangssignal des jeweiligen Kanals f hren Zum Anschluss an symmetrische Mikrofoneing nge...

Page 8: ...gungskanal d Funkfrequenz e IR bertragung f Aktivierte Stummschaltung g Aktivierter Sperrmodus Funkmikrofon 1 Mikrofonmodul 2 Betriebsanzeige 3 Taste Ein Aus und Stumm 4 Batteriefach f r zwei 1 5 V Ba...

Page 9: ...der unsymmetrisch beschalteten 6 3 mm Klinkenbuchse MIX liegt das Summensignal der beiden Empfangseinheiten an Verwenden Sie diese Buchse zum Anschluss an einen Mikrofoneingang oder hochempfindlichen...

Page 10: ...en desto besser ist der Empfang Die Schraubkappe kann nun wieder angeschraubt werden 5 Schalten Sie das nachfolgende Audioger t ein bzw ziehen Sie den entsprechenden Mischpultregler auf Sprechen Sie i...

Page 11: ...entfernen M glicherweise werden zwei Sender auf der gleichen Frequenz betrieben Ist dies der Fall einen der Sender abschalten M glicherweise ist das Signal zu schwach Wenn m glich Empf nger n her am...

Page 12: ...oausg nge Mic 2 x XLR sym Mix 6 3 mm Klinke unsym Spannungsversorgung Empf nger 12 V DC ber mitgeliefertes Netzteil 100 240 V AC 50 60 Hz Gesamtanschlusswert 5 W Handmikrofone 2 x 1 5 V Batterie Typ A...

Page 13: ...0 69 828 975 20 825 050 70 829 050 21 825 150 71 829 150 22 825 250 72 829 250 23 825 350 73 829 350 24 825 450 74 829 450 25 825 550 75 829 550 26 825 650 76 829 650 27 825 750 77 829 750 28 825 850...

Page 14: ...al for the entire service life of the product pass this manual on to every further owner or user of the product download the latest version of the user manual from the Internet Delivery Includes Pleas...

Page 15: ...iate power unit Always plug in the power unit last Make sure that the plug is tightly connected with the outlet Condensation Water If the device has been exposed to drastic temperature fluctuation e g...

Page 16: ...is to be transported Cleaning Never use solvents or aggressive detergents in order to clean the device Rather use a soft and damp cloth Serial Barcode Never remove the serial barcode from the device a...

Page 17: ...c frequency scanning 6 Backlit power switch 7 Antenna input 8 Balanced 3 pin XLR outputs for the output signal from the respective channel For connection to balanced microphone inputs of a mixer or am...

Page 18: ...ission channel d Radio frequency e IR transmission f Active muting g Active lock mode Hand held Microphone 1 Microphone head 2 Power indicator 3 On off and mute button 4 Battery compartment for two 1...

Page 19: ...r Use the balanced XLR outputs CH A and CH B for connection to balanced microphone inputs Use the unbalanced 6 3 mm jack MIX for the master signal of both receiving channels for connection to a microp...

Page 20: ...at a radio signal is being received The more segments by the bargraph are displayed the better is the reception The cap can now be screwed onto the microphone again 5 Switch on the following audio uni...

Page 21: ...al sources of HF interference such as lighting equipment Two transmitters may be operating on the same frequency Locate and turn one off Signal may be too weak If possible move receiver closer to tran...

Page 22: ...B T H D 0 1 Audio outputs Mic 2 x XLR bal Mix 6 3 mm jack unbal Power supply Receiver 12 V DC via supplied power unit 100 240 V AC 50 60 Hz Power consumption 5 W Microphones 2 x 1 5 V battery type AA...

Page 23: ...4 950 69 828 975 20 825 050 70 829 050 21 825 150 71 829 150 22 825 250 72 829 250 23 825 350 73 829 350 24 825 450 74 829 450 25 825 550 75 829 550 26 825 650 76 829 650 27 825 750 77 829 750 28 825...

Page 24: ...OMNITRONIC 201 OMNITRONIC 201 OMNITRONIC 201 OMNITRONIC 2015 5 5 5 nderungen und Irrtum vorbehalten Every information is subject to change without prior notice 00092158 DOCX Version 1 1...

Reviews: