


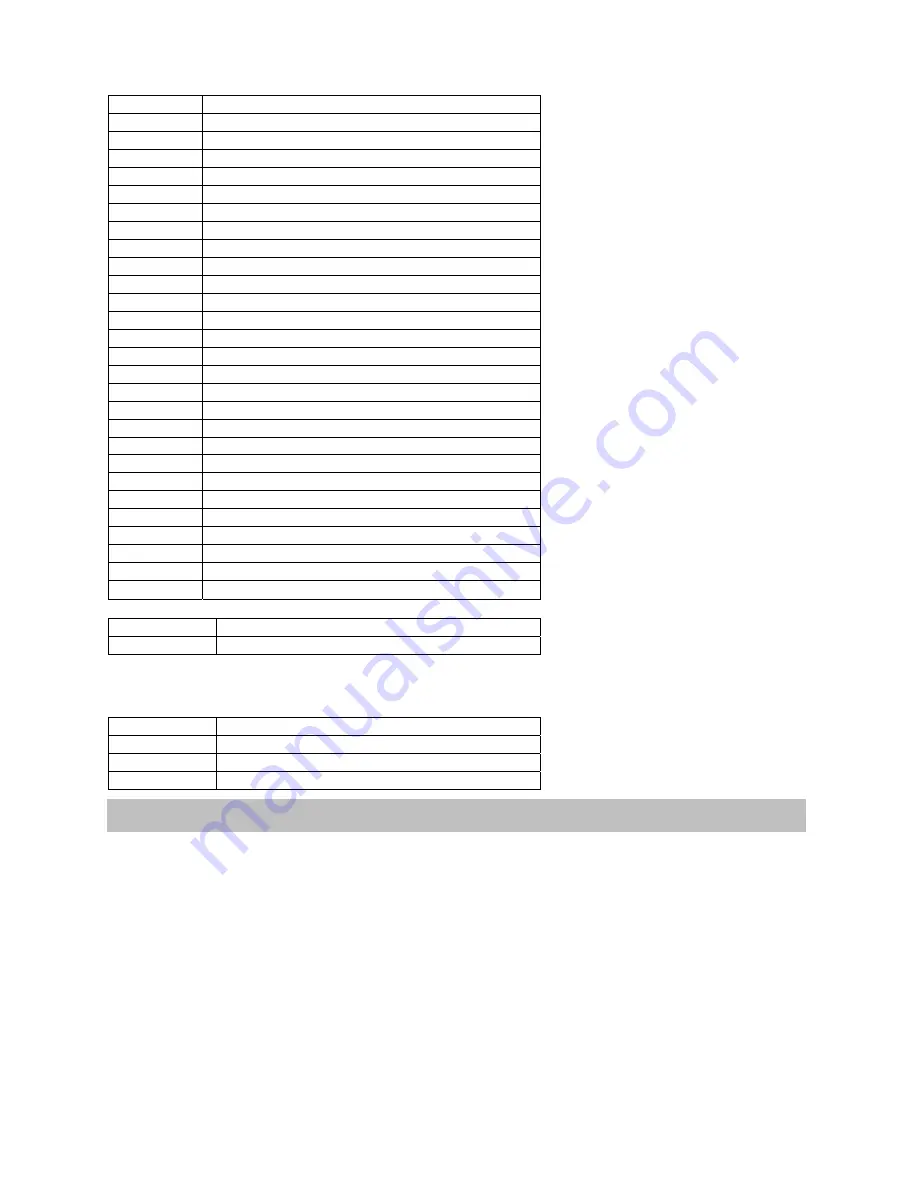
4
Channel 3 Pattern Control
00-08 Beam
Off
09-17
Beam Chase #1
18-26
Split Sky Horizontal
27-35
Split Sky Vertical
36-44
Flat Beam Fan
45-53
Rotating Beam Fan
54-62
Dual Counter Rotating Beam Fans
63-71
Tight Square Cone (rotates)
72-80
Dual Flat Beam Scan
81-89
Dual Sky (opens then closes)
90-98
Bouncing Beam Fan
99-107
Box Tunnel #1 (Closes "X" Axis Only)
108-115 Quad
Tunnel
(rotates)
116-125
Triangle Tunnel (rotates)
126-134 V-Sky
135-143
Dual Diagonal Fans #1
144-152
Dual Diagonal Fans #2
153-161
Box Tunnel #2 (Closes on "X" and "Y")
162-170 Quad
Tunnel
(fixed)
171-179
Counter Rotating Fans
180-188
Dual Beam Cones (tight)
189-197
Single Rotating Beam Fan
198-206
Dual Beam Fans (tight)
207-215
Dual Beam Fans (one flat, one rotates)
216-224 Beam
Cone
225-233
Dual Rotating Square Cones
234-242
Beam Chase #2 (adjust channel 4 for effect)
243-255
Beam Chase #3 (adjust channel 4 for effect)
Channel
4
Pattern
Speed
00-230
Fastest to Slowest
231-255
Freeze Frame (Pattern Hold)
Channel 5
X Axis amplitude (crunches down image, then inverts it top to bottom)
Channel 6
Y Axis amplitude (crunches down image, then inverts it side to side)
Channel 7
Y Axis Offset (allows user to raise and lower scan area)
00-13
Normal
setting
14-53
Lowers "Y" Axis Offset
54-127
Raises "Y" Axis Offset
128-255
Snap to Center
There are several options available under DMX control. Below is a brief overview.
PATTERN
28 Base Patterns to include all your favorites like Liquid Sky, Tunnels, Fans, Beam Chases and much
more.
PATTERN SPEED and HOLD
Find a pattern you like and then adjust the speed to your liking; you can also “Freeze” the pattern by
simply pushing the channel 4 fader all the way up.
Y AXIS OFFSET
This feature enables you to raise or lower the position of your effect on cue.
PRIMARY COLOR CONTROL
Take control of the Green and Red to turn them on and off manually via DMX.
(Allows users with different models of Stinger to control individual COLORS)
Effects and Color Control


