


4
| OMNIA VOCO® 8 - QUICK START SETUP GUIDE
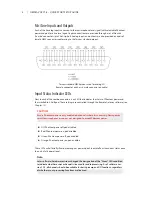
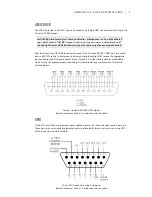
Ethernet Connections
There are two 10/100 Ethernet ports on the rear panel; one interface is for control, the second is for
L/AES67 AoIP. Connect these ports to your network switches as appropriate. If you do not
connect the VOCO 8 to an existing network, you will need a cable connected from the control port
directly to a Windows PC for initial configuration of the unit (see the “Remote Gateway Software”
section of this Quick Start Guide for further details).
AC Power Connections
The VOCO 8 features redundant power supplies. This is to accommodate facilities with dual power
feeds to each equipment rack fed from completely independent sources. Both inputs should be
connected, preferably to completely separate AC power sources such as conditioned utility power
and UPS/generator, or at the very least two different circuits in a rack. While the unit will still function
with only one power supply connected, an error message will be displayed on the LCD and in the
remote software.
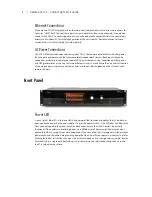
Front Panel
Power LED
A (very stylish) blue LED in the lower left hand corner of the front panel indicates that AC power has
been applied to one or both power supplies. There is no power switch. If this LED does not illuminate
after you’ve plugged in the power cords (on both ends), ensure that the AC outlets are actually
functional. If the outlets are providing power, try a different set of power cords. Power cords don’t
generally fail, but stranger things have happened. If you’ve verified that it’s plugged in, tried multiple
power cords, and the outlets are providing power but the unit still won’t power up, contact The Telos
Alliance for further instructions. We don’t see very many dead units or outright power supply failures
(let alone two in a single unit) but perhaps it was something you said while putting the unit in the
rack. Try to be nicer next time.