background image

Version February 2020

EN

 19

HST 300 Smart User’s Manual

O . M . I . S . A .   S   r   l

Via Verga 9/11

20845 Sovico (MB), Italy

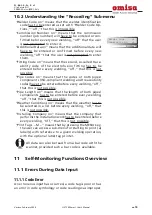
10.2  Understanding the “Recording” Sub-menu

“Welder Code on” means that the welder identification 

code has to be entered as set with “Welder Code Op-
tions,” “off,” that this is impossible.

“Commission Number on” means that the commission 

number (job number) will have to be entered or con-
firmed before every new welding, “off” that the user 
is not prompted to enter it.

“Additional Data on” means that the additional data will 

have to be entered or confirmed before every new 
welding, “off” that the user is not prompted to enter 
them.

“Fitting Code on” means that the second, so-called trace-

ability code of the electrofusion fitting has to be 
entered before every welding, “off,” that this is not 
possible.

“Pipe Codes on” means that the codes of both pipes/

components (ISO-compliant welding and treaceability 
codes) have to be entered before every welding, “off,” 
that this is not possible.

“Pipe Length on” means that the length of both pipes/

components has to be entered before every welding, 
“off,” that this is not possible.

“Weather Conditions on” means that the weather has to 

be selected in a list before every welding, “off,” that 
this is not possible.

“Installing Company on” means that the company that 

performs the installation work has to be entered before 
every welding, “off,” that this is not possible.

“Print Tags  – M – ” means that by pressing the MENU key, 

the user can access a sub-menu for starting to print (a) 
label(s) with reference to a given welding operation, 
with the optional label tag printer.

Info


All data can also be read from a bar code with the 
scanner, provided such a bar code is available.

11  Self-Monitoring Functions Overview

11.1  Errors During Data Input

11.1.1 Code Error

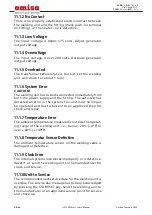
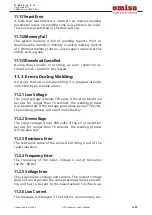
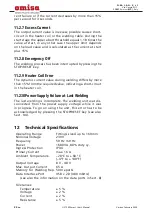
An erroneous input has occurred, a code tag is poor or has 
an error in code symbology or code reading was improper.

Display 16

 Welder Code     on

>Commission No.  on

Summary of Contents for HST 300 Smart

Page 1: ...ST 300 Smart Versione Febbraio 2020 O M I S A S r l Via Verga 9 11 20845 Sovico MB 39 039 2323028 info omisa it http www omisa it Manuale d uso User s Manual Bedienungsanleitung Manual de instruccione...

Page 2: ...man version of the manual enclosed herein is the original copy reflected in the translations herein Inliegende deutsche Fassung der Anleitung ist der Urtext welchen inliegende bersetzungen wiedergeben...

Page 3: ...ollegamento del raccordo 10 5 4 Lettura del codice raccordo con uno scanner portatile 10 5 5 Avvio del processo di saldatura 11 5 6 Processo di saldatura 11 5 7 Fine della saldatura 11 5 8 Processo di...

Page 4: ...onitoraggio 19 11 1 Errori durante l immissione dei dati 19 11 1 1 Errore codice 19 11 1 2 Contatto interrotto 20 11 1 3 Sottotensione 20 11 1 4 Sovvratensione 20 11 1 5 Saldatrice surriscaldata 20 11...

Page 5: ...pericoli la salute dell operatore il prodotto e altro hardware dell operatore l efficiente funzionamento del prodotto Tutti i soggetti coinvolti nell installazione funzionamento e manutenzione del pr...

Page 6: ...Per estendere la lunghezza del cavo di alimentazione utilizzare esclusivamente prolunghe approvate etichettate come tali e con le seguenti sezioni fino a 20 m 1 5 mm consigliato 2 5 mm tipo H07RN F ol...

Page 7: ...tore monofase 220 240 V 50 60 Hz d 20 d 160 3 2 kW Avviare prima il generatore quindi collegare la saldatrice La tensione inattiva deve essere impostata a ca 240 volt Quando si spegne il generatore sc...

Page 8: ...la tempera tura ambiente mostra tutte le informazioni sul display in testo semplice Tutti i dati relativi alla saldatura o alla tracciabilit vengono salvati nella memoria interna e possono essere invi...

Page 9: ...i tasti freccia Se deve essere inserito il codice identificativo dell operatore e in tal caso quando o con quale frequenza determinato nel sottomenu Impostazioni del menu di configurazione vedi sez 1...

Page 10: ...decodificati sullo schermo vedi Display 4 Info I valori visualizzati sono i parametri di saldatura nomi nale contenuti nel codice a barre del raccordo o cal colati sulla base di questi dati Sono visu...

Page 11: ...le istruzioni del produttore del raccordo deve essere rispettato Se il codice a barre fornito dal produttore del raccordo contiene i dati sul tempo di raffreddamento esso verr visualizzato al termine...

Page 12: ...issione di dati di tracciabilit preformattati e definiti dall operatore Tutti i dati di tracciabilit abilitati nel menu di configurazione in Registrazioni vedi sez 10 devono essere inseriti prima del...

Page 13: ...empo di saldatura Se questa opzione stata scelta nel menu di inserimento ma nuale dei parametri apparir sullo schermo un display come quello mostrato a destra Utilizzare i tasti freccia per impostare...

Page 14: ...i saldatura andrebbero irrevocabilmente persi e non sarebbero disponibili altrove 8 1 Selezione del formato del file Il collegamento del supporto di archiviazione fa apparire la schermata nella quale...

Page 15: ...aggio Scarico terminato appare sullo schermo Se si verifica un problema durante il download viene visua lizzato il messaggio Non pronto Dopo che la causa del pro blema viene risolta il download ripren...

Page 16: ...ART SET 9 2 Misurazione della resistenza Quando stato premuto il tasto START SET per avviare una saldatura viene misurato il valore della resistenza del raccordo e comparato al valore immesso con la l...

Page 17: ...ere abilitati o disabilitati Il sottomenu desiderato viene selezionato usando le frecce e Quindi per accedere al sottomenu premere il tasto MENU In entrambe le parti del menu di configurazione utilizz...

Page 18: ...tem peratura Numero di inventario M indica che premendo il tasto ME NU si pu accedere a un sottomenu per inserire il numero con il quale l unit inventariata dalla societ Numero di etichette M indica c...

Page 19: ...ono essere inseriti prima di ogni saldatura OFF che ci non possibile Lunghezza tubo ON indica che la lunghezza di entrambi i tubi componenti deve essere inserita prima di ogni salda tura OFF che ci no...

Page 20: ...ll a limentazione che dal raccordo L auto test ha rilevato un errore nel sistema La saldatrice non deve pi essere accesa e deve essere inviata a un centro autorizzato per essere controllata e riparata...

Page 21: ...Tutti gli errori che si verificano mentre la saldatura in corso vengono segnalati da un allarme acustico 11 2 1 Sottotensione La tensione in ingresso inferiore a 175 volt Se la condizione di errore p...

Page 22: ...a Il valore di corrente dinamica durante la saldatura differisce di pi del 15 dal valore richiesto indicando un corto circuito nella resistenza 11 2 10Erogazione rete rotta all ultima saldatura L ulti...

Page 23: ...co MB Italia Web www omisa it Mail info omisa it Info Ci riserviamo il diritto di modificare le specifiche tec niche del prodotto senza preavviso 14 Accessori parti del prodotto Adattatore a gomito a...

Page 24: ...man version of the manual enclosed herein is the original copy reflected in the translations herein Inliegende deutsche Fassung der Anleitung ist der Urtext welchen inliegende bersetzungen wiedergeben...

Page 25: ...ing the Welder ID Code 9 5 3 Connecting the Fitting 10 5 4 Reading the Fitting Code with a Handheld Scanner 10 5 5 Starting the Welding Process 11 5 6 Welding Process 11 5 7 End of Welding 11 5 8 Abor...

Page 26: ...elf Monitoring Functions Overview 19 11 1 Errors During Data Input 19 11 1 1 Code Error 19 11 1 2 No Contact 19 11 1 3 Low Voltage 20 11 1 4 Overvoltage 20 11 1 5 Overheated 20 11 1 6 System Error 20...

Page 27: ...errors of handling or misuse however the following may be exposed to hazards the operator s health the product and other hardware of the operator the efficient work of the product All persons involved...

Page 28: ...by it 2 6 Extension Cables on the Worksite To extend power cord length use exclusively properly ap proved extension cables that are labeled as such and have the following conductor sections up to 20...

Page 29: ...40 V 50 60 Hz d 20 d 160 3 2 kW Start the generator first then connect the welding unit The idle voltage should be set to approx 240 volts When turning the generator off disconnect the welding unit fi...

Page 30: ...s welding duration depending on ambient temperature shows all information on the display in plain text All data that are relevant for the weld or for traceability are saved to the internal memory and...

Page 31: ...rom a tag with the scanner or by using the cursor keys Whether the welder identification code has to be entered and if so when or how often is determined in the Settings sub menu of the configuration...

Page 32: ...d the weld ing unit confirms this by an audible signal and displays the decoded data on the screen see Display 4 Info The displayed values are the nominal welding parameters contained in the fitting b...

Page 33: ...and the audible signal buzzes con tinuously An error has to be acknowledged by pressing the STOP RESET key 5 9 Cooling Time The cooling time as given in the fitting manufacturer s instructions has to...

Page 34: ...F report file or in the DataWork format contains a number of welding and traceability data that the operator can decide to enter or not to enter in the set up menu 6 1 Entering Preformatted and User d...

Page 35: ...pressing the START SET key 7 1 Manually Entering Welding Voltage and Time If this option was chosen in the manual parameter input menu a display like the one to the right appears on the screen Use th...

Page 36: ...contents of the report memory the welding reports would be irrevocably lost and would not be available elsewhere either 8 1 Selecting the File Format Connecting the storage media causes the the screen...

Page 37: ...fter a selection was made among the options Wait for all the selected reports to transfer and the Download completed message to appear on the screen If a problem occurs while the download is in progre...

Page 38: ...y This message has to be acknowledged by pressing START SET 9 2 Measuring Resistance When the START SET key was pressed to initiate a welding process the resistance value of the fitting is measured an...

Page 39: ...led or disabled The desired sub menu is selected using the and arrow keys Then to access that sub menu press the MENU key In both parts of the configuration menu use the and arrow keys to select the d...

Page 40: ...access a sub menu for entering the number under which the unit is inventorized with the operating company Number of Tags M means that by pressing the MENU key the user can access a sub menu for enteri...

Page 41: ...mpliant welding and treaceability codes have to be entered before every welding off that this is not possible Pipe Length on means that the length of both pipes components has to be entered before eve...

Page 42: ...the power supply and the fitting The auto test has detected an error in the system The unit must no longer be operated and has to be sent to an approved shop for check and repair 11 1 7 Temperature E...

Page 43: ...re also indicated by an audible alarm 11 2 1 Low Voltage The input voltage is below 175 volts If the error condition persists for longer than 15 seconds the welding process will be aborted If the volt...

Page 44: ...lue during welding differs by more than 15 from the required value indicating a short circuit in the heater coil 11 2 10Power Supply Failure at Last Welding The last welding is incomplete The welding...

Page 45: ...5 Sovico MB Italy Web www omisa it Mail info omisa it Info We reserve the right to change technical specs of the product without prior notice 14 Accessories Parts for the Product Push on Elbow Adapter...

Page 46: ...man version of the manual enclosed herein is the original copy reflected in the translations herein Inliegende deutsche Fassung der Anleitung ist der Urtext welchen inliegende bersetzungen wiedergeben...

Page 47: ...gabe des Schwei ercodes 9 5 3 Anschlie en des Fittings 10 5 4 Einlesen des Fittingcodes mit einem Handscanner 10 5 5 Starten des Schwei vorgangs 11 5 6 Schwei prozess 11 5 7 Ende des Schwei vorgangs 1...

Page 48: ...gsfunktionen 19 11 1 Fehlerarten w hrend der Eingabe 19 11 1 1 Codefehler 19 11 1 2 Kein Kontakt 20 11 1 3 Unterspannung 20 11 1 4 berspannung 20 11 1 5 Ger t zu hei 20 11 1 6 Systemfehler 20 11 1 7 T...

Page 49: ...das Produkt und andere Sachwerte des Betreibers die effiziente Arbeit des Produkts Alle Personen die mit der Inbetriebnahme Bedienung War tung und Instandhaltung des Produkts zu tun haben m ssen entsp...

Page 50: ...rungskabel im Freien Es d rfen nur entsprechend zugelassene und gekennzeich nete Verl ngerungskabel mit folgenden Leiterquerschnitten verwendet werden bis 20 m 1 5 mm empfohlen 2 5 mm Typ H07RN F ber...

Page 51: ...d schlie en Sie dann den Schwei automaten an Die Leerlaufspannung sollte auf ca 240 Volt eingeregelt werden Bevor der Generator abgeschal tet wird muss zuerst der Schwei automat getrennt werden Wichti...

Page 52: ...zeigt alle Informationen im Display im Klartext Alle f r die Schwei ung bzw R ckverfolgung relevanten Daten werden in einem Festspeicher abgespeichert und k nnen an einen USB Stick ausgegeben werden F...

Page 53: ...Strichcodes mit dem Handscanner oder mit den Pfeiltasten Ob der Schwei ercode einzulesen ist und wenn ja wann genau bzw wie oft wird im Einstell Men unter Einstellungen festgelegt vgl Abschn 10 1 Nac...

Page 54: ...rten Daten auf dem Display an vgl Anzeige 4 Hinweis Angezeigt werden die im Fittingcode enthaltenen bzw aus ihnen errechneten Soll Daten f r die Schwei ung Die Anzeige erfolgt im brigen vor der Messun...

Page 55: ...nt Ein Fehler l sst sich nur mit der STOP RESET Taste quittieren 5 9 Abk hlzeit Die Abk hlzeit ist nach den Angaben des Fittinghersteller einzuhalten Wenn der Strichcode des Herstellers des Fittings e...

Page 56: ...und R ckverfolgbarkeitsdaten deren Erfassung vom Nutzer im Einstell Men einzeln zu und abgeschaltet werden kann 6 1 Eingabe von normierten und frei definierbaren R ckverfolgbarkeitsdaten Alle im Einst...

Page 57: ...n Mit START SET ist die Auswahl zu best tigen 7 1 Manuelle Eingabe von Spannung und Zeit Nach der entsprechenden Auswahl im Men der manuellen Schwei parametereingabe erscheint das neben stehende Displ...

Page 58: ...nhalt l schen gehen die Protokolle unwiderruflich verloren obwohl sie nirgendwo sonst gespeichert sind 8 1 Wahl des Dateiformats Nach Anschlie en des Speichermediums erscheint der Bild schirm zur Ausw...

Page 59: ...und am Bildschirm der Hinweis Ausgabe beendet erscheint Sollte w hrend der Ausgabe ein Problem entstehen erscheint die Fehlermeldung Nicht bereit Nach Beseitigung des Pro blems wird die Ausgabe automa...

Page 60: ...tiert werden 9 2 Widerstandsmessung Nach Bet tigen der START SET Taste am Beginn einer Schwei ung wird der Fitting Widerstand gemessen und mit den eingelesenen Werten des Fittingcodes verglichen Ist d...

Page 61: ...chaltet die in den Schwei protokollen erscheinen oder nicht erschei nen sollen Die Auswahl geschieht mit den Pfeiltasten und Um das jeweilige Untermen aufzurufen ist dann die MEN Taste zu dr cken Mit...

Page 62: ...fen wird Inventarnummer M bedeutet dass durch Bet tigen der MEN Taste das Untermen zur Eingabe der Nummer unter der das Ger t bei der Betreiberfirma intern inven tarisiert ist aufgerufen wird Anzahl E...

Page 63: ...i ung die Codes beider Rohre Werkst cke ISO Schwei und R ck verfolgbarkeitscodes eingegeben werden m ssen aus dass das nicht m glich ist Rohrl nge ein bedeutet dass vor jeder Schwei ung die L nge beid...

Page 64: ...at muss sofort von Netz und Fitting getrennt werden Der Selbsttest hat Fehler im System gefunden Der Schwei automat darf nicht mehr verwendet werden und muss zur Reparatur eingeschickt werden 11 1 7 T...

Page 65: ...n w hrend des Schwei vorgangs Alle Fehler die w hrend des Schwei vorgangs auftreten wer den mit einem akustischen Signal gemeldet 11 2 1 Unterspannung Die Eingangsspannung ist kleiner als 175 Volt Ste...

Page 66: ...Windungsschluss Der Stromverlauf weicht w hrend der Schwei ung um 15 vom Sollwert ab bedingt durch Kurzschluss im Heizwendel 11 2 10Netzunterbrechung bei der letzten Schwei ung Die vorherige Schwei u...

Page 67: ...39 23 23 028 20845 Sovico MB Italien Web www omisa it Mail info omisa it Hinweis Technische nderungen am Produkt bleiben vorbehalten 14 Zubeh r Ersatzteile f r das Produkt Winkel Aufsteck Adapter 4 0...

Page 68: ...man version of the manual enclosed herein is the original copy reflected in the translations herein Inliegende deutsche Fassung der Anleitung ist der Urtext welchen inliegende bersetzungen wiedergeben...

Page 69: ...n del c digo ID del operario 9 5 3 Conexi n del accesorio 10 5 4 Lectura del c digo del accesorio mediante el esc ner 10 5 5 Comienzo del proceso de soldadura 11 5 6 Proceso de soldadura 11 5 7 Fin d...

Page 70: ...justables 19 11 1 Errores durante la introducci n de datos 19 11 1 1 Error c digo 19 11 1 2 Sin contacto 20 11 1 3 Subtensi n 20 11 1 4 Sobretensi n 20 11 1 5 Unidad sobrecalentada 20 11 1 6 Error de...

Page 71: ...anipulaci n del producto el usuario est expuesto a los si guientes tipos de peligro y fallos La salud del operario Otra maquinaria involucrado en el proceso Funcionamiento correcto del producto Todo e...

Page 72: ...si n de cables en el lugar de trabajo Para alargar el cable de alimentaci n principal en el lugar de trabajo es imprescindible la utilizaci n solo del cableado ade cuadamente aprobado para este tipo d...

Page 73: ...r y depende a su vez de las especificaciones de la alimentaci n suministrada condiciones meteorol gicas y el tipo de generador incluidas sus caracter sticas de control y regulaci n Potencianominaldesa...

Page 74: ...2176 El microprocesador de la m quina HST 300 Smart Controla y monitoriza el proceso de soldadura de la ma nera totalmente autom tica Determina la duraci n de soldadura de acuerdo con la temperatura d...

Page 75: ...manera que siem pre pregunte antes por el c digo ID de operario y luego por el c digo del accesorio El mensaje que aparece en pantalla entonces es C digo soldador Luego este paso puede ser configurad...

Page 76: ...o de una del accesorio de otro tipo si el c digo del accesorio a soldar est da ado o ilegible Lea el c digo de barras colocando el esc ner delante de este a una distancia de unos 5 a 10 cm la l nea r...

Page 77: ...ponde al tiempo actual y escuchamos la se al ac stica dos veces 5 8 Interrupci n de la soldadura En caso de una soldadura fallida aparecer un mensaje de texto en la pantalla y se oye la se al ac stica...

Page 78: ...rme y contiene el n mero de soldadura y datos de trazabilidad que el usuario puede definir en el men de inicio 6 1 Introducci n de la informaci n de trazabilidad predefinida y definida por el usuario...

Page 79: ...teriormente aparece la pan talla como en la Pantalla 15 Utilice las teclas con flecha para indicar el voltaje y el tiempo de soldadura a realizar seg n las instrucciones del fabricante del accesorio y...

Page 80: ...as Puede elegir entre formato PDF en opci n de informe breve o detallado el formato DataWork del software espec fico de manejo de estos datos o archivo CSV Utilice las teclas del cursor y para hacer s...

Page 81: ...la trans misi n de datos que no puede ser resuelto durante el proceso aparecer el mensaje de error Descarga cancelada Pulse la tecla START SET para confirmar 8 5 Borrado de datos de la memoria Los dat...

Page 82: ...la diferencia entre estos dos valores est por debajo de la tolerancia permitida seg n el c digo del accesorio se inicia el proceso de soldadura Si est por encima del nivel de toleran cia permitido la...

Page 83: ...Apagado On Off de la opci n seleccionada Si junto a la opci n aparece una M significa que existe un sub men de la opci n seleccionada al que se accede pulsando la tecla MENU Presione el bot n START SE...

Page 84: ...el usuario accede a un sub men para establecer el n mero de la m quina seg n el inventario de la empresa propietaria N mero etiquetas M significa que al presionar la tecla MENU el usuario accede a un...

Page 85: ...ro ducido en cada soldadura Off que no ser posible esta introduccci n Longitud tubos On significa que se debe introducir la longi tud de los dos tubos componentes a soldar en cada uni n Off que no ser...

Page 86: ...tarse tanto de la fuente de ali mentaci n como del accesorio inmediatamente El testado autom tico de la m quina ha detectado un error del sistema La m quina no puede seguir funcionando y se debe envia...

Page 87: ...de soldadura Todos los errores que ocurren durante el ciclo de soldadura est n acompa ados de una se al ac stica 11 2 1 Subtensi n El voltaje de entregada est por debajo de 175 voltios Si el error per...

Page 88: ...obina Los valores de la corriente din mica durante el proceso de soldadura han variado en m s de un 15 del valor requerido indicando un cortocircuito en la espiral de calentamiento 11 2 10Interrupci n...

Page 89: ...MB Italia Web www omisa it Mail info omisa it Info Nos reservamos el derecho de modificaci n de espe cificaciones t cnicas del producto sin previo aviso 14 Accesorios Recambios del producto Conector a...

Page 90: ...30 EU Dir 2012 19 EU Dir 2014 35 EU Dir 2011 65 EU Altre norme Otras normativas EN 60335 1 EN 61000 3 3 2013 EN 60335 2 45 EN 62135 2 2008 EN 60529 ISO 12176 2 EN 61000 3 2 Nel caso che vengano realiz...

Page 91: ...Dir 2012 19 EU Dir 2014 35 EU Dir 2011 65 EU Other Standards Andere Normen EN 60335 1 EN 61000 3 3 2013 EN 60335 2 45 EN 62135 2 2008 EN 60529 ISO 12176 2 EN 61000 3 2 Any and all modi cations of the...

Reviews: