background image

2. Battery and Charger 

It is recommended to charge battery immediately when device 
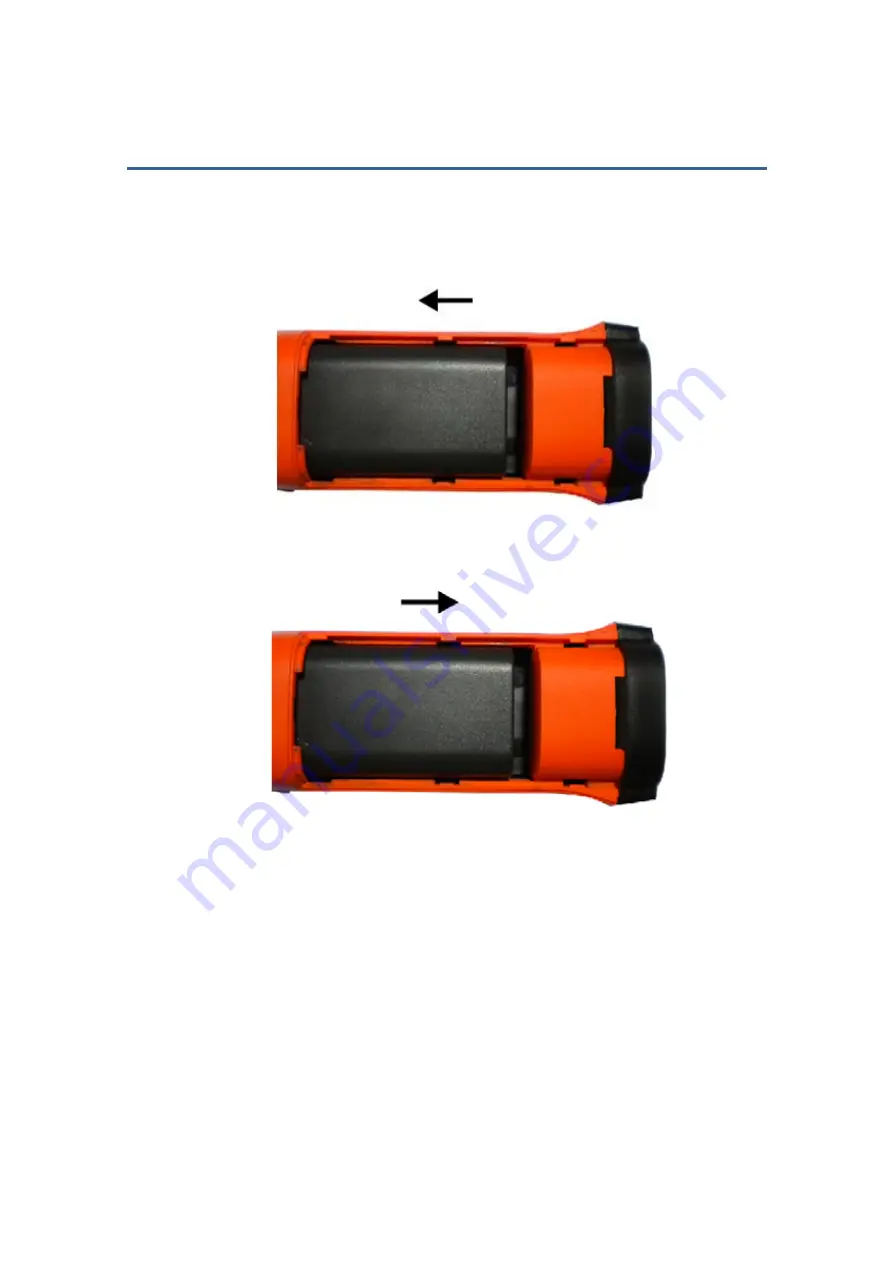
indicates low power. By press and move in the indicated direction, 
user can easily insert and remove battery. 

Battery Insertion 

Battery Removal 

Device comes with two sets of Li-Ion battery and one battery 
charger. It is strongly recommended to operate only with the 
included battery and charger. Use any other brand charger or 
Li-Ion battery may cause fire or critical damage. 

3

Summary of Contents for OSXL160

Page 1: ...omega com e mail info omega com For latest product manuals omegamanual info OSXL160 Infrared Camera Extended Warranty Program SM Shop online at User sGuide MADE IN CHINA ...

Page 2: ...ce Managed by the United Kingdom Office Toll Free 0800 466 342 TEL 33 0 161 37 29 00 FAX 33 0 130 57 54 27 e mail sales omega fr Germany Austria Daimlerstrasse 26 D 75392 Deckenpfronn Germany Toll Free 0800 6397678 TEL 49 0 7056 9398 0 FAX 49 0 7056 9398 29 e mail info omega de United Kingdom OMEGA Engineering Ltd ISO 9001 Certified One Omega Drive River Bend Technology Centre Northbank Irlam Manc...

Page 3: ...OSXL160 Infrared Camera User Manual Please read carefully before first use ...

Page 4: ......

Page 5: ...iolent shock and impact during operation or transport z Storage temperature is between 40 and 60 ć ć The device must be kept in original packing case during transport z Typical storage place is cool dry ventilated and without strong electromagnetic field z Keep the lens surface off grease or any chemical substance which would damage the lens Close the lid after operation z Please regularly backup ...

Page 6: ......

Page 7: ... Start Reference 8 4 1 Infrared Image 8 4 2 Measure Target Temperature 8 4 3 Infrared Image and Voice Annotation 9 4 4 Infrared Image Playback 9 4 5 Replace Lens 9 4 6 Connect to PC 10 5 Operation Menu 10 5 1 Display Summary 10 5 2 Main Menu 12 5 2 1 File 13 Manage 14 Save 16 Format 16 5 2 2 Measure 16 Spot Measure 17 Line Measure 19 Horizontal Line Measure 19 Vertical Line Measure 20 Area Rect Me...

Page 8: ... Unit 27 Ambient Temp 27 Reference 27 Ref Temp 28 Image Reverse 28 Clear Screen 28 L S Auto Manual Mode 28 5 2 4 Setup 28 System Setup 29 Language 30 Auto Rectify 30 Auto Save 30 Video 30 Transparence 30 Display Device 30 Screen Save 30 Power Save 30 Time Date 31 Factory Default 31 Information 31 6 Building Thermal Imaging Summary 32 7 Technical Specification 35 8 Technical Support 38 9 Appendix E...

Page 9: ...OSXL160 Infrared Camera the new standard in Infrared imaging industry Typical Application z Power Plant Monitor and diagnose the condition of electrical wire and equipment detect power leak and prevent system malfunction z Petrochemical Industry oil pipeline check material interface detect heat leakage insulation structure and power equipment detect z Fire Protection forest fire protection and lat...

Page 10: ...OSXL160 Infrared Camera comes with the following standard items and accessories Item Quantity OSXL160 Infrared Camera 1 Li Ion Battery 2 Battery Charger 1 USB Cable 1 Video Cable 1 User Manual 1 IR See Software CD 1 Suitcase 1 ...

Page 11: ... indicated direction user can easily insert and remove battery Battery Insertion Battery Removal Device comes with two sets of Li Ion battery and one battery charger It is strongly recommended to operate only with the included battery and charger Use any other brand charger or Li Ion battery may cause fire or critical damage 3 ...

Page 12: ...harging 1 The battery can also be charged by using an adapter Normally it takes 5 hours to charge one battery in this mode 2 3 Attention for Using Battery Charger 1 Battery Charging can only be conducted inside of a house 2 Do not short circuit the battery 3 Do not put the battery in high temperature environment 60ć Never disassemble the battery or put it into fire which may cause explosion 4 Do n...

Page 13: ...f the device 2 Power LED Light When device is powered on the Power LED Light will be on 3 4 5 6 Direction Buttons Up Ÿ Down ź Left Ʒ and Right 4 direction buttons have different usage in different mode In main menu direction buttons are used for moving selected items or changing slide bar value In real time Infrared view mode directions buttons provide one click access Press Ʒ to freeze Infrared i...

Page 14: ...tte or temperature measurement limit Press Ʒ to change and Ÿ ź has no effects 7 OK Menu Confirm Button This button has different functions under different conditions z In real time Infrared view mode press this button opens the main menu z In main menu press this button to confirm operation z In real time Infrared view mode long press this button to manually rectify measurement result z In image v...

Page 15: ...S standard video output 11 Audio Output Audio output playbacks recorded voice annotation 12 USB 2 0 Interface USB2 0 interface transfers data between device and PC 13 External DC In External DC requirement is 12V 3 3 Side View 14 Hotkey Button 7 ...

Page 16: ...image 4 2 Measure Target Temperature 1 Point device to measurement target and adjust to correct focus On the upper right LCD corner displays the spot measurement result For better accuracy long press OK button to perform manual rectify 2 Select Area Rect Measurement to measure max min and average temperature within a rectangle box 3 It is recommended to press Ʒ button to freeze thermal image first...

Page 17: ...Record Press OK button to confirm In main menu File Æ Save provides the same function Select Cancel during voice recording to exit 4 4 Infrared Image Playback 1 Press OK button to open main menu 2 Select File Æ Manage and select folder to view stored thermal image 3 When viewing thermal image press Ʒ button or button to switch image in the same folder 4 The icon indicates voice annotation attached...

Page 18: ... 4 4 hereinabove 4 6 Connect to PC Connect device to PC using included USB cable Refer OSXL160 software manual for additional PC operation instruction It is recommended to format device periodically 5 Operation Menu 5 1 Display Summary All items can be selected by short pressing the Hotkey button Note Long press Hotkey button will turn on off laser sight The 10 ...

Page 19: ...Temperature unit there are three options ćǃ ǃK 6 Battery condition indicates current battery power condition 7 Point measure 1 2 3 and 4 indicates temperature value of point 1 2 3 and 4 respectively 8 Line measure the temperature value in the crossing of measure line and cursor line 9 Area measure measure points within the area maximum minimum or average temperature is optional 10 Temperature dist...

Page 20: ... the color code at the same time 14 Color code color palette Any kind of color code is available in the palette 5 2 Main Menu Menu and sub menu items Press OK button when not in Hotkey mode to enter main menu Note if press OK button too long instead of enter main menu triggers manual rectify 12 ...

Page 21: ...tem and selected item is highlighted with white background Press OK or button to enter sub menu Press Ʒ button to return to previous menu or exit 5 2 1 File Using File menu to save playback delete thermal image and voice annotation File Sub menu 13 ...

Page 22: ...is day is saved in this folder Thermal image file name is Phhmmss and hhmmss is hour minute second according to system time For example P080502 in folder M090102 means the thermal image taken at 08 05 02 time in Jan 2nd 2009 In File Manage window press Ÿ and ź button to select items Selected item is highlighted with red background Press Ʒ and button to switch folder or file when highlighted After ...

Page 23: ...ion data with current thermal image Long press Ÿ button to enter Voice Annotation menu If voice annotation already exists press Record will record new voice annotation and erase previously saved one Press Cancel first to stop recording then press Save to save Voice Annotation Long press ź button to delete thermal image 15 ...

Page 24: ...ge Freeze image first before saving Format Format the internal FLASH memory Press OK to confirm or cancel to exit Format will erase all saved thermal images It is recommended to transfer data to PC before format 5 2 2 Measure There are 5 items Spot Line Area Rect Parameters and Save Setting in Measure menu 16 ...

Page 25: ...Measure Sub menu Spot Measure Press Ʒ or button to select or deselect Selected spot is check marked Up to 4 spots can be selected at the same time Spot Target Selection 17 ...

Page 26: ... be selected Spot Measure Attribute Press Hotkey button until spot marker is flashing in yellow and then use Ÿ ź Ʒ buttons to move spot location to different directions Press OK button to enter Attribute Menu After 2 seconds with no operation system will exit to real time Infrared view screen Spot Measure Attribute 18 ...

Page 27: ...Line Measure Horizontal Line Measure Horizontal line is temperature sampling line and upper right LCD corner displays temperature measurement reading on vertical cursor line intersection After using Hotkey button select line measure press Ÿ and ź button to adjust sampling line position and press Ʒ and button to adjust cursor line position Press OK button to enter Attribute Menu After 2 seconds wit...

Page 28: ...ter using Hotkey button select line measure press Ʒ and button to adjust sampling line position and press Ÿ and ź button to adjust cursor line position Press OK button to enter Attribute Menu After 2 seconds with no operation system will exit to real time Infrared view screen Area Rect Measure Press Ʒ or button to select or deselect Selected Area is check marked Up to 3 areas can be selected 20 ...

Page 29: ... Target Selection Area Rect Measure Measure result on upper right LCD corner is the temperature measurement result within the corresponding rectangle There are 3 measure types max min and average temperature 21 ...

Page 30: ...fer to Appendix Emissivity of raw materials Set Reference Set current area as reference If selected all measure result will be relative value to this temperature Measure Type Select from max min and average Adjust Adjust rectangle position and size Parameters Change different settings to adjust temperature measurement accuracy Press Ÿ and ź button to select different parameters and press Ʒ and but...

Page 31: ... Humidity value according to environmental condition Press Ʒ or once to change Humidity 1 Long press Ʒ or will change Humidity in 10 interval Adjust Ratio Due to long time usage of device the sensitivity of IR detector may decrease In such case it is necessary to adjust ratio value to get more accurate temperature reading During calibration if temperature reading is higher than actual target tempe...

Page 32: ...nges must be saved before power off device Otherwise changes will not be saved for next power on 5 2 3 Image There are 5 items Image Setup Analysis Setup Image Reverse Clear Screen and Auto Manual L S in Image menu Image Sub menu 24 ...

Page 33: ...eding Alarm Temp device will alarm with buzzer sound and mark the high temperature location as Alarm Color if Alarm Color is set Alarm Temp When Alarm Switch is off this option is disabled When Alarm Switch is on Alarm Temp is the desired alarm temperature Press Ʒ or once to change Alarm Temp 0 1 ć Long press Ʒ or will change Alarm Temp in 1 interval Default setting is 37 0 ć ć 25 ...

Page 34: ... 2 Default setting is Auto Isotherm Temp Press Ʒ or once to change Isothermal Temp 0 1 ć Long press Ʒ or will change Isothermal Temp in 1 interval ć Default setting is 37 0ć Isotherm Width Adjust Isothermal Width to change the range of Isothermal Color display Press Ʒ or once to change Isothermal Width 0 1 ć Long press Ʒ or will change Isothermal Width in 1 interval ć Default setting is 1 0ć Scree...

Page 35: ...0ć Extra grade 300 1200ć which is customized high temperature measurement Temp Unit Press Ʒ or to select Temperature Unit from and K ć 9 5 32 ć ˈK 273 15 ć Ambient Temp For more accurate measure result set Ambient Temp to correct environmental temperature Press Ʒ or once to change Ambient Temp 0 1 ć Long press Ʒ or will change Ambient Temp in 1 interval ć Reference 27 ...

Page 36: ...rence Image Reverse Press OK button to reverse palette for thermal image display Press OK again to switch back Clear Screen Press OK button to clear all screen items except Logo mark L S Auto Manual Mode Press OK button to switch between auto and manual rectifying In manual rectifying mode upper left corner of LCD display shows L S 5 2 4 Setup There are 4 items in Setup menu System Setup Time Date...

Page 37: ...des Language Auto Rectify Auto Save Video Transparence Display Device Screen Save and Power Save Press Ÿ and ź button to switch selection and press Ʒ and button to adjust value Active item is highlighted with red background System Setup Sub menu 29 ...

Page 38: ...feature Press Ʒ or once to change the value by 1 second Long press Ʒ or will change the value in 10 intervals Video Select between PAL and NTSC Transparence Set to enable or disable menu transparence feature Display Device Select between LCD display and external monitor device Only one video output device can be selected at one time the other one will be disabled If accidentally selected external ...

Page 39: ...utton to select an item press ϧ or ϰ button to change its value and press OK button to confirm If Li Ion battery is removed for a long time it is necessary to reset system time and date Factory Default Restore factory default and rectify some improper settings Information Select to display system information such as serial number software version and production date etc ...

Page 40: ...known higher demands are being set on buildings The features of our TI series IR camera make it possible to detect slight temperature difference and to analyze indoor humidity and leakage Hereinafter are images in some cases The effect drawing of building detection The effect drawing of indoor humidity 32 ...

Page 41: ...The effect drawing of indoor water leakage The effect drawing of indoor corner air leakage 33 ...

Page 42: ...The effect drawing of outdoor corner air leakage 34 ...

Page 43: ...e Quality Spectral Range 8 14ȝm Display LCD 3 5 Color LCD Temperature Range 20ć 120ć 0ć 350ć 350ć 1200ć customized Accuracy 2ć or 2 reading range select the bigger value Measure rectification Auto Manual Measure Mode 4 spots 3 areas available under real time mode max min and average temp line measure isothermal display temp difference measure and temp alarm sound color Color Palette 12 Colors sele...

Page 44: ... English Italian Japanese Russian French German Korean Spanish and Portuguese Emissivity Rectification Adjustable from 0 01 to 1 0 AmbientTemp Rectification Auto according to background temperature input Atmospheric Trans Correction Auto according to distance relative humidity ambient temperature input 36 ...

Page 45: ...ording per image built in microphone Laser Director Class 2 1mW 635nm Red Battery Type Rechargeable Li Ion Battery BatteryOperating Time 3 Hours Under normal temperature Charging type Intelligent charger Power Save Included Power Supply External Power 12V 5 DC Operation Temperature 20ć 50ć Storage Temperature 40ć 60ć Humidity 90Č non condensing Operating Condition Protection Grade IP54 Weight 660g...

Page 46: ... battery or batteries are not installed correctly ĺ Install battery correctly z Battery power is used up ĺ Change battery or recharge z Save power mode ĺpower on after 5 seconds Device power off automatically z Battery power is used up ĺ Change battery Battery power is soon used up z Ambient temperature is too high or low z Battery is not fully charged ĺ recharge battery fully z Battery may alread...

Page 47: ...00 0 64 Cast Iron inoxidized 100 0 21 Rough 25 0 94 Wrought Iron Polished 38 0 28 Nickel Oxidized 200 0 37 Stainless Steel Oxidized 60 0 85 Steel 800ć Oxidized 200 0 79 Brick 20 0 93 Concrete 20 0 92 Glass Smooth flat 20 0 94 White 100 0 92 Lacquer Natural Black 100 0 97 Smoky black 25 0 95 Candle smoke 20 0 95 Carbon Black lead rough 20 0 98 Paint 16 Color average 100 0 94 Paper White 20 0 93 Soi...

Page 48: ......

Page 49: ...otherwise shall not exceed the purchase price of the component upon which liability is based In no event shall OMEGA be liable for consequential incidental or special damages CONDITIONS Equipment sold by OMEGA is not intended to be used nor shall it be used 1 as a Basic Component under 10 CFR 21 NRC used in or with any nuclear installation or activity or 2 in medical applications or used on humans...

Page 50: ...tors 䡺 Turbine Paddlewheel Systems 䡺 Totalizers Batch Controllers pH CONDUCTIVITY 䡺 pH Electrodes Testers Accessories 䡺 Benchtop Laboratory Meters 䡺 Controllers Calibrators Simulators Pumps 䡺 Industrial pH Conductivity Equipment DATA ACQUISITION 䡺 Data Acquisition Engineering Software 䡺 Communications Based Acquisition Systems 䡺 Plug in Cards for Apple IBM Compatibles 䡺 Data Logging Systems 䡺 Reco...

Reviews: