background image

AC Current Data Logger

3

are using Windows™3.1, double-click on the window labeled 

Omegalog

,

then double-click on the 

OMEGALOG

 icon.

3.


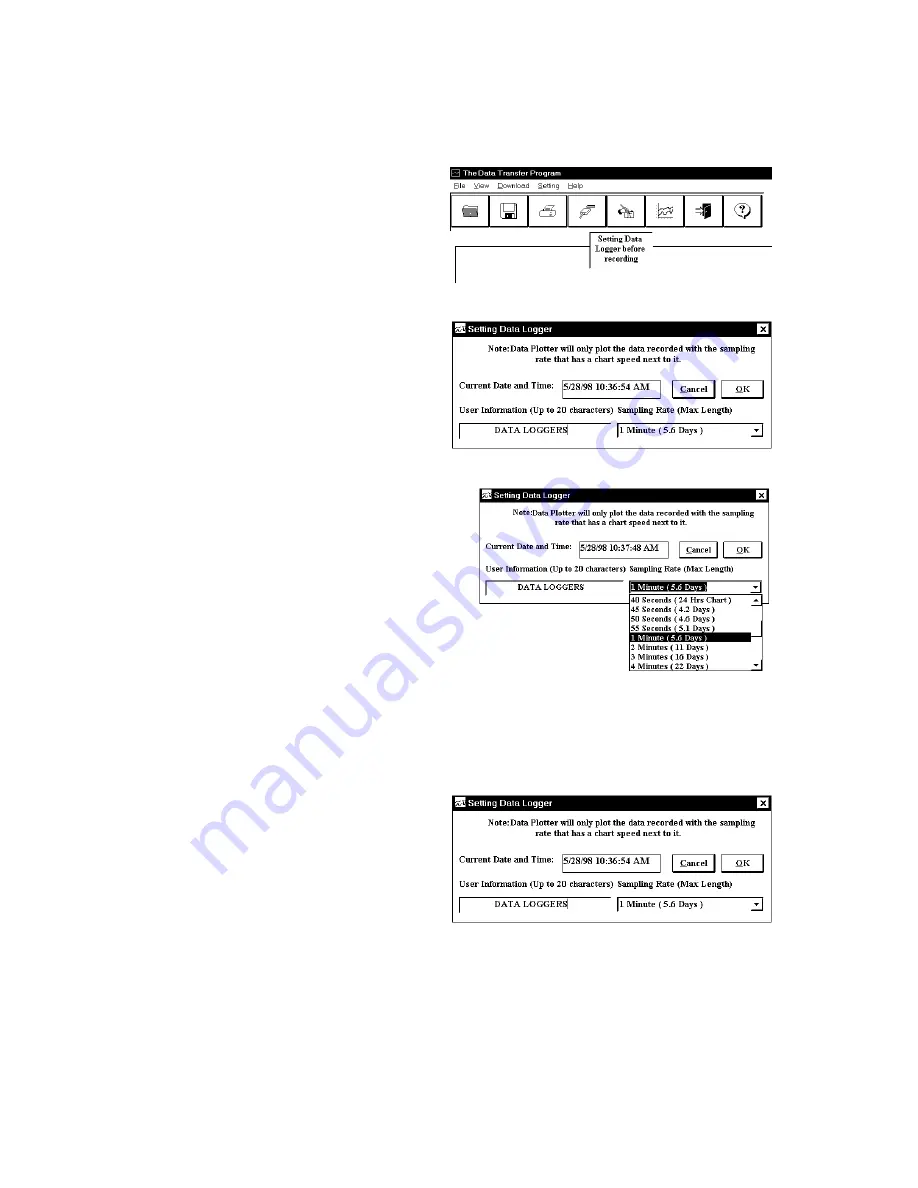
The program will open with a

blank window showing no text or

graph. On the toolbar located

along the top of the screen, click

on the 

Setting Data Logger

before recording 

button. This

will open a secondary window

Setting Data Logger

.

4.


If a user message is desired,

click in the 

User Information

field and add the desired

message. Note that the last

message will be dis-played and

will remain until it is erased or

changed by the user.

5.


To select the sampling rate, click on

the down arrow in the 

Sampling

Rate

 box. This will open a drop-

down menu with the recording

interval selections. Note that the

maximum recording times are

indicated in parentheses next to the

recording interval. The recording

intervals that correspond to charts

used by the OM-DP3 Data Plotter

show the appropriate chart selection instead of a maximum recording time.

6.


Click on the desired sampling rate. You may need to use the up or down

arrows on the drop down menu to see more of the available recording inter-

vals.

7.


The time and date the logger is

set to will be the same time as

the PC clock. It is important to

make sure the time set in the PC

is correct. The PC time will be

displayed as the 

Current Date

and Time

 in the setting window.

Refer to the owner’s manual for your computer to find instructions on setting

the PC time if it is not correct.

8.


When all of the settings for the OM-DLAC are to your satisfaction, click on 

OK

to store the setting in the OM-DLAC and to close the window.

9.


The OM-DLAC is now set and ready to begin a new recording. Disconnect

the OM-DLAC from the PC interface.

Summary of Contents for OM-DLAC

Page 1: ...AC Current Data Logger 1...

Page 2: ...4 If you are using Windows 3 1 click on Program Manager 5 Select FILE and select RUN 6 Type A SETUP and press Enter To get the latest product information and current release of the Data Logger to PC s...

Page 3: ...s are indicated in parentheses next to the recording interval The recording intervals that correspond to charts used by the OM DP3 Data Plotter show the appropriate chart selection instead of a maximu...

Page 4: ...eached its maximum capacity of 16 000 samples NOTE If the battery is exhausted during a recording the OM DLAC will automatically terminate the recording and save any data recorded up to that point The...

Page 5: ...DINGS 1 Plug the PC interface into the printer port of the computer being used to set the OM DLAC Plug the OM DLAC being read to the cable from the PC in terface 2 Start the Data Logger program If you...

Page 6: ...To zoom to a particular part of the graph place the mouse cursor in a corner of an imaginary box that will enclose the area of interest 3 Press and hold the left mouse button and move the cursor in a...

Page 7: ...t listing or a plotted graph 2 To view a recording as text when a graph is on the screen click the Text button located in the display box 3 Use the Windows scroll bar on the right hand side of the scr...

Page 8: ...the OK button or press the Enter key to continue If you have typed a password before and you don t want password protection for the calibration function you can input None as the new password and thi...

Page 9: ...r is not set in the recording position If so slide the door open Any information recorded up to this point will not be lost and is auto matically saved 2 Remove the rear battery cover 3 The battery an...

Page 10: ...rature 40 F to 170 F 40 C to 76 C Time Accuracy 100ppm 75 F Current Range 0 to 300 Amps AC using supplied clamp on probe Current Resolution 0 1 Amp AC Current Accuracy 5 Memory Capacity 16 000 Data Sa...

Page 11: ...uter Using the OM DP3 you can plot recorded information from a data logger or change the settings of a data logger prior to making a different data recording The OM DP3 can be operated from batteries...

Reviews: