3
BEFORE USE
1. Verify that the product and the application are
compatible, if in doubt call Omega Technical Service
(888)332-6419.
2. Before using this product, read the operator's
manual completely and familiarize yourself
thoroughly with the product, its components and
recognize the hazards associated with its use.
3. Locate and open the release valve
(counterclockwise no more than 1/2 full turn).
4. With saddle fully lowered, locate and remove the oil
filler plug. Secure the handle into the handle sleeve,
then pump 6 to 8 full strokes. This will help release
any pressurized air which may be trapped within the
reservoir. Ensure the oil level is ~3/16" above the
inner cylinder as seen from the oil filler plug hole.
Re-install the oil filler plug.
5. Check to ensure that jack rolls freely and that the
pump operates smoothly before putting into service.
Replace worn or damaged parts and assemblies
with Omega Authorized Replacement Parts only.
(See Replacement Parts Section). Lubricate as
instructed in Maintenance Section.
6. Inspect before each use. Do not use if bent, broken
or cracked components are noted.
OIPM#25048- SJ2
WARNING
!
To avoid crushing and related injuries:
NEVER work on, under or around a load supported
only by a jack. ALWAYS use adequately rated jack
stands.
Lift only on areas of the vehicle as specified by the
vehicle manufacturer. Do not use adapters or
accessories that are not provided initially.
! SAFETY MESSAGE !
ASSEMBLY
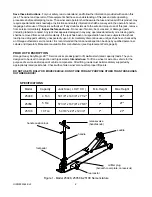
Little, if any, assembly is required of these jacks.
Always secure the handle into the handle fork by
means of the bolt and lock washer provided. Tighten
securely to prevent accidental removal of handle while
in use. Familiarize yourself with the illustrations in the
operator's manual. Know your jack and how it operates
before attempting to use.
OPERATION
Lifting
1. Place vehicle in park, with emergency brake on and
wheels securely chocked to prevent inadvertent
vehicle movement.
2. Locate and close release valve by turning handle
knob clockwise, firmly. Center jack saddle under lift
point.
3. Verify lift point, then pump handle to contact lift
point. To lift, pump handle until load reaches desired
height.
4. Transfer the load immediately to appropriately rated
jack stands.
Lowering
1. Raise load high enough to clear the jack stands,
then carefully remove jack stands (always used in
pairs).
2. Slowly turn the handle knob counterclockwise, but
no more than 1/2 turn. If the load fails to lower:
a. Use another jack to raise the vehicle high
enough to reinstall jack stands.
b. Remove the affected jack and then the stands.
c. Using the other jack, lower the load by turning
the handle knob counterclockwise, but no more
than 1/2 turn.
3. After removing jack from under the load, push
saddle down to reduce ram exposure to rust and
contamination.
Study, understand, and follow all instructions
provided with and on this device. Do not exceed
rated capacity. This is a lifting device only. After
lifting, immediately transfer the load to
appropriately rated vehicle stands. Never work on,
under, or around a load supported by this device.
Use only on hard, level surfaces capable of
sustaining rated capacity loads. Do not move or
dolly loads with this device. Do not modify this
device. Failure to heed these markings may result
in personal injury and/or property damage.
!
WARNING


