
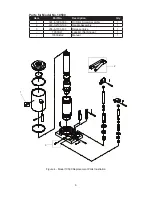


3
PREPARATION
Before Use
1. Verify that the product and the application are
compatible, if in doubt call Omega Lift Technical
Service (888)332-6419.
2. Before using this product, read this manual
completely and familiarize yourself thoroughly with
the product and the hazards associated with its
improper use.
3. Assemble handle sections by lining up spring clip of
smaller diameter handle section with slot of larger
handle section. Press down on spring clip and slide
smaller diameter section until clip is secure in slot.
4. With the notched end of the provided
handle, engage and open the release valve
(counterclockwise no more than 1/2 turn).
5. With ram fully retracted, locate and remove the oil
filler screw. Insert the handle into handle sleeve,
then pump 6 to 8 strokes. This will help release any
pressurized air which may be trapped within the
reservoir. Ensure the oil level is just below the oil
filler screw hole. Reinstall the oil filler screw.
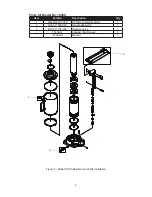
6. Check to ensure that the pump operates smoothly
before putting into service. Replace worn or
damaged parts and assemblies with Omega Lift
Authorized Replacement Parts only.
7. Inspect before each use. Do not use if bent, broken
or cracked components are noted.
Study, understand, and follow all instructions
before operating this device. Do not exceed rated
capacity. Use only on hard, level surfaces capable
of supporting the load. Lifting device only. Immedi-
ately after lifting, support the vehicle with appropri-
ate means. Failure to heed these markings may
result in personal injury and/or property damage.
WARNING
!
OPERATION
Lifting
1. Assemble 3 pc. handle, ensure that spring clips
align with slots.
2. Use wheel chocks to help prevent inadvertent
shifting and movement of vehicle being lifted.
3. Position the jack near lift point. Lift only on those
areas recommended by the vehicle manufacturer.
Consult vehicle service manual for the location of
recommended lift points.
4. Close the release valve by turning it clockwise until
it is firmly closed.
CAUTION:
Use the handle provided with this
product or an authorized replacement handle to
ensure proper release valve operation. Do not use
an extender on the operating handle.
5. Insert and secure handle into handle sleeve. Pump
handle until saddle contacts load.
5a. (Model 10500 only): Insert and secure handle one
of into handle sleeves. For higher speed, no load
lifting, use the low pressure high volume pump. For
loaded operation and easier operating force, use
the high pressure low volume pump. Pump handle
until saddle contacts load.
6. Raise load to desired height, then immediately
transfer the load to appropriately rated support
devices such as jack stands.
Lowering
1. Raise load enough to carefully remove jack stands.
2. Secure handle onto release valve and slowly turn
handle counterclockwise, but no more than 1/2
turn.
3. If load fails to lower:
a. Carefully transfer the load to another lifting
device and jack stands.
b. Carefully remove affected jack, and then the jack
stands. Lower the load, again by slowly turning
the release valve no more than 1/2 turn.
WARNING:
Use the handle provided with this
product or an authorized replacement handle to
ensure proper release valve operation. Do not use
an extender on the operating handle.
4. After removing jack from under the load, push ram
and handle sleeve down to reduce exposure to rust
and contamination.
MAINTENANCE
Important:
Use only a good grade hydraulic jack
oil. Avoid mixing different types of fluid and NEVER
use brake fluid, turbine oil, transmission fluid, motor
oil or glycerin. Improper fluid can cause premature
failure of the jack and the potential for sudden and
immediateloss of load.
Adding oil
1. With saddle fully lowered and pump piston fully
depressed, set jack in its upright, level position.
Remove oil filler screw.
2. Fill until oil is level with the filler screw hole, reinstall
oil filler screw.
Changing oil
For best performance and longest life, replace the
complete fluid supply at least once per year.
1. With saddle fully lowered and pump piston fully
depressed, remove the oil filler plug.
2. Lay the jack on its side and drain the fluid into a
suitable container.
Note:
Dispose of hydraulic fluid in accordance with
local regulations.
3. Fill with premium quality jack oil. Reinstall oil filler
plug.
!
!


