9
Operation
GRINDING ADJUSTMENT
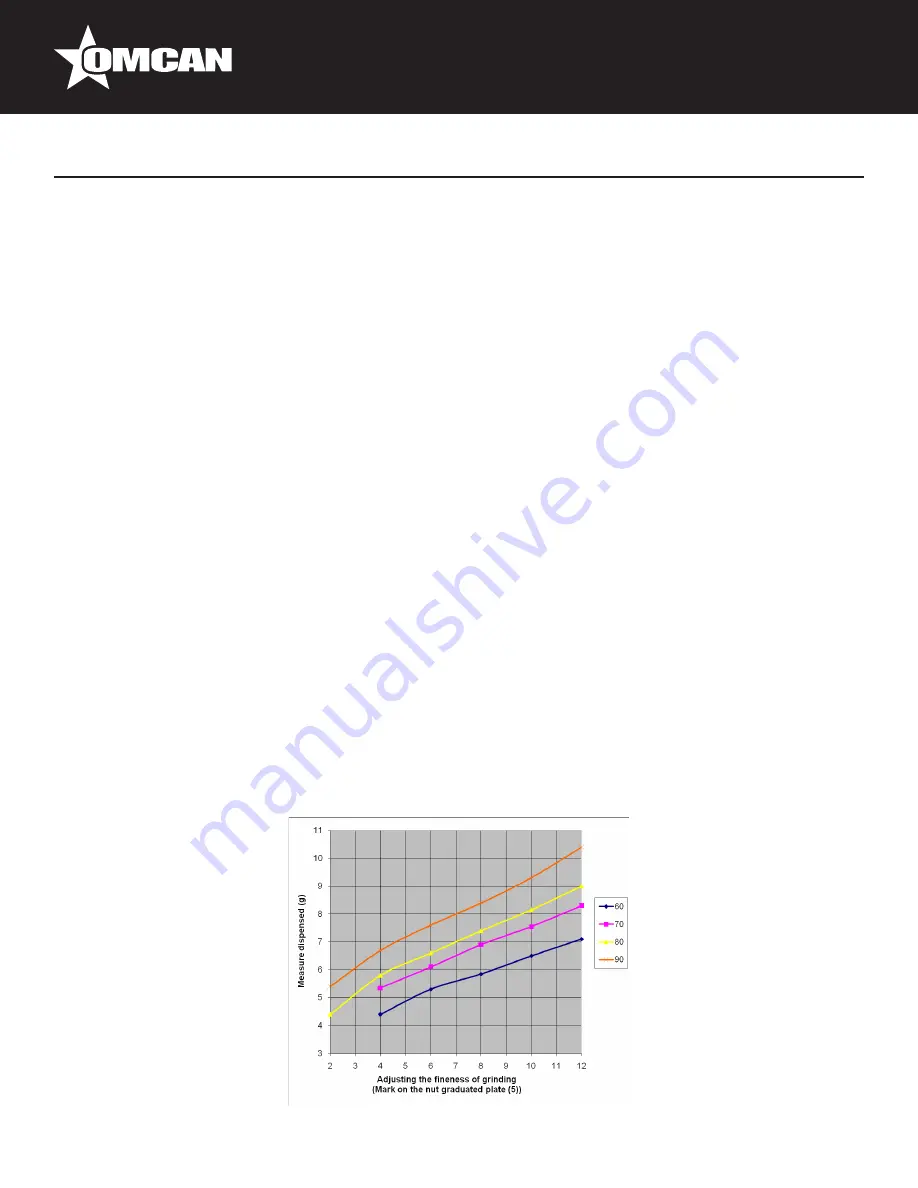
CARE: Changing the grinding setting will always require resetting the timers. See the information chart
in the next section.
Note: Never operate the machine with the two grindstones in contact. Letting the grindstones come
into contact may result in the grindings jamming in the grinder unit and premature wear of the
grindstones.
The machine is set in the factory for the “0” marker on the nut (5) graduated plate to correspond to the finest
grinding without the grindstones touching (fig. C).
On delivery, the machine is set to an espresso-type grinding with the adjusting nut (5) approximately on the
marker (15).
1.
Hold the adjustment nut (5) with one hand and press the indexing pointer (7) with the other.
2.
Tighten the adjustment nut by turning in a clockwise direction (right-handed thread) by one or two notches
for finer grinding.
3.
Loosen the adjustment nut by turning in an anti-clockwise direction (right-handed thread) by one or two
notches for coarser grinding.
4.
Release the indexing pointer (7) to lock the nut in position.
5.
Draw off a few measures of coffee to check the grinding adjustment.
The machine can provide very fine grinding. However, depending on the type of coffee used, be careful not
to bring the grindstones into contact as this would cause the output to drop considerably and alter the coffee
aroma.
SETTING THE MEASURED DOSE OF GROUND COFFEE (TIMERS)
The ground coffee outlet tube (23) should be cleaned regularly to prevent the coffee which has built up on the
walls from interfering with the consistency of the coffee dose measurement (fig. H).
IMPORTANT: Check or adjust the grinding before setting the timers. Where the timers are being set
following adjustment of the grinding, you can use the chart BELOW.
Summary of Contents for Santos 55
Page 15: ...15 Figure Drawings...
Page 16: ...16 Figure Drawings...
Page 17: ...17 Parts Breakdown Model Santos 55 44637...
Page 20: ...20 Electrical Schematics Model Santos 55 44637...


